Menu code
Many of you have requested some menu code so I have decided to create a simple, fully functional menu example. This menu has the following buttons: New Game, Sound Volume, Video Resolution, Quit. I know that you might need Save, Load, etc but all these functions are implemented in the template menu and you can add them (and their respective buttons) to my code.
I wanted to give you the chance to play with the menu in a standalone project so I have created a simple "game" - a level where you get to stare at some eye-check sprite. If you're confused, please think what must have been inside my head when I have decided to pick up an example like that! The good thing is that you can start the "game", adjust the sound level (and hear the difference), change the resolution (and see it being changed) and quit the game.
The game starts running at 800x600 pixels, in 16 bit mode.
var video_mode = 7; // 800x600
var video_depth = 16; // 16 bit mode
First of all, we need to define some bmaps; we are using two bitmaps for every button and a single bitmap for every panel. The names are pretty suggestive so I won't make any comments here.
bmap main_pcx = <main.pcx>;
bmap new1_pcx = <new1.pcx>;
bmap new2_pcx = <new2.pcx>;
bmap sound1_pcx = <sound1.pcx>;
bmap sound2_pcx = <sound2.pcx>;
bmap video1_pcx = <video1.pcx>;
bmap video2_pcx = <video2.pcx>;
bmap quit1_pcx = <quit1.pcx>;
bmap quit2_pcx = <quit2.pcx>;
bmap maincursor_pcx = <maincurs.pcx>;
bmap sound_pcx = <sound.pcx>;
bmap video_pcx = <video.pcx>;
bmap slider_pcx = <slider.pcx>;
I'm using two levels: introlev.wmb is a dummy level, a simple hollowed block with some colored lights inside it and level1.wmb is the first (and only) game level.
string introlevel_wmb = <introlev.wmb>;
string level1_wmb = <level1.wmb>;
The panel definitions are similar; main_pan has four buttons on it; sound_pan and video_pan don't have buttons, but sliders.
panel main_pan
{
bmap = main_pcx;
layer = 20;
pos_x = 220;
pos_y = 200;
button = 50, 65, new1_pcx, new1_pcx, new2_pcx, null, start_game, mouse_over;
button = 50, 115, sound1_pcx, sound1_pcx, sound2_pcx, null, set_volume, mouse_over;
button = 50, 165, video1_pcx, video1_pcx, video2_pcx, null, set_resolution, mouse_over;
button = 50, 215, quit1_pcx, quit1_pcx, quit2_pcx, null, quit_game, mouse_over;
flags = d3d, overlay, refresh;
}
panel sound_pan
{
bmap = sound_pcx;
layer = 20;
pos_x = 160;
pos_y = 240;
hslider = 60, 95, 200, slider_pcx, 0, 100, sound_vol;
flags = d3d, overlay, refresh;
}
panel video_pan
{
bmap = video_pcx;
layer = 20;
pos_x = 160;
pos_y = 240;
hslider = 60, 95, 200, slider_pcx, 4, 8, video_value;
flags = d3d, overlay, refresh;
}
If you don't understand what I'm doing with the buttons and sliders, please read their definitions in the manual and compare what I did with the manual.
Let's take a look at:
function main()
{
on_esc = null;
level_load (introlevel_wmb);
wait (2);
game_init(); // checks the Esc key state and changes the panels if needed
main_pan.visible = on; // show the main panel
mainmenu_mouse(); // and give me a cursor to play with
vec_set (camera.pos, nullvector); // move camera to the origin
while (game_started == 0) // we haven't pressed New yet
{
camera.pan += 0.3 * time; // rotate the camera gently
camera.tilt += 0.1 * time;
camera.roll += 0.05 * time;
wait (1);
}
}
If you're starting a new project from scratch Esc will exit the engine. We want to use Esc to bring the main menu on, so the first line in main deactivates the built-in (exit) Esc function. We load the dummy level, we wait two frames to make sure that it has loaded and then we run the game_init() function (more on that a little later). Main_pan is made visible, mainmenu_mouse() give us a cursor to play with, the camera is moved in the origin and starts to rotate by changing its pan, tilt and roll angles.
function mainmenu_mouse ()
{
mouse_mode = 2;
mouse_map = maincursor_pcx;
while (game_started == 0)
{
mouse_pos.x = pointer.x;
mouse_pos.y = pointer.y;
wait (1);
}
}
The first lines in mainmenu_mouse() show the cursor and change it to our maincursor_pcx. We can move the cursor as long as the game hasn't started using the predefined pointer.x and pointer.y.
Let's get back to:
function game_init()
{
while (1)
{
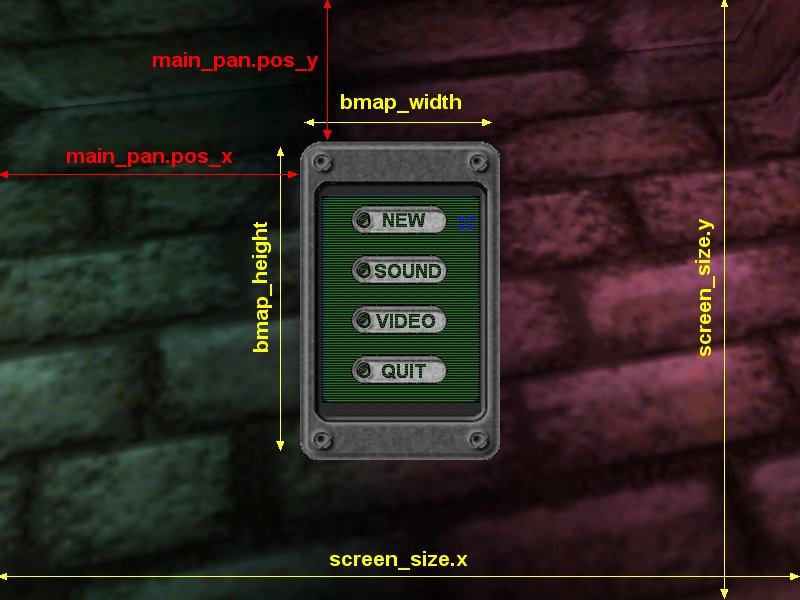
main_pan.pos_x = (screen_size.x - bmap_width(main_pcx)) / 2;
main_pan.pos_y = (screen_size.y - bmap_height(main_pcx)) / 2;
sound_pan.pos_x = (screen_size.x - bmap_width(sound_pcx)) / 2;
sound_pan.pos_y = (screen_size.y - bmap_height(sound_pcx)) / 2;
video_pan.pos_x = (screen_size.x - bmap_width(video_pcx)) / 2;
video_pan.pos_y = (screen_size.y - bmap_height(video_pcx)) / 2;
Every panel can be moved using its pos_x and pos_y parameters. We have provided some initial pos_x and pos_y values to our panels, but the panel needs to change its position to make sure that it is positioned in the center of the screen at any resolution. Take a look at the picture below to see how this works:
if (key_esc == 1)
{
while (key_esc == 1) {wait (1);}
if (main_pan.visible == on)
{
main_pan.visible = off;
mouse_mode = 0;
}
else
{
if (sound_pan.visible == off && video_pan.visible == off)
{
main_pan.visible = on;
game_started = 0;
mainmenu_mouse();
}
}
if (sound_pan.visible == on)
{
sound_pan.visible = off;
main_pan.visible = on;
}
if (video_pan.visible == on)
{
video_pan.visible = off;
main_pan.visible = on;
if (int (video_value != video_mode))
{
switch_video (video_value, 16, 1);
}
}
}
wait (1);
}
}
If we press Escape, we have to wait for its release (while loop) because we don't want 50-100 menu changes a second (the changes triggered by Esc would be executed every frame). If main_pan is visible, we remove it and we hide the cursor. If main_pan isn't visible we check to see if sound_pan or video_pan are visible. If none of them is visible (there's no panel on screen) we make main_pan visible, we stop the game and we show the cursor. If sound_pan is visible, we hide it and show main_pan; if video_pan is visible, we do the same thing with it BUT if the resolution has changed we switch the video mode. Our video slider can deliver non-integer values, so we use int (video_value).
I'm using a small action: eye_checker to keep the sprite oriented and a small function mouse_over() to play a sound when the mouse is over one of the buttons:
action eye_checker
{
my.oriented = on;
}
function mouse_over()
{
play_sound (mouse_snd, 70);
}
The long awaited moment has finally arrived: we get to see the functions associated to the menu buttons:
function start_game()
{
main_pan.visible = off;
game_started = 1;
mouse_mode = 0;
level_load (level1_wmb);
wait (2);
camera.z = 220;
camera.tilt = -90;
}
Function start_game() will be executed every time we press the New button. This function hides the main_pan, sets game_started to 1, shows the cursor, loads the game level and then sets the camera.z position and tilt angle.
function set_volume()
{
main_pan.visible = off;
sound_pan.visible = on;
}
Function set_volume() hides main_pan and shows sound_pan. If you take a look at the hslider definition in sound_pan, you will see that by changing the slider position we modify sound_vol; this is a predefined variable that changes the volume for all the wav sounds in the game. Move the slider, press Esc and you will hear the difference when you move the mouse over the main_pan buttons.
function set_resolution()
{
main_pan.visible = off;
video_pan.visible = on;
}
Function set_resolution hides main_pan and shows video_pan. When you move the slider, video_value is changing and when you press Esc the resolution will be changed - see the code in game_init()
function quit_game()
{
exit;
}
This function will exit the engine right away.
Terrain deformation
Vec_for_mesh and vec_to_mesh were some of Aum3's hot features. Take a look at this code that generates falling bombs (ok, I've used a rocket model) that create craters when they impact with a terrain mesh.
I have created another standalone project; the example runs at 800x600x16bit, Vertex_dist[1090] is an array that will hold the distance between every vertex and hit_coords
var video_mode = 7; // 800x600
var video_depth = 16; // 16 bit mode
var vertex_dist[1090];
var hit_coords;
Function main loads our test level and sets a weird camera position (if you don't like this position, press zero and move the camera where you want it)
function main()
{
level_load (terrain1_wmb);
wait (2);
camera.x = 345;
camera.y = -345;
camera.z = 300;
camera.pan = 135;
camera.tilt = -40;
}
I have added a small model in Wed; its associated action generates random falling bombs:
action bomb_launcher
{
my.passable = on;
while (1)
{
temp.x = my.x + 200 - random(400);
temp.y = my.y + 200 - random(400);
temp.z = my.z;
bomb = ent_create (bomb_mdl, temp, move_bomb);
waitt (40); // create a new bomb every 2.5 seconds
}
}
The first line in this action prevents the bomb from getting stuck inside its creator. A new bomb is generated every 2.5 seconds, in a 400x400 quants area. Every bomb moves according to its move_bomb function:
function move_bomb()
{
my.enable_entity = on;
my.enable_block = on;
my.event = explode_me;
bomb_speed.x = 0;
bomb_speed.y = 0;
bomb_speed.z = -5;
bomb_speed *= time;
while (my != null)
{
ent_move (nullvector, bomb_speed);
wait (1);
}
}
You can see that the bomb is sensitive to entities and level blocks, has a negative z speed and moves until its explode_me event is triggered:
function explode_me()
{
waitt (2);
play_entsound (me, bumm_wav, 200);
ent_remove (me);
}
We need to wait a little to be able to store the impact coords in hit_coords. We play an explosion sound and we remove the bomb.
The terrian does all the job when its create_crate event is triggered:
action terrain
{
terrain1 = me;
my.enable_impact = on;
my.event = create_crate;
}
function create_crate()
{
vec_set (hit_coords, bomb.pos);
First of all, we store the impact coords before the bomb disappears
wait (1);
my.skill1 = 1;
my.skill2 = 1500;
We set the vertex_dist index to 1 and skill2 to a huge distance; this distance will be much smaller for the vertices that are closer and closer to the impact point.
while (my.skill1 < 1090) // vertices 1...1089 for a 33x33 grid
{
vec_for_mesh (temp, terrain1, my.skill1);
vertex_dist [my.skill1] = vec_dist (hit_coords.x, temp.x);
if (vertex_dist[my.skill1] < my.skill2) // this vertex is closer than the others?
{
my.skill2 = vertex_dist[my.skill1]; // then it might be the one!
}
my.skill1 += 1; // next vertex
}
My terrain has a 33x33 grid with 1089 vertices; my.skill1 will be set to 1, 2, 3, ... 1089 in the while loop above. Vec_for_mesh sets temp to vertex 1, 2, 3, ... and we store the distance between vertex1 and hit_coords in vertex_dist[1], the distance between vertex2 and hit_coords in vertex_dist[2] and so on, like in the picture below:
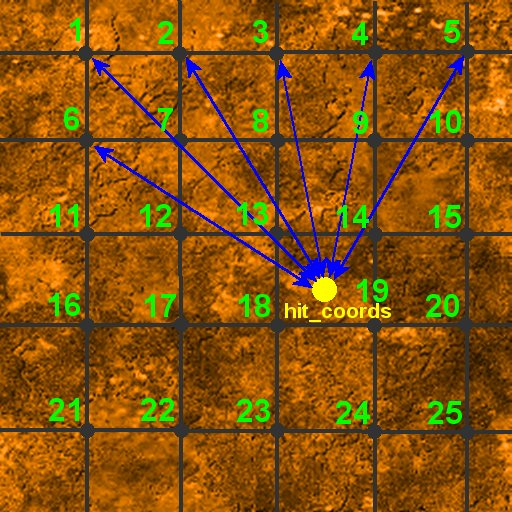
I couldn't draw blue arrows for all the vertices, but it looks like vertex18 is the winner in my picture, so the distance between vertex18 and hit_coords will be stored in skill2.
Now we need to find out the index for the winner, because this index will be passed to function deform(vertex_number).
my.skill1 = 1;
while (my.skill1 < 1090)
{
if (my.skill2 == vertex_dist[my.skill1])
{
my.skill3 = my.skill1;
}
my.skill1 += 1;
}
deform (my.skill3);
}
This time we are searching for the smallest vec_dist stored in vertex_dist and when we find it we store the index in skill3 - this is the vertex that will be moved inwards. It is clear that these while loops can be optimized but they run so fast (without wait) and it isn't necessary to do it.
The final function is:
function deform(vertex_number)
{
vec_for_mesh(temp, terrain1, vertex_number);
vec_scale (temp, 0.7);
vec_to_mesh (temp, terrain1, vertex_number);
}
We set vertex_number as an argument for vec_for_mesh, so temp will be set to vertex_number's coords. Temp will be scaled to 70% of its value and then vec_to_mesh will deform the vertex that was closest to hit_coords.