Car AI
This time we will get to play a demo of our game, so open carai4.wmp, build it and run it using carai4.wdl.
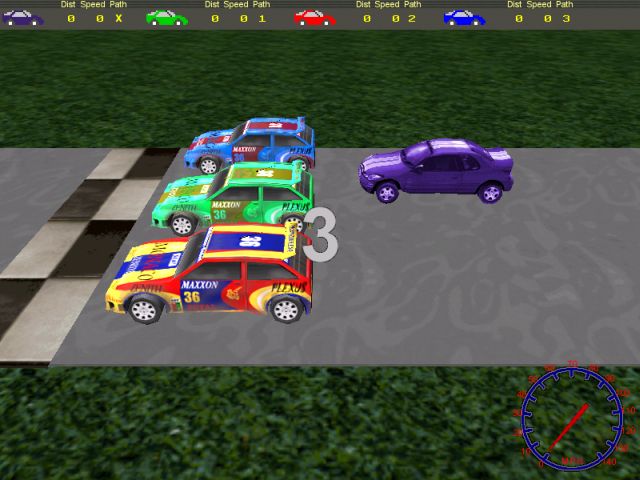
The cars will wait until "3" flashes on the screen, but you'd better keep your finger pressed on the "up" arrow key! Well, the speeds for the computer-driven cars aren't too big, so you should win most of the races. Play with the speeds of the cars until you lose most of the races and sell that version of the game. Btw, you can set a different max_laps value in carai4.wdl to get a different number of laps for your game.
I started to write the code for this new AI series a few months ago; you might want to read those articles first. You will see that the "Finish" panel that appears at the end of the race includes the player now; the code used for that is similar to the old code, so I'm not going to explain it again. Let's concentrate on the new stuff that was added to the demo then:
- We've got a decent intro sequence;
- The cars pick a random path at the end of every lap;
- The distance, the current speed and the path number are displayed on a panel that appears at the top of the screen.
There are a few more minor changes to the old player / car AI code, but they are commented heavily. Let's start with the code that is used for the intro:
starter init_race()
{
sleep (2);
one_ent.visible = on;
snd_play (lo_wav, 50, 0);
while (one_ent.x > 100)
{
one_ent.x -= 50 * time;
wait (1);
}
one_ent.visible = off;
two_ent.visible = on;
snd_play (lo_wav, 50, 0);
while (two_ent.x > 100)
{
two_ent.x -= 50 * time;
wait (1);
}
two_ent.visible = off;
three_ent.visible = on;
snd_play (high_wav, 100, 0);
while (three_ent.x > 100)
{
three_ent.x -= 150 * time;
wait (1);
}
race_started = 1;
three_ent.visible = off;
}
The function above starts by itself when we run the script file. The first line of code gives us 2 seconds to admire the view :) and then makes visible the first figure (one_ent). I have used 3 "entity" definitions and 3 sprites for the 3 figures that appear at game start. Each entity (figure) is moved towards the camera (its x is decreased inside a "while" loop) until it is really close to the camera; we play a sound and then we hide the old figure, displaying the one that follows it. As soon as "3" is closer than 100 quants to the camera, race_started is set to 1 and "3" is made invisible. All the cars (including player's car) have a "while" loop that instructs them to wait until race_started is set to 1, so they will start their engines as soon as that happens.
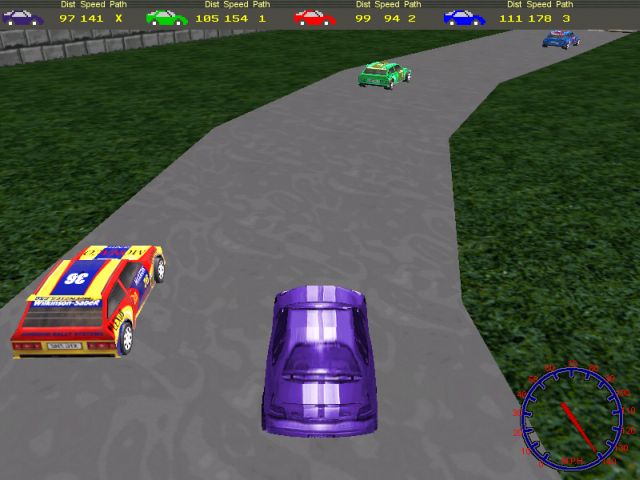
If you have read the article in Aum33, you know that each computer-driven car uses a path for its movement. This method has many advantages, but it might lead to boring driving simulations; your customers might discover that the cars use the same paths over and over, so they will know for sure that (as an example) the green car isn't touching the inner part of the track! Don't worry, the cars in this month's demo use random paths all the time. You will be surprised to hear that the algorithm isn't using random values, and yet the paths are completely random.
I have used an array definition that looks like this:
var paths[12] = 3, 1, 2, 1, 3, 2, 3, 2, 1, 1, 3, 2;
The cars start with the default paths given by the variables below:
var car1_path = 1;
var car2_path = 2;
var car3_path = 3;
Let's see how they choose a random path every lap. Every AI-driven car includes a few lines like these:
if (waypoint_number == 66)
{
pick_new_path();
}

As soon as one of the cars gets close to the end of the lap (waypoint_number = 66), it runs the function pick_new_path, which chooses a new path for the car. A possible result of the function call is shown in the picture above.
function pick_new_path()
{
if (my.skill40 == 1) {return;} // the car has picked its path already
my.skill40 = 1;
index += 1; // advance one more step inside the array
index %= 12; // limit index to the first 12 (0..11) elements in the array
if (my.skill1 == 1)
{
car1_path = paths[index];
}
if (my.skill1 == 2)
{
car2_path = paths[index];
}
if (my.skill1 == 3)
{
car3_path = paths[index];
}
if (paths[index] == 1)
{
ent_path("car01");
}
if (paths[index] == 2)
{
ent_path("car01");
}
if (paths[index] == 3)
{
ent_path("car03");
}
sleep (10); // wait for 10 seconds
my.skill40 = 0; // the car can pick a random path again (waypoint_number = 66 for several frames)
}
You should trust me when I tell you that any car will have its waypoint_number set to 66 for several frames. This happens because the speed of the car isn't extremely big and the distance between two consecutive nodes on the path isn't extremely small :) Our cars should change their paths only once per lap, so we set skill40 to 1 at first, and then we reject all the other function calls if skill40 is set to 1. We increase index, we limit its value to 11 because our "paths" array uses elements from 0 to 11, and then we get the path number from "paths" for the car that has called the function. Please allow me to remind you that the first car has its skill1 set to 1 in Wed, the second car has its skill1 set to 2, and the third car has its skill1 set to 3. The next "if" branches assign one of the 3 paths (car01, car02 or car03) to the car, depending on the value that was read from "paths". The last few lines in our function wait for 10 seconds (waypoint_number should have a different value by now) and then set back skill40 to zero, allowing a new function call for next lap.
Maybe you are wondering how does this randomness work; why did I say that the paths are random, when I read their values from a predefined array? Well, the trick here is that we don't know which car is the winner. The cars use random speed values every lap, so any car could pick the second path, for example. All you need to do is to make sure that every triplet of values inside the array includes "1", "2" and "3" because you won't want your cars to bump into each other too often.
panel race_pan
{
bmap = race_pcx;
pos_x = 0;
pos_y = 0;
layer = 10;
digits = 323, 18, 1, system_font, 1, car1_path; // the path used by the first car
digits = 510, 18, 1, system_font, 1, car2_path; // the path used by the second car
digits = 703, 18, 1, system_font, 1, car3_path; // the path used by the third car
digits = 100, 18, 3, system_font, 1, players_speed; // the speed of the 1st car
digits = 280, 18, 3, system_font, 1, car1_speed; // the speed of the 2nd car
digits = 470, 18, 3, system_font, 1, car2_speed; // the speed of the 3rd car
digits = 660, 18, 3, system_font, 1, car3_speed; // the speed of the player
digits = 64, 18, 3, system_font, 0.01, player.distance; // the distance covered by player's car
digits = 244, 18, 3, system_font, 0.01, car1.distance; // the distance covered by the 1st car
digits = 434, 18, 3, system_font, 0.01, car2.distance; // the distance covered by the 2nd car
digits = 624, 18, 3, system_font, 0.01, car3.distance; // the distance covered by the 3rd car
flags = overlay, refresh, visible;
}
You can see that the panel used in the demo isn't too complicated; it includes "digits" for the paths, the speeds and the distances covered by the cars. The figures for the speeds weren't looking too good; 20 quants a frame isn't a value you would want to display on a speedometer, so I had to write a small function that changes the speeds into something that looks more decent.
starter compute_speeds() // just makes the speeds look good, really
{
while ((car1 == null) || (car2 == null) || (car3 == null) || (player == null)) {wait (1);}
while (1)
{
car1_speed = car1.car_speed * 6; // 6 = experimental value (same read on the panel and on the speedo)
car2_speed = car2.car_speed * 6;
car3_speed = car3.car_speed * 6;
players_speed = player.skill2 * 6; // player.skill2 = player's "car_speed"
wait (1);
}
}
This function waits until all the cars and the player are created and then it multiplies the speeds in quants / frame with 6 (that's an experimental value); this is how we get the same speed for the player on the speedometer and on the panel. The last set of digits displays the distances (multiplied by 0.01) covered by the cars; those values were stored in skill25 aka "distance".
This article concludes the car AI series. The demo isn't a NFS killer, but it shows you how to build a racing arcade game from scratch. The weak point of the demo is the collision system that allows the cars to penetrate each other. I know that the A6 user will be happy with the new collision system that is planned for A6.3 (though I might be wrong about the version number) but if you own A5 you will have to live with this problem.
Hold on, I think I've found a solution for the A5 users too! Why don't you build your cars using wmb entities? Try this method and share your results with the rest of us using Conitec's forum. Good luck!
Context menu
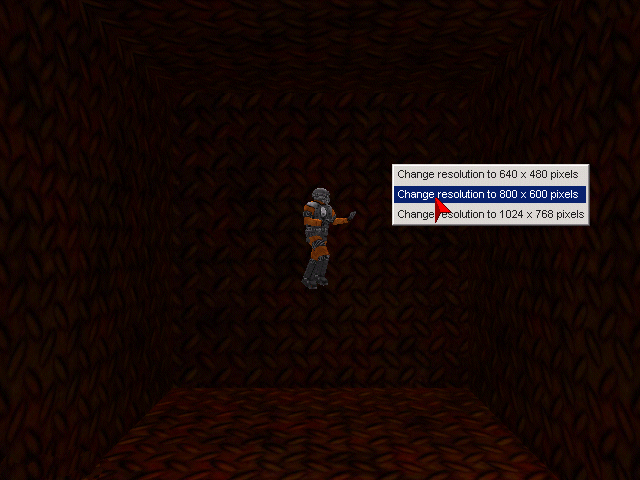
This article will teach you how to use the right mouse button for popup menus. The example changes the video resolution, but you can use its skeleton and turn it into a fully working context menu, with several options that appear under certain circumstances, and so on.
We need to define a panel that includes 3 buttons:

panel context_pan
{
bmap = menu_pcx;
pos_x = 0;
pos_y = 0;
layer = 10;
button = 2, 2, b1_640_pcx, b2_640_pcx, b1_640_pcx, change_resolution, null, null;
button = 2, 22, b1_800_pcx, b2_800_pcx, b1_800_pcx, change_resolution, null, null;
button = 2, 42, b1_1024_pcx, b2_1024_pcx, b1_1024_pcx, change_resolution, null, null;
flags = overlay, refresh;
}
Please note that the panel isn't visible at the moment; the buttons use the same change_resolution function. Function main loads the level, sets the bitmap that will be used for the mouse pointer and allows the mouse to move using a while loop.
function main()
{
level_load (context_wmb);
mouse_map = pointer_pcx;
while (1)
{
mouse_pos.x = pointer.x;
mouse_pos.y = pointer.y;
wait (1);
}
}
Let's take a look at the function that runs when we click one of the 3 buttons on to the menu:
function change_resolution(button_number)
{
if (button_number == 1) // 640 x 480
{
video_switch (6, 0, 0);
}
if (button_number == 2) // 800 x 600
{
video_switch (7, 0, 0);
}
if (button_number == 3) // 1024 x 768
{
video_switch (8, 0, 0);
}
mouse_mode = 0; // now hide the pointer
}
If the player presses the first button, the engine will switch to 640 x 480 pixels, keeping the same color depth. The same things happen when the player presses the 2nd or the 3rd button (the resolution will be different, of course). The last line of code hides the mouse pointer as soon as one of the buttons is clicked.
The menu is made visible when we press the right mouse button:
function show_menu()
{
mouse_mode = 2;
context_pan.pos_x = pointer.x;
context_pan.pos_y = pointer.y;
context_pan.visible = on;
}
on_mouse_right = show_menu;
You can see that function show_menu is run as soon as the player presses the right mouse button; the function makes the mouse pointer visible, sets the correct pos_x and pos_y parameters for the panel and then makes the panel visible.
How do we get rid of the menu? Take a look at the function below:
function hide_menu()
{
context_pan.visible = off;
wait (1);
mouse_mode = 0;
}
on_mouse_left = hide_menu;
This last function hides the panel, waits for a frame and then hides the mouse pointer too.