Car demo
This code was written for those of you that want to create a car game and need a standalone version of the player_drive action in the templates.
action my_car
{
player = me;
my.enable_block = on;
my.enable_entity = on;
my.event = increase_damage;
while (1)
{
if (damage > 100) {return;}
if (car_speed != 0)
{
my.pan -= 0.2 * key_force.x * car_speed * time;
}
car_speed = 3 * key_force.y * time + max (1 - time * 0.1, 0) * car_speed;
if (key_shiftl + key_shiftr == 0)
{
ent_move (car_speed, nullvector);
move_carview();
}
if (damage > 20)
{
temp = damage / 20;
emit (temp, player.x, car_smoke);
}
wait (1);
}
}
The car is moving as long as its damage is below 100. The car can rotate (change its pan angle) as long as car_speed != 0 - this way we obtain the "wheels" flag effect in the standard player_drive. The line that computes car_speed is similar to the one in the tutorial (for Tuesday) that comes with the A4 / A5 manual: v -> v + dv. Change 3 to change the speed and 0.2 to change the rotation speed.
If we press one of the shift keys, the car will stop (ent_move isn't executed anymore) and we can rotate the car without moving it by pressing two arrow keys (up + right, down + left, etc) at the same time. This is the only way to see my model in its full splendor so don't miss this opportunity!
The car can collide with level blocks and entities; when this happens, increase_damage is executed:
function increase_damage()
{
if (event_type == event_block)
{
damage += 0.006 * abs(car_speed);
}
if (event_type == event_entity)
{
damage += 0.003 * abs(car_speed);
}
}
You can see that the damage depends on car_speed. If the car collides with blocks, the damage is bigger. Btw, I'm using abs(car_speed) in this function because if you would hit a block with the back of the car, the damage would be lowered :) because of the negative car_speed.
If damage is bigger than 20 the car will emit smoke (bigger damage = thicker smoke):
function car_smoke()
{
if (my_age == 0)
{
my_map = carsmoke_map;
my_speed.x = random(1) - 0.5;
my_speed.y = random(1) - 0.5;
my_speed.z = random(1) + 1;
my_size = random(500) + 300;
my_flare = on;
}
my_alpha = 100 - my_age * 4;
my_size = min (1000, my_size + 2 * time);
if (my_age > 25)
{
my_action = null;
}
}
There's nothing special in this function: the particles grow transparent at the end of their life; their size grows up to 1000. You should emit smoke from one of the vertices in the back of the car. The last function is:
function move_carview()
{
camera.x = player.x - camera_distance * cos(player.pan);
camera.y = player.y - camera_distance * sin(player.pan);
camera.z = player.z + camera_height;
camera.pan += 0.2 * ang (player.pan - camera.pan);
}
We've discussed this type of camera in a previous AUM edition; please note that the camera will follow the car with a little delay (change 0.2 to 0.05 or 0.5).
I almost forgot: the action stand_still is attached to every guard.mdl in the level and stops their animations.
Camera follows a path
I have to be honest with you: I got this idea from Doug (I took a good look at his "bird follows path" code). The result of my work is different but he deserves credit here.
We don't want to modify the templates, so we define a new view named cutcamera. We have to place an entity (fish.mdl?) in the level and attach it the cutcamera_init action:
action cutcamera_init
{
vec_set (cut_center, my.pos);
my.skill20 = max_speed;
camera.visible = off;
cutcamera.tilt -= 20;
cutcamera.x = 0;
cutcamera.y = 0;
cutcamera.size_x = screen_size.x;
cutcamera.size_y = screen_size.y;
ent_path("campath");
ent_waypoint(my._target_x, 1);
my.x = my._target_x;
my.y = my._target_y;
my.z = my._target_z;
cutcamera.visible = on; // make cutcamera visible
The camera will rotate to face the fish entity all the time. The fish can be placed anywhere in the level because it is invisible and passable so it won't get hurt if you do that. First of all we store the fish coordinates and the maximum speed. We disable the default (camera) view and we set the new cutcamera. The fish will move to the first waypoint in the "campath" path (that's why we store its initial coordinates).
while(1)
{
cutcamera.x = my.x;
cutcamera.y = my.y;
cutcamera.z = my.z;
cutcamera.pan = my.pan;
vec_set(my._speed, my._target_x);
vec_sub(my._speed, my.x);
if (vec_to_angle(my.pan, my._speed) < 15)
{
ent_nextpoint(my._target_x);
}
vec_set (temp, cut_center.x);
vec_sub (temp, my.x);
vec_to_angle (my.pan, temp);
vec_normalize(my._speed, (max_speed * time));
if (key_s != 1)
{
ent_move(nullskill, my._speed);
}
The fish moves on the 3D path and the cutcamera view is attached to it. There are two things that we must consider:
1) We have to set _speed so that the fish will move on the path
2) We have to rotate the fish (the view) so that it always points to cut_center.
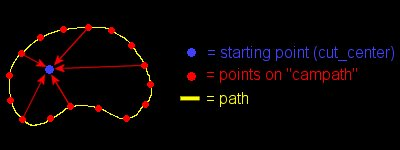
You can see that cut_center doesn't have to be in the center of the path and the path can have any shape (don't forget that it is a 3D path, after all).
If we want to rotate the "my" object towards the "you" object we have to use 3 lines of code according to the manual:
vec_set (temp, you.x);
vec_sub (temp, my.x);
vec_to_angle (my.pan, temp)
I have used these lines (I could have used vec_rotate, too) to set the _speed vector in the direction of the next waypoint and to rotate the view towards cut_center (all the red dots point towards cut_center but I didn't want to make a mess of the picture). We normalize the _speed vector; we cut the length and keep its direction.
You might wonder what's with these lines:
if (vec_to_angle(my.pan, my._speed) < 15)
{
ent_nextpoint(my._target_x);
}
I have used a little trick here: I am assuming that you are lazy and your path has less than a thousand points, so the camera shakes when it reaches the target (one of the points on campath) and has to change its direction (take a look).
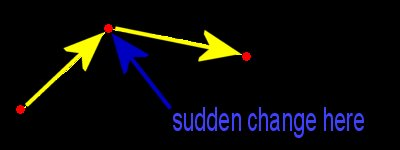
I have zoomed a little so that you can see how player_dizzy++ every time we reach another point on the path. What can we do? The lines above are computing the distance between the fish and the next waypoint. When we get close enough to the destination point, we quit moving towards it and set the new destination point - here's the difference:
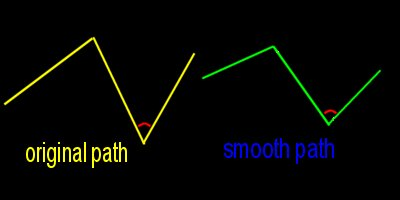
The green path is smoother; take a look at the red angles - bigger angles = smoother transitions. Before I forget, you can press S to stop the movement.
What's left to be added to this beautifully working piece of code? We could lower its speed when it reaches a certain area (let's say that we want to take a good look at the nuclear core in our level) then accelerate it back when it has left that area.
I have created this type of movement in my office.wmp example when the fish goes below 190 quants (I got this value in Wed)
if (my.z < 190)
{
max_speed = max (my.skill20 / 2, max_speed * 0.995);
}
else
{
max_speed = min (my.skill20, max_speed * 1.005);
}
We've stored max_speed in skill20 and now we lower it from 7 (initial value) to 3.5; please note that we aren't simply setting max_speed to 3.5 but we are constantly decreasing it (we multiply it by 0.995) until it reaches 3.5. When we exit our special area (my.z > 190) max_speed is constantly increased (multiplied by 1.005) from 3.5 to 7 which was stored in skill20, remember?
Of course that you can add multiple conditions like this:
if (my.x < 100 && my.y > 250 && my.y < 300 && my.z > 400)
{
..........................................................
}