Mastering cameras
I know that some of you could use some simple camera code snippets so here they are. Just make sure that you include cameras.wdl then run your level and press 1 4 to change the view: we have top view, side view, isometric view and marker view. Marker view is used for one of the antennas in First AI demo and I thought that you might find it useful in one of your projects.
Im not sure if you have noticed that all my demos are standalone projects or files that dont modify the templates this is why I have disabled the default (camera) view. I have created a new view named aum_camera its parameters are set in this function:
function set_cameras()
{
camera.visible = off;
aum_camera.size_x = screen_size.x;
aum_camera.size_y = screen_size.y;
aum_camera.pos_x = 0;
aum_camera.pos_y = 0;
aum_camera.visible = on;
select_camera();
}
You can see that the size for aum_camera is read from screen_size; therefore we dont need to know the screen resolution. We make the new view visible and we call select_camera; a simple while(1) loop checks if we have pressed the keys 1...4 and changes the view accordingly:
Top view
if (camera_number == 1)
{
aum_camera.x = player.x;
aum_camera.y = player.y;
aum_camera.z = player.z + 300;
aum_camera.pan = player.pan;
aum_camera.tilt = -90;
aum_camera.roll = 0;
}
The first camera is really simple: it follows the player all the time, it is placed above the player (aum_camera.z = player.z + 300) and it looks down at the player (aum_camera.tilt = -90)
Side view
if (camera_number == 2)
{
aum_camera.x = player.x + 200 * sin(player.pan);
aum_camera.y = player.y - 200 * cos(player.pan) ;
aum_camera.z = player.z + 10;
aum_camera.pan = player.pan + 90;
aum_camera.tilt = 0;
aum_camera.roll = 0;
}
This camera requires a little trigonometry, so Id better let an image speak for me:
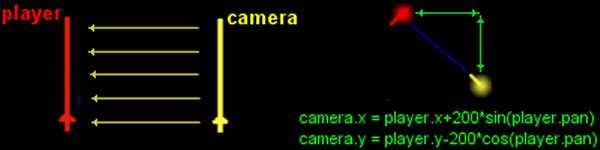
You can replace 200 with other values: smaller numbers will make the camera come closer to the player. I have lifted the camera a little above the ground (player.z + 10) and I have rotated it towards the player (player.pan + 90).
Isometric view
if (camera_number == 3)
{
aum_camera.x = player.x - 200 * cos(player.pan);
aum_camera.y = player.y - 200 * sin(player.pan);
aum_camera.z = player.z + 200;
aum_camera.pan = player.pan;
aum_camera.tilt = -30;
aum_camera.roll = 0;
}
This is your regular 3rd person camera. It works fine but it hasnt any form of collision detection. If you are interested in a good 3rd person camera code (the one that is used in Rune is the best Ive seen so far) maybe Ill write the code for it in one of the future AUM editions. Heres the additional picture:
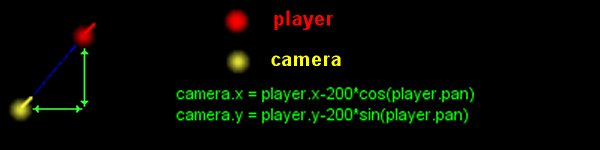
I have lifted the camera a lot this time because I wanted to tilt it down (aum_camera.tilt = -30)
AI demo (marker) view
if (camera_number == 4)
{
aum_camera.x = player.x + 200 * cos(player.pan) + 150 * sin(player.pan);
aum_camera.y = player.y + 200 * sin(player.pan) - 150 * cos(player.pan);
aum_camera.z = player.z;
aum_camera.pan = player.pan + 130;
aum_camera.tilt = 0;
aum_camera.roll = 0;
}
This is the last camera; if you are looking at your monitor right now (I hope you are, although Id be proud to know that you have memorized AUM4 :) this camera would be placed in the upper right corner of your monitor, looking at you all the time and moving with you. I have used similar code for the two antennas in First AI demo here are the pictures:
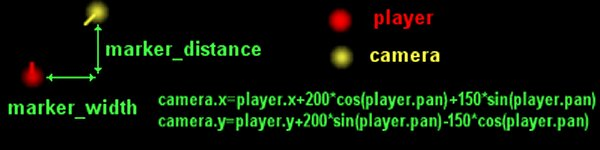
Now that you have heard about the antennas (the camera is placed as if it was the front right antenna in the next picture), you are prepared to see the
First AI demo
Do you remember the standard patrol action that comes with the templates? You had to place some positions in the level and adjust their pan to create a virtual enclosed path. I like this action a lot but it is way too complicated to be explained here, so I had to rewrite it. I have added some AI code to it and the result is the FAID, the demo that works with A4 and A5.
Before I start explaining what I did, please load the aidemo1 level in wed and take a look at it: there are only four positions close to the corners and a lot of boxes in guards way. Can he make it? Can he avoid all these obstacles? Why dont you run that level right now and see for yourself? Run aidemo1.wdl.
I took a good look (for about three laps) and Im still happy with the result. I have used a simple idea: the guard has two antennas that are placed like this:
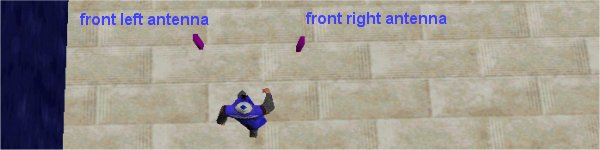
If at least one of the antennas (front_right or front_left) is inside a solid block (content_solid), the guard avoids the obstacle until the antenna gets out of the solid block.
Now you should load the aumai1 level; dont forget to run the ai1.wdl file. Move the block close to the guard and see how (and if) it manages to avoid the block. You can see the antennas please note that they arent needed because we use vectors (not entities) to check content; I have created these visible antennas to show you how this algorithm works. When you want to remove the antennas simply comment these two lines in ai1.wdl:
create (<marker.mdl>, front_right, frlaction);
create (<marker.mdl>, front_left, frlaction);
I have tried to use decent, meaningful names for variables so if you want to use several "intelligent" units youll have to rename a few variables to my.skillxx, copy their values to temp (if necessary) and so on.
Please note that the following explanations are referring to ai1.wdl. The function init_demo() is called in main and sets the camera position and angles according to our needs:
function init_demo()
{
camera.x = 0;
camera.y = 0;
camera.z = 440;
camera.tilt = -90;
camera.pan = 270;
}
All the interesting stuff is in action guard_patrol. First of all we create the block that is used for tests:
block_pos.x = 0;
block_pos.y = 0;
block_pos.z = 0;
create (<block.wmb>, block_pos, move_block);
We place the cube (block.wmb) in the origin at game start; the action that controls its movement (move_block) is really easy so I wont explain it here.
Function create_markers() creates the antennas:
function create_markers()
{
while (1)
{
front_right.x = guard_syn.x + 50 * cos(guard_syn.pan) + 20 * sin(guard_syn.pan);
front_right.y = guard_syn.y + 50 * sin(guard_syn.pan) - 20 * cos(guard_syn.pan);
front_right.z = guard_syn.z;
front_left.x = guard_syn.x + 50 * cos(guard_syn.pan) - 20 * sin(guard_syn.pan);
front_left.y = guard_syn.y + 50 * sin(guard_syn.pan) + 20 * cos(guard_syn.pan);
front_left.z = guard_syn.z;
fright_marker = content(front_right);
fleft_marker = content(front_left);
if (fright_marker == content_solid)
{
obstacle_right = 1;
}
else
{
obstacle_right = 0;
}
if (fleft_marker == content_solid)
{
obstacle_left = 1;
}
else
{
obstacle_left = 0;
}
wait (1);
}
}
Please dont forget that Im using simplified versions of functions and actions to make the things easier for you.
We create the antenna vectors (front_right and front_left) in front of the player then we check if their content is content_solid. If one of the antennas is inside a solid block, the corresponding variable (obstacle_right or obstacle_left) is set to 1.
Heres the rest of the guard_patrol action:
my_pos.x = destination.x - my.x;
my_pos.y = destination.y - my.y;
result = vec_to_angle(my_angle, my_pos);
if (result < 30)
{
vec_set (my_pos, destination);
my_angle.pan = my.skill12;
temp.pan = 60;
temp.tilt = 90;
temp.z = 2000;
scan_pos (my_pos,my_angle,temp);
if(result > 0)
{
vec_set (destination, my_pos);
my.skill12 = my_angle.pan;
}
}
my.skill13 = ang (my_angle.pan - my.pan);
if (obstacle_right != 1 && obstacle_left != 1)
{
my.pan += 0.2 * my.skill13 * time;
}
The guard computes the distance between its coordinates and the next position, rotates towards it and if it is close enough to the destination (result < 30) it will search for a new position. If the guard finds a new position (result > 0) and the antennas arent inside a solid block it will gently rotate towards the target. Skill13 holds the difference between guards pan and targets pan.
if (obstacle_right == 1)
{
my.skill30 = my.pan;
while (my.pan < my.skill30 + 80)
{
marker_distance = 0;
my.pan += 5 * time;
move_guard();
wait (1);
}
}
if (obstacle_left == 1)
{
my.skill30 = my.pan;
while (my.pan > my.skill30 - 80)
{
marker_distance = 0;
my.pan -= 5 * time;
move_guard();
wait (1);
}
}
if (obstacle_right == 1 && obstacle_left == 1) {my.pan = random(360);}
if (marker_distance < 50) {marker_distance += 2 * time;}
move_guard();
If one of the antennas is inside a solid block, we store guards pan in skill30 and we add (or substract) 80 degrees to it in a while loop. You can try to add smaller or bigger pan values depending on your levels. We have to set marker_distance to 0 for a short period to improve the detection around the corners (if you run the test level and play with the block youll understand why). If both antennas are inside a solid block, the guard chooses a random pan angle that will get one of the antennas out of the solid block. You know that marker_distance is the distance between the guard and its antennas. While this distance is smaller than 50, it is slowly increased.
function move_guard()
{
move_mode = ignore_you + ignore_passable + activate_trigger;
ent_move(temp, nullvector);
ent_cycle("walk",my.skill11);
my.skill11 += 5 * time; // skill11 = animation frame
if (my.skill11 >= 100) {my.skill11 = 0;}
}
This function moves and animates the player. I have used similar functions in Aum2 and Aum3 so you know how this works.
I wanted to show the antennas so I have created two models that are placed at front_right and front_left vector coordinates.
create (<marker.mdl>, front_right, frlaction);
create (<marker.mdl>, front_left, frlaction);
function frlaction()
{
my.passable = on;
waitt (2);
remove me;
}
Function frlaction creates the models for the antennas, makes them passable (to allow them to penetrate solid blocks), displays them for 1/8 seconds then removes the antennas.
Is this First AI demo perfect? I dont think so; if it would be perfect I would have named it Final AI demo. Here are its weak points:
- The code wont work that great in crowded areas (you can change marker_distance and marker_width to make it work better for your levels);
- If the area near one of the positions is blocked, the guard will try to get to it all day long;
- The guard will get stuck from time to time;
If I see that you are interested in it, I will continue to improve this code.