To be or not to be: that is the particle
Maybe you're wondering: when or why should I use particles? Aren't sprites better? The answer is really simple: every time you need hundreds or thousands of small things to move in the air, you need to use particles. The main difference between particles and sprites is that the particles are using less memory and they don't perform any collision detection during their life (ok, they don't perform any collision detection after their death too :)
This article shows you how to create four simple particle effects. My goal is to make you understand (almost) everything about particles, so that you'll be able to create eye-candy particle effects by yourself.
First of all I have created an observer - an entity that moves with the camera to give you different positions in the level. You can use the left or right mouse buttons to zoom in or out. Press space to change the positions and b to start the bomb (the gunpowder).
The only interesting stuff for beginners is the code that switches between the five positions:
var pos_array[15] = 0,0,0, -420,450,-250, 350,350,-200, -420,-450,-250, 420,-450,-250;
......................................................
my.x = pos_array[index];
my.y = pos_array[index+1];
my.z = pos_array[index+2];
if (index < 12) {index+=3;}
else {index -= 12;}
.....................................................
You can see that I have created an array that holds the xyz coordinates for every position. I took these coordinates in wed and of course you can choose better positions. When I start the game, observer's position is xyz = 0 0 0 - that's the center of the level. If I press space, index (a simple var) is increased by 3 and observer's xyz will be -420 450 -250. If I press space four times, index will be 12 and index -= 12 will reset it to 0.
Now let's see some real particle action - the snowfall.
while(1)
{
snow_pos.x = my.x + random(200) - 100;
snow_pos.y = my.y + random(200) - 100;
snow_pos.z = my.z;
if (random(1) > 0.7)
{
emit(2,snow_pos,particle_snow);
}
wait (1);
}
emit(2,snow_pos,particle_snow); will emit two particles at the position given by snow_pos. The particles are emitted from time to time (when random(1) is bigger than 0.7); they will live by the rules scripted in particle_snow. Let's see how snow_pos is computed.
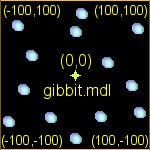
You can see that we have placed gibbit.mdl in Wed, therefore my.x, my.y, my.z are actually gibbit's.x, y, z. You know that random(200) will generate a random number between 0 and 200, so random(200) - 100 will generate numbers between -100 and 100.
snow_pos.x = my.x + random(200) - 100;
snow_pos.y = my.y + random(200) - 100;
will generate snow flakes anywhere in a squared area near gibbit.mdl (take a look at the picture). The snow flakes will start at the same height with gibbit.mdl.
Now that the particle is created, what is going to happen with it? It has to behave by the rules in particle_snow()
function particle_snow()
{
if(my_age == 0)
{
my_speed.x = 0;
my_speed.y = 0;
my_speed.z = -2.5 + random(1);
my_size = 100 + random(50);
my_map = snow_map;
my_flare = on;
my_alpha = 30;
}
if(my_age > 250)
{
my_action = null;
}
}
if (my_age == 0) means 'at the moment of creation'. This is where you (usually) choose particle's speed, size, color, bitmap and other things. The snow falls down so there's no need for us to change its speed on x or y. We give the snowflake a negative speed on z (so that it falls down) that ranges between -2.5 and -1.5:
my_speed.z = -2.5 + random(1);
You can see that the size will have a random value between 100 and 150 and that we're using the previously defined snow_map bitmap for the flakes.
If the particle is old enough (older than 250) it will die. This is good because it allows you to create other particles that will replace it without performance loss. Please take care to choose the proper value for the age: if the age is too small, the particles won't touch the ground; if the age is too big, the particles will penetrate the floor (remember they don't perform any collision detection?) and will continue their movement. You can't predict the proper value for age, but you can try several values and see how they work.
Let's take a look at the 2nd particle action - the laser barrier
action laser_barrier
{
my.invisible = on;
temp.x = my.x;
temp.y = my.y;
temp.z = my.z;
while (my.skill9 < my.skill1)
{
my.skill9 += 1;
temp.x += my.skill9 * cos(my.pan)/200;
temp.y += my.skill9 * sin(my.pan)/200;
emit(1,temp,particle_laser);
}
}
I have placed an mdl arrow in Wed, I adjust its angle and the laser barrier is following arrow's direction. Pretty cool, huh?
First of all, this is a situation where you can use a while loop without wait: we know the length of the laser beam - we've set it using arrow's skill1 (bigger values = bigger laser barriers) - so we'll create the particles only once. We place the arrow.mdl in Wed - the first particle will start at its position. The following particles will have to point in the same direction; this is why we're using arrow's pan to compute the directions on x and y. If you replace 200 with a bigger value, the distance between the particles will be smaller.
function particle_laser() is really simple so I won't explain how it works; please note that the particles don't have to die because their number is limited.
"Ok, you told me that the particles can't perform collision detection - how would they know that the player tries to get himself killed?" You can use an invisible entity and kill the player when it collides with it on event_impact. The good thing with this type of laser barrier is that it looks 'real' and you can easily turn it on and off using my_age - it looks interesting...
There's nothing special with action volcano; the interesting part is function particle_volcano()
function particle_volcano()
{
if (my_age == 0)
{
my_speed.x = random(8)-4;
my_speed.y = random(8)-4;
my_speed.z = random(6)+6;
my_size = 400;
my_flare = on;
my_alpha = 100;
my_map = fire_map;
}
my_speed.z -= 0.06;
my_alpha -= my_age / 5;
if (my_age > 10)
{
my_size = 800;
my_map = smoke_map;
}
if (my_age >= 25)
{
my_action = null;
}
}
This time we have random speeds on x, y and z. The speed on x and y ranges between -4 and 4, the speed on z can be 6...12 - so the particle will move upwards. We're adding a little gravity with my_speed.z -= 0.06 that constantly decreases the speed on z. If you own A5, you'll see that the particles are fading as they grow old. When particle's age is above 10, its bitmap is changed and its size is increased in order to add some realistic smoke (ok, I know that my bitmaps aren't showing realistic smoke but I'll let you create better bitmaps). No particle can live more than 25 - it's settled.
Finally, action gunpowder:
action gunpowder
{
my.invisible = on;
gunpowder_pos.x = my.skill1;
gunpowder_pos.y = my.y;
gunpowder_pos.z = my.z;
while (1)
{
while (gunpowder_pos.x < my.skill1)
{
while (key_b == 1) {wait(1);}
emit (5,gunpowder_pos,particle_gunpowder);
gunpowder_pos.x += 2 * time;
wait (1);
}
end_of_rope = 1;
if (key_b == 1)
{
gunpowder_pos.x = my.x;
end_of_rope = 0;
}
wait (1);
}
}
First of all, you have noticed that at game start, gunpowder_pos.x = my.skill1, so the while loop won't start. If we press the 'b' key
if (key_b == 1)
{
gunpowder_pos.x = my.x;
end_of_rope = 0;
}
the while loop starts because a new gunpowder_pos.x is set. The end_of_rope variable tells us if the gunpowder has burned to its end or not. The line:
gunpowder_pos.x += 2 * time;
will move the gunpowder on the x axis; you can do that with the y or z axis or you can combine the movements on x, y and z. At the end of the rope, the particles are growing fast and they'll move faster and faster on the x axis, but you should have a bomb here. If you own A5 you can make the rope 'burn' by changing its u or v parameters. There are many other things that you can do with A5 and particles - this wdl works with A4 and A5 so I had to cut some interesting A5 stuff :(
Well, I have started to understand some things about particles. I create them at a certain position, I write an action and they will obey it, I let them die to make sure that I don't have 20,000 particles running at the same time. If I would like to create a waterfall using particles, what should I do? I guess I could restrict the movement on the y axis (or x, depending on the waterfall orientation) and use a slightly modified snowfall action, right? This should create a 'line' of particles that keep falling.
snow_pos.x = my.x + random(200) - 100;
//snow_pos.y = my.y + random(200) - 100; // comment this line or the line above
snow_pos.z = my.z;
I'm curious if this works fine for you - maybe you'll drop me a note at the forum about it. Ok, here's the final tip: use small sized sprites and scale them up many times - you'll get great looking particles every time.
Sneaking (Thief - like) in the dark
I remember myself playing Thief - you have to steal different objects to get some cash. You sneak in the dark, use arrows to kill the guards and so on. The idea is interesting and can easily add value to any action game. This piece of code uses 'trace' to implement a Thief - like behaviour: try to stay in the dark and you won't be seen. Move into the light and an alarm will sound.
function scan_texture()
{
while (1)
{
vec_set(temp, player.x);
temp.z -= 300;
trace_mode = ignore_me + ignore_passable + ignore_models + ignore_sprites + scan_texture;
trace (player.x, temp);
if (tex_light > 50)
{
alarm();
}
waitt(8);
}
}
Trace traces a line between two points and returns several parameters. The first point is player's coordinate, the second point is located 300 quants below the player. We do this because we're interested in getting tex_light, which gives us the shadow map brightness in that area. If tex_light is bigger than 50 (the player is in a bright area), the alarm will sound twice a second - waitt(8).
I'm using a simple panel that displays tex_light - you'll learn how to do that a little later. Don't forget that your test level should have dark areas and bright areas - if the level is too bright, the alarm will sound all the time.