Panels, texts and buttons
The panels, texts and buttons are used by the 2D engine inside A4 / A5 to add some flavor to 3D games; don't underestimate them - you can create full 2D games or fake 3D games with the 2D engine. I have created a dumb, educative game that makes heavy use of panels, texts and buttons and guess what? I named it Guessme...
The main function is really simple:
function main()
{
D3D_PANELS = ON;
LOAD_LEVEL (<guess.wmb>);
start_game();
}
I have set D3D_PANELS to ON to enable hardware accelerated panels. I'm also loading a simple level (not necessary, but useful if you want to add more stuff or if your main panel doesn't cover the whole screen.
I have created a panel that covers the whole screen (800x600 pixels) and has its VISIBLE flag set, so it will appear at game start. I have two buttons used to start the game and to quit. If you remember the button definition in the manual, when I move the mouse over one of the buttons, it will change its bitmap to starthi_map or quithi_map. When I click one of the buttons, its corresponding action (start_guessing or quit_game) is executed.
PANEL guessmain_pan
{
BMAP guess800_map;
LAYER 10;
POS_X 0;
POS_Y 0;
BUTTON 20, 20, start_map, start_map, starthi_map, start_guessing, NULL, mouse_over;
BUTTON 20, 70, quit_map, quit_map, quithi_map, quit_game, NULL, mouse_over;
FLAGS OVERLAY, REFRESH, VISIBLE;
}
Function quit_game is really simple - it shuts down the engine; function start_guessing is more complex. Before we move on, please note that texts are pretty similar to panels; they have layers and can be moved on the screen.
function start_guessing() // simplified version
{
intro_text.VISIBLE = ON; // display the text stored in intro_string ("Try to guess a number...")
WAITT (16); // wait a second, then start scrolling the text upwards
WHILE (intro_text.POS_Y > -30) // make sure that all the three rows have disappeared
{
intro_text.POS_Y -= TIME * 0.05 * (570 - intro_text.POS_Y); // we modify intro_text's POS_Y to scroll faster and faster
WAIT (1);
}
intro_text.VISIBLE = OFF; // remove the intro text
random_number = int(RANDOM(9)+1); // pick a random number between 1 and 9
click_text.VISIBLE = ON; // display the text stored in click_string ("Click the keypad...")
keypad_pan.VISIBLE = ON; // display the keypad panel
WHILE (success == 0) // if I guess the number, success = 1
{
IF (random_number == your_guess) // got it
{
smaller_pan.VISIBLE = OFF; // remove the "arrow" panels
bigger_pan.VISIBLE = OFF;
PLAY_SOUND thanks_snd, 100; // plays the thank you sound
success = 1; // get out of the while loop
}
ELSE
{
IF (random_number < your_guess) // I chose a bigger number
{
bigger_pan.VISIBLE = OFF;
smaller_pan.VISIBLE = ON; // so make the smaller arrow panel visible
}
ELSE
{
smaller_pan.VISIBLE = OFF; // I chose a smaller number
bigger_pan.VISIBLE = ON; // so make the bigger arrow panel visible
}
}
WAIT (1);
}
click_text.VISIBLE = OFF; // remove the "Click the keypad..." text
keypad_pan.VISIBLE = OFF; // and the rest of the panels excepting guessmain
smaller_pan.VISIBLE = OFF;
bigger_pan.VISIBLE = OFF;
}
Finally, there's start_game()
function start_game() // simplified version
{
MOUSE_MAP = cursor_map; // we choose the mouse pointer, place it in the center of the screen and make the cursor freely movable
MOUSE_POS.X = SCREEN_SIZE.X / 2;
MOUSE_POS.Y = SCREEN_SIZE.Y / 2;
MOUSE_MODE = 2;
WHILE (1)
{
MOUSE_POS.X = POINTER.X; // move the mouse on x and y
MOUSE_POS.Y = POINTER.Y;
IF (MOUSE_LEFT == 1) // if the left mouse button (lmb) is pressed, we check to see if it was over the keypad_pan.
{
IF (MOUSE_POS.X > 650 && MOUSE_POS.X < 700)
{
IF (MOUSE_POS.Y > 0 && MOUSE_POS.Y < 50)
{
your_guess = 1;
}
IF (MOUSE_POS.Y > 50 && MOUSE_POS.Y < 100)
{
your_guess = 4;
}
IF (MOUSE_POS.Y > 100 && MOUSE_POS.Y < 150)
{
your_guess = 7;
}
}
IF (MOUSE_POS.X > 700 && MOUSE_POS.X < 750)
{
IF (MOUSE_POS.Y > 0 && MOUSE_POS.Y < 50)
{
your_guess = 2;
}
IF (MOUSE_POS.Y > 50 && MOUSE_POS.Y < 100)
{
your_guess = 5;
}
IF (MOUSE_POS.Y > 100 && MOUSE_POS.Y < 150)
{
your_guess = 8;
}
}
IF (MOUSE_POS.X > 750 && MOUSE_POS.X < 800)
{
IF (MOUSE_POS.Y > 0 && MOUSE_POS.Y < 50)
{
your_guess = 3;
}
IF (MOUSE_POS.Y > 50 && MOUSE_POS.Y < 100)
{
your_guess = 6;
}
IF (MOUSE_POS.Y > 100 && MOUSE_POS.Y < 150)
{
your_guess = 9;
}
}
}
WAIT (1);
}
}
You might wonder why did I use this type of checking for keypad and not regular buttons. First of all, this is a tutorial and you must learn as many tricks as possible. More that that, you can create a "button" of virtually any shape and size and use this type of code to click on it.
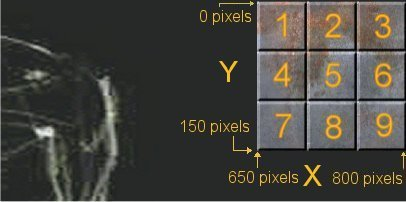
You can see that I have placed the keypad panel in the upper right corner.
IF (MOUSE_LEFT == 1) // if the left mouse button (lmb) is pressed, we check to see if it was over the keypad_pan.
{
IF (MOUSE_POS.X > 650 && MOUSE_POS.X < 700) // first column (1, 4, 7) starts at 650 and ends at 700 pixels on X
{
IF (MOUSE_POS.Y > 0 && MOUSE_POS.Y < 50) // first row (1, 2, 3) starts at 0 and ends at 50 pixels on Y
{
your_guess = 1; // you have clicked on 1
}
IF (MOUSE_POS.Y > 50 && MOUSE_POS.Y < 100) // second row (4, 5, 6) starts at 50 and ends at 100 on Y
{
your_guess = 4;
}
IF (MOUSE_POS.Y > 100 && MOUSE_POS.Y < 150) // third row (7, 8, 9) starts at 100 and ends on 150 on Y
{
your_guess = 7;
}
}
..............................................
We don't need a keypad panel for this type of action; keypad_pad is placed over the screen to show the player where to click.
Clocks and string instructions
I was surprised to see the you can create a real time clock so easy; I have created two strings:
STRING clock_string, " "; // hh:mm ss = 8 chars that hold data like this: 17:34 56
STRING temp_string, " "; // 2 chars storing temporary data that will be added to clock_string from time to time
I'm using a clock_text that will show the string clock_string (the time) on screen; function start_clock does all the job.
function start_clock()
{
WHILE (1)
{
str_for_num(clock_string, SYS_HOURS);
str_cat(clock_string, ":");
IF (SYS_MINUTES < 10)
{
str_cat(clock_string, "0");
}
str_for_num(temp_string, SYS_MINUTES);
str_cat(clock_string, temp_string);
str_cat(clock_string, " ");
IF (SYS_SECONDS < 10)
{
str_cat(clock_string, "0");
}
str_for_num(temp_string, SYS_SECONDS);
str_cat(clock_string, temp_string);
WAIT (1);
}
}
Let's go through this function line by line:
str_for_num(clock_string, SYS_HOURS);
Reads SYS_HOURS which is a number, converts it to string and puts it in clock_string (the first two characters)
str_cat(clock_string, ":");
Adds the : character to the string (in the 3rd position) to create a clock that looks like this 12:32
IF (SYS_MINUTES < 10) // add a "0" if the minutes are displayed with a digit
{
str_cat(clock_string, "0");
}
SYS_MINUTES will show 12: 7 instead of 12:07 for SYS_MINUTES below 10, so we add a 0 when needed
str_for_num(temp_string, SYS_MINUTES);
Reads SYS_MINUTES and converts it to string (we use temp_string then we will copy it in clock_string)
str_cat(clock_string, temp_string);
We add the minutes to clock_string; the minutes should be the 4th and 5th characters in clock_string
str_cat(clock_string, " ");
Add a space in the 6th position of the screen
IF (SYS_SECONDS < 10) // add a "0" if the seconds are displayed with a digit
{
str_cat(clock_string, "0");
}
We add a "0" if the seconds are below 10
str_for_num(temp_string, SYS_SECONDS);
We read SYS_SECONDS and convert it to string; the result is placed in temp_string
str_cat(clock_string, temp_string); // add seconds to clock_string
We add seconds to clock_string (the 7th and 8th position)
All this stuff is placed in a WHILE(1) loop, so it executes all the time.