Scripted cut scenes
The world is changing! The good old 256-colors movies that were used for the cut scenes a few years ago are replaced with scripted cut scenes that are created using the game engine itself! And this article will discuss the most used techniques.
Let's begin with the scenario:
1) A few soldiers are discussing close to the 2 trucks that they are supposed to protect;
2) A chopper lands silently nearby without being seen. Two masked men get out of the chopper and run towards the trucks;

3) A van passes by, creating noise and attracting the soldiers' attention;

4) One of the masked men sneaks behind one of the trucks, plants the explosive and then runs away;

5) The trucks explode and all the soldiers are killed.
All these things were created using simple actions and functions:
function main()
{
fps_max = 40;
level_load (cutscene_wmb);
wait (3);
camera.x = -800;
camera.y = -1100;
camera.z = 50;
camera.pan = 115;
camera.tilt = -10;
}
It is highly recommended to lock the frame rate during the cut scene; you'll see why in a minute. We load the level, we wait until it is loaded and then we set the initial camera position:
This is the model that has action soldier_1 attached to it:
action soldier_1
{
soldier1 = my;
while (vec_dist (my.x, soldier2.x) > 150)
{
ent_cycle("stand", my.skill20);
my.skill20 += 0.25;
if (my.skill20 == 19)
{
snd_play (radio_wav, 20, 0);
}
wait (1);
}
my.skill20 = 0;
snd_play (allquiet_wav, 50, 0);
while (my.skill20 < 95)
{
ent_cycle("salut", my.skill20);
my.skill20 += 5 * time;
wait (1);
}
snd_play (isee_wav, 60, -30); // bigger volume for the left channel
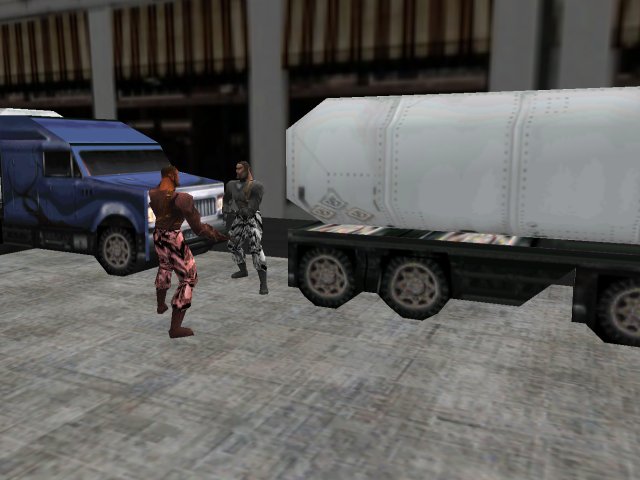
The first soldier will wait until the distance between him and the higher ranked soldier2 is smaller than 150 quants, playing its "stand" animation in a loop. Please note that I'm not using a time-corrected value for its animation, but a fixed value (0.25) because I wanted to play the radio_wav sound at a specific animation frame. We don't need to use time-corrected values because the frame rate is locked.
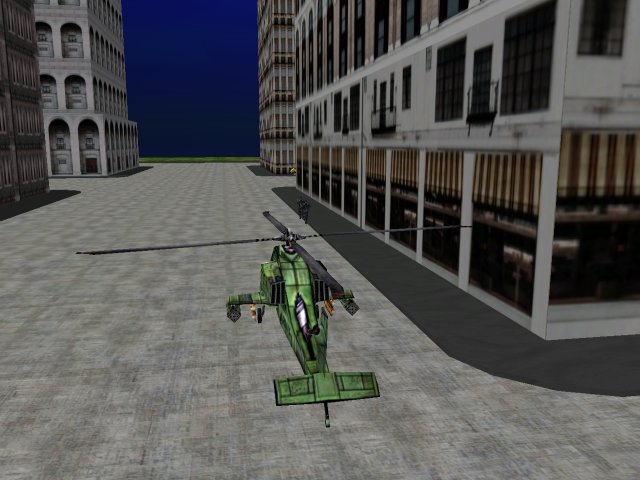
The officer has approached now (see the first picture) so the first soldier says its allquiet_wav line, and then it salutes the officer. The same soldier plays officer's isee_wav line, with a bigger volume for the left channel because of the -30 balance factor. The point I'm trying to make is this: it doesn't matter who does the job, as long as it looks real.
sleep (2);
media_play("soundtrack.wav", null, 20); // start the soundtrack
chopper_moves = 1;
camera.x = 300;
camera.y = -2700;
camera.z = 50;
while (start_van == 0) {wait (1);}
while (van1.x < 1000)
{
vec_set(temp, van1.x);
vec_sub(temp, my.x);
vec_to_angle (my.pan, temp); // rotate the soldier towards the van
wait (1);
}
snd_play (itsnothing_wav, 80, 0);
while (start_explosion == 0) {wait (1);}
sleep (0.2);
while (my.y > -3000)
{
my.y -= 50 * time;
my.x -= 5 * time;
my.z += 30 * time;
my.roll += 50 * time;
wait (1);
}
sleep (9); // experimental value
beep; // you would load a new (playable) level here
}
Two seconds pass and the soundtrack starts playing. The variable named "chopper_moves" is set to 1, telling the chopper to start moving, and we set a new position for the camera. Nothing will happen with soldier1 until start_van is set to 1. This is a variable used by the van that distracts the two soldiers. Anyway, when the van starts moving, the first two soldiers will constantly look at it; you will want to use bones here if you own A6, but I wanted to make sure that the code runs ok with A5 too.
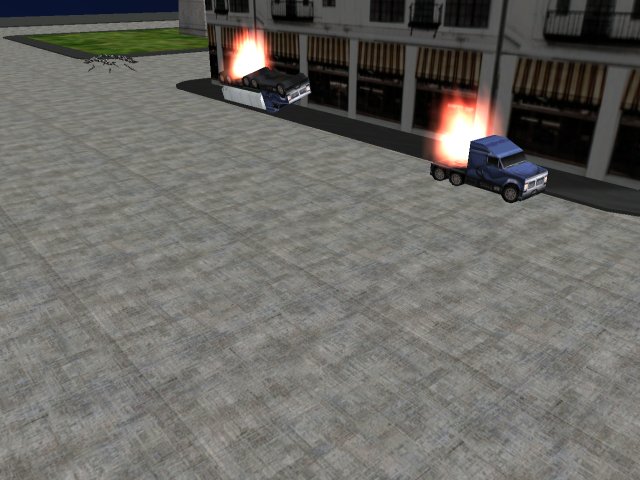
The x for the van is over 1000 now so the first soldier will say its itsnothing_wav line. The soldier will wait until the variable named "start_explosion" is set to 1, and then, after 0.2 seconds, it will start flying :) as shown in the picture below:
We wait for 9 more seconds (that's an experimental value) and then we play a beep sound; that's where you will want to put a level_load instruction that loads your playable level.
action soldier_2
{
soldier2 = my;
sleep (6); // wait for 6 seconds
while (vec_dist (soldier1.x, my.x) > 70)
{
ent_cycle("run", my.skill20);
my.skill20 += 4 * time;
my.skill20 %= 100; // loop the animation
my.y += 5 * time;
wait (1);
}
my.skill20 = 0;
while (my.skill20 < 95)
{
ent_cycle("salut", my.skill20);
my.skill20 += 3.5 * time;
wait (1);
}
The officer will wait for 6 seconds; this gives us enough time to watch the first soldier. The officer will move towards the soldier by increasing its y in a while loop; it plays its "run" animation too. When the officer has come closer than 70 quants to the soldier, it stops and plays its "salut" animation.
while (start_van == 0) {wait (1);}
while (van1.x < 1000)
{
vec_set(temp, van1.x);
vec_sub(temp, my.x);
vec_to_angle (my.pan, temp); // rotate the soldier towards the van
wait (1);
}
while (start_explosion == 0) {wait (1);}
sleep (0.3);
while (my.y > -3000)
{
my.y -= 50 * time;
my.x -= 10 * time;
my.z += 30 * time;
my.roll += 50 * time;
wait (1);
}
}
The officer will stand still until start_van is set to 1, and just like the first soldier, it will look at the van until its x is greater than 1000. The officer will wait until the explosion is triggered, and then, after a 0.3 seconds pause, it will start flying just like soldier1 did.
action john_doe
{
my.skill20 = random(100); // set a random animation start for every dummy soldier
while (start_explosion == 0)
{
ent_cycle("stand", my.skill20);
my.skill20 += 1 * time;
my.skill20 %= 100; // loop the animation
wait (1);
}
sleep (0.5 + random(1) / 3);
snd_play (scream_wav, 80, 0);
my.skill10 = my.x;
while (my.x > my.skill10 - 1000)
{
my.x -= 50 * time;
if (my.x > my.skill10 - 500)
{
my.z += 20 * time;
if (my.tilt < 180) {my.tilt += 50 * time;}
}
else
{
ent_cycle ("death", 95);
my.z -= 20 * time;
}
wait (1);
}
my.z = 20;
}
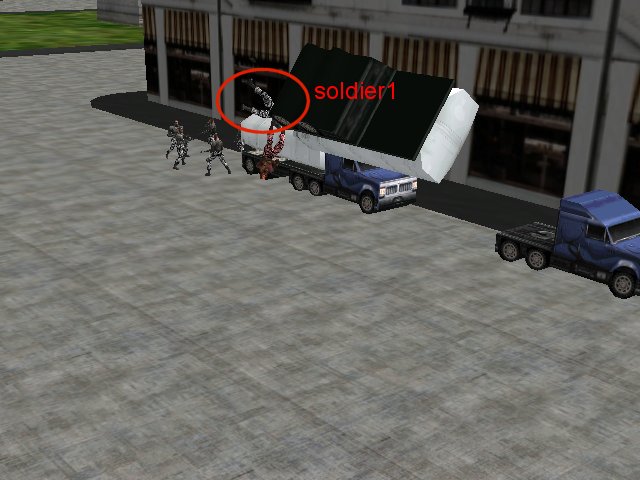
This action is assigned to the six soldiers that are placed close to the 2nd truck. They pick a random frame, and then they play their "stand" animation in a loop until start_explosion is set to 1. When this happens, the soldiers wait for 0.5 - 0.83 seconds, play the scream_wav sound and then start flying. This time I wanted to show their corpses lying on the ground, so I chose a different method: the soldier will store their initial x (using their own skill10) and then they will fly until their x becomes 1000 quants smaller. The last line of code sets their z to a convenient value (20).
action chopper
{
var chopper_handle;
var animation_speed = 20; // chopper's animation speed
while (chopper_moves == 0) {wait (1);} // wait until the chopper is allowed to move
while (my.z > 35)
{
ent_cycle("fly", my.skill20); // play "fly" animation
my.skill20 += animation_speed * time;
my.skill20 %= 100; // loop the animation
my.z -= 10 * time;
my.y -= 20 * time;
vec_set(temp, my.x);
vec_sub(temp, camera.x);
vec_to_angle (camera.pan, temp); // rotate the camera towards the chopper
wait (1);
}
start_specops = 1;
while (animation_speed > 0)
{
if (!snd_playing(chopper_handle))
{
chopper_handle = ent_playsound (my, chopper_wav, 100); // the sound is louder this time
snd_tune (chopper_handle, 0, 25 * animation_speed, 0);
}
ent_cycle("fly", my.skill20); // play "fly" animation
my.skill20 += animation_speed * time;
my.skill20 %= 100; // loop the animation
animation_speed -= 0.15 * time;
wait (1);
}
}
The chopper was placed in a convenient position and it has to wait until the variable named chopper_moves is set to 1. When this happens, the chopper plays its "fly" animation in a loop, decreasing its z (preparing to land) and its y (coming closer to the trucks). The camera will follow the chopper until it touches the ground (its z is below 35). We have to create the 2 spec ops men, so we set the var named start_specops to 1. The chopper will play the chopper_wav sound in a loop, decreasing the frequency of the sound (because of the snd_tune instruction) and the "fly" animation speed.
We are using a starter function for the spec ops men:
starter create_specops
{
while (start_specops == 0) {wait (1);} // wait until the chopper has landed
sleep (1);
temp.x = -300;
temp.y = 1500;
temp.z = 35;
ent_create (specops_mdl, temp, move_specop1);
temp.y += 100;
ent_create (specops_mdl, temp, move_specop2);
}
The function waits until start_specops is set to 1, sleeps for 1 more second and then chooses the starting positions for the masked men, creates them and attaches them the move_specop1 and move_specop2 functions:
function move_specop1()
{
specop1 = my;
my.pan = 270;
while (my.y > -650)
{
ent_cycle("run", my.skill20);
my.skill20 += 10 * time;
my.skill20 %= 100; // loop the animation
my.y -= 15 * time;
if (my.x > -450) {my.x -= 1 * time;}
if (my.y < 600)
{
camera.x = -145;
camera.y = 2060;
camera.z = 200;
camera.pan = 260;
camera.tilt = -10;
}
wait (1);
}
This guy does most of the job, really. I don't know why they've hired the second man! It chooses the correct pan angle and then it starts running until its y becomes smaller than -650 quants (that's close to the corner of the street). We apply a small movement on the x axis too, but only if x is greater than -450 quants. If the y coordinate is smaller than 600, we set a new position for the camera - the one that is placed behind the chopper:
start_van = 1;
my.y = -710;
my.pan = 180;
while (my.x > -800)
{
ent_cycle("run", my.skill20);
my.skill20 += 7 * time;
my.skill20 %= 100; // loop the animation
my.x -= 8 * time;
wait (1);
}
ent_cycle("standcrouch", 90); // crouch behind the truck
sleep (5); // plant the bomb :)
my.pan = 0;
while (my.x < 0)
{
ent_cycle("run", my.skill20);
my.skill20 += 7 * time;
my.skill20 %= 100; // loop the animation
my.x += 8 * time;
wait (1);
}
sleep (1); // wait a bit and then trigger the explosion
start_explosion = 1;
}
The van has started to move now, so the masked man picks a new position and orientation, and then starts running towards the truck by decreasing its x. The movement will continue until x gets smaller than -800 quants; when this happens, the man will crouch ("standcrouch") and then will wait for 5 seconds pretending that it plants the bomb. The man chooses the right pan angle, and then it runs away from the truck.
We wait for 1 second, and then we set the var named start_explosion to 1, and this triggers the long awaited explosion process.
function move_specop2()
{
specop2 = my;
my.pan = 270;
while (start_van == 0)
{
my.x = specop1.x;
my.y = specop1.y + 100;
ent_cycle("run", my.skill20);
my.skill20 += 10 * time;
my.skill20 %= 100; // loop the animation
wait (1);
}
}
The second masked man picks the right angle, and then it follows the first mask, playing its "run" animation until the variable named start_van is set to 1. Rest in peace!
action van
{
van1 = my;
while (start_van == 0) {wait (1);}
camera.x = -150;
camera.y = -1700;
camera.z = 320;
camera.pan = 140;
camera.tilt = -25;
snd_play (van_wav, 20, 0);
while (my.x < 2000)
{
my.x += 20 * time;
wait (1);
}
}
That's a small action. The van will wait until start_van is set to 1, and then it will set a new camera position and angles. An engine sound is played, and the van increases its x coordinate in a loop until it grows over 2000 quants.

The first truck consists of two different models:
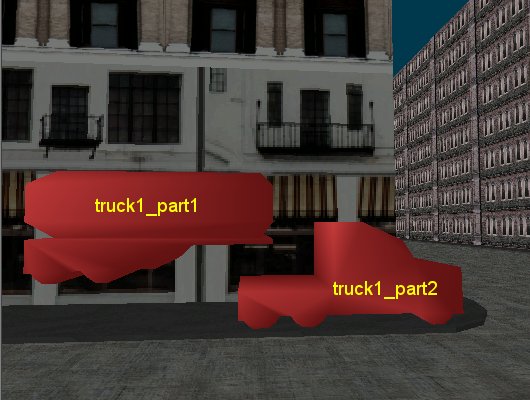
action truck1_part1
{
while (start_explosion == 0) {wait (1);}
snd_play (explosion1_wav, 100, 0);
sleep (0.2);
snd_play (explosion2_wav, 100, 0);
while (my.y > -3000)
{
my.y -= 50 * time;
my.z += 30 * time;
my.roll += 50 * time;
camera.roll = 2 - random(4); // shake the camera a bit
wait (1);
}
camera.roll = 0; // reset camera's roll angle
}
The first part of the truck will wait until start_explosion is set to 1, and then it will play two explosion sounds. The fuel tank (truck1_part1) will start to fly up in the sky, increasing its z with the speed given by 30 * time. The camera will choose a random roll angle that can range from -2 to 2; the end of the explosion resets camera's roll angle. What happens with the second part of the truck?
action truck1_part2
{
while (start_explosion == 0) {wait (1);}
sleep (0.5);
snd_play (explosion1_wav, 100, 0);
while (1)
{
temp.x = my.x -70;
temp.y = my.y;
temp.z = my.z + 50;
effect (fire_fx, 1, temp, normal);
wait (1);
}
}
It waits until start_explosion is set to 1, plays an explosion sound, and then creates a particle fire effect at the position given by temp.
action truck2
{
while (start_explosion == 0) {wait (1);}
sleep (0.4);
snd_play (explosion1_wav, 100, 0);
sleep (0.1);
snd_play (explosion2_wav, 100, 0);
snd_play (explosion1_wav, 100, 0);
while (my.x > -1400)
{
my.x -= 20 * time;
my.z += 3 * time;
if (my.roll < 180) {my.roll += 50 * time;}
camera.roll = 2 - random(4); // shake the camera a bit
wait (1);
}
camera.roll = 0; // reset camera's roll angle
while (1)
{
temp.x = my.x -70;
temp.y = my.y;
temp.z = my.z + 80;
effect (fire_fx, 1, temp, normal);
wait (1);
}
}
The second truck waits until start_explosion is set to 1, and then it plays several explosion sounds, moves a bit backwards (that's how we see it decreasing its x coordinate) and rolls over (from 0 to 180 degrees). The camera will shake a bit too, but then it will be reset. The last while loop creates the same fire effect using a convenient position.
function fire_fx()
{
temp.x = random(20) - 10;
temp.y = random(20) - 10;
temp.z = random(10);
vec_add (my.vel_x, temp);
my.alpha = 20 + random(80);
my.bmap = fire_tga;
my.size = 200;
my.bright = on;
my.move = on;
my.lifespan = 4;
my.function = fade_away;
}
function fade_away()
{
my.alpha -= 2 * time;
if (my.alpha < 0) {my.lifespan = 0;}
}
The function that was used for the fire effect is typical: it sets random values for the speed of the flames, chooses a random transparency factor that ranges from 20 to 100 and assigns function fade_away to each and every particle. This function simply decreases the alpha for the fire particles, removing them when their alpha is below 0. You should add some smoke to this fire effect - I wanted to keep the things as simple as possible.
This pretty much wraps it up. You won't be able to simply copy and paste this code in your projects because now you have learned that it depends heavily on your scenario, level geometry, and so on. The good news is that you've got several templates that should help you a lot. Here's the final advice: the camera will stay where you want it if you don't change its x, y, z, pan, tilt, or roll inside a while loop. Don't get me wrong; while loops and cameras mix well, but you should get the camera out of the loop when you want it to move to another place and so on.