Waterfall
I think that a good waterfall can be created using the following recipe: mix a transparent wmb entity with some code that shifts the texture on it and generates some particles. That's exactly what I'm going to do.
action waterfall
{
my.transparent = on;
while (1)
{
my.v -= 30 * time;
Action waterfall is attached to the waterfall wmb entity. You can see that the entity is transparent and the texture on it is moving because we change its v parameter; let's take a look at the entity the way we see it in Wed:

I can hear you asking: what's so special about this entity?
Well, we need to know the width of the waterfall (130 quants in my example) and me must place its origin the way you see it in the Back view. This way the particles will be created in the region that separates the waterfall and the water pool without having to write complicated code / adding more entities as particle generators.
vec_set (temp, my.pos);
temp.y += 60 - random(120);
effect (water_splash, 1, temp, normal);
wait (1);
}
}
We use temp to store the position of the waterfall entity and then we add a random value between -60 and 60 quants to the waterfall entity on y. This will create several water_splash particle generators with random positions on y. The particles are produced using the common "effect" instruction, with 1 particle being created every frame. I haven't limited the number of splashes: if your PC has 100 fps you will get 100 particles every second. This way weaker PCs will get the chance to display as many splashes as they can. If you want, you can emit several particles at once and use sleep(x) instead of wait (1) inside the loop.
Let's see the function that generates the particles:
function water_splash()
{
temp.x = random(4) - 2;
temp.y = random(2) - 1;
temp.z = random(1) + 1;
vec_add (my.vel_x, temp);
my.alpha = 10 + random(10);
my.bmap = water_pcx;
my.size = 20 + random(10);
my.flare = on;
my.move = on;
my.bright = on;
my.lifespan = 200;
my.function = splash_fade;
}
The particles have a small random speed on x (-2..2) and y (-1..1) and a positive speed on z (1..2) because they will rise a little bit. You can see that the particles start their life with a random alpha and size and with a lifespan of 200 ticks. The function that drives every particle is presented below:
function splash_fade()
{
my.size += 5 * time;
my.alpha -= 1 * time;
if (my.alpha < 0)
{
my.lifespan = 0;
}
}
The particle increases its size and decreases its alpha during its lifetime. When the particles has become invisible (alpha < 0) it is removed because we don't want to waste resources for nothing.
You should be able to create great looking waterfalls using this piece of code as an example. You can choose from a number of different splash bitmaps depending on a random value, play with alpha, size, flags and so on. Good luck!
Breakable windows
Read this article and you will find out how to create a window that breaks when you shoot it or when the player passes through it. The player should loose a part of its health if it does that, right?
action breakable_glass
{
my.transparent = on;
my.enable_impact = on;
my.enable_entity = on;
my.enable_shoot = on;
my.event = glass_pieces;
}
The action above will be attached to your window entity and it will make it transparent and sensitive to impact, shoot or other entities. When one of these events is detected, function glass_pieces will run:
function glass_pieces()
{
if (you == player) {player._health -= 20;} // decrease player's health if it breaks the window by passing through it
my.passable = on;
snd_play (breakglass_snd, 50, 0);
my.skill10 = 0;
my.invisible = on;
while (my.skill10 < 15)
{
create (gibglass_mdl, my.pos, gib_glass);
my.skill10 += 1;
wait (1);
}
ent_remove (me);
}
If the player passes through the window, its health is decreased with 20 points. The window is made passable because the glass giblets must pass through it, a sound is played and then the window is made invisible. You might wonder why I haven't removed the window yet - the answer is that I want to use its skill10 as a counter because we must create 15 glass fragments inside the while loop. As soon as all the giblets are created, the big window is removed.
Time to look at the gib_glass() function:
function gib_glass()
{
my.transparent = on;
my.skill1 = random(200) - 100;
my.skill2 = (random(100) + 25) * sign (my.y - player.y);
my.skill3 = -random(25) - 10;
my.skill1 *= time; // all the values (skill1..skill3) are multiplied with time
my.pan = random(360);
my.tilt = random(360);
my.roll = random(360);
while(my.skill40 < 10)
{
move_mode = ignore_passable;
ent_move (nullvector, my.skill1);
my.skill3 -= 20 * time;
my.skill40 += time;
wait(1);
}
my.passable = on;
while (my.alpha > 0)
{
my.alpha -= 0.3 * time;
wait (1);
}
ent_remove (me);
}
The giblets are transparent; we use skill1..skill3 as a local var. Every glass piece will move in a random direction using ent_move; you can see that the movement on x ranges from -100 to 100 (skill1), the movement on z ranges from -35 to -25 (skill3) because the giblets have to fall down. What's with the movement on y (skill2) and why should it depend on player's position?
Let's see if an image is more efficient than 1000 words:
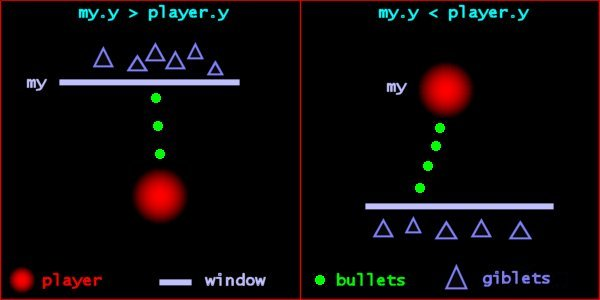
If the player shoots the window, many of the giblets should fall on the other side of the window. Skill2 (speed on y) will change its sign depending on the position of the player and the window.
The giblets get random pan, tilt, roll values and move inside a while loop. Skill3 (speed on z) decreases more and more, placing the gibs closer and closer to the ground with every frame. When the movement stops, we make the giblets passable and then we decrease their alpha until they disappear.