This month we are going to add enemy (AI-controlled) cars to our template. Before diving into it, let's talk a bit about the template guidelines. I'd say that the new template system is very easy to use and does its job; you only have to include a file in order to get new stuff to play with.
#include "t_car.h" // get access to player's car action
#include "t_car_cameras.h" // get access to the camera functions
#include "t_car_ai.h" // get access to the enemy cars actions
The car template has changed a lot on the inside and very little on the outside since last month; the only difference you'll notice is the fact that now we include the .h files instead of the .c files in our projects. This has happened because now the .c files are standalone scripts that can run without needing anything else, while the .h files allow us to customize the behavior of the entities from the .c files.
Let's take the t_car.c file as an example; it is a script that runs by itself using default values for speed, acceleration and so on. You could include the t_car.c in your own projects and get a physics-based car that can be controlled by the player OR you could include the t_car.h file in your projects and get the same physics-based car, but a car that can be customized to your liking. If you want to create new templates examine my template car code and follow the Template Writing Guidelines that can be found at Conitec's website.
These things being said, let's open the main.c file that comes with this month's car templates:
#include <acknex.h>
#include "t_car.h" // template car code
#include "t_car_cameras.h" // car camera code
#include "t_car_ai.h" // enemy cars AI code
ENTITY* sky =
{
type = "skycube+6.tga";
flags2 = SKY | CUBE | SHOW;
}
function main()
{
video_screen = 1; // start the game in full screen mode
video_mode = 8; // run at a 1024x768 pixels resolution
camera.arc = 100; // set a proper camera arc value
level_load("car_test.wmb");
}
It all looks simple with our included .h files, a sky cube definition and a tiny main( ) function. Run the script and use the WSAD or the cursor keys to drive until you get past the flags at the end of the racetrack. Don't forget to use the E or L keys if you get stuck somewhere in the level.
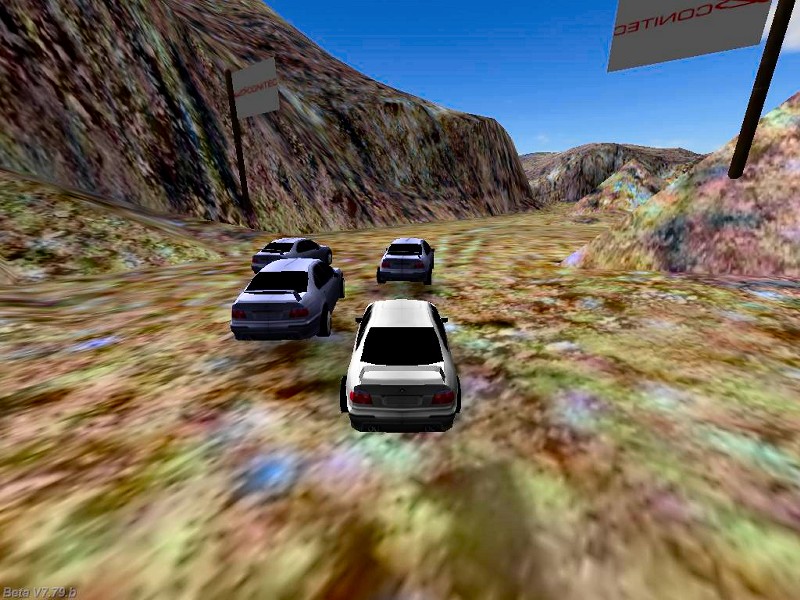
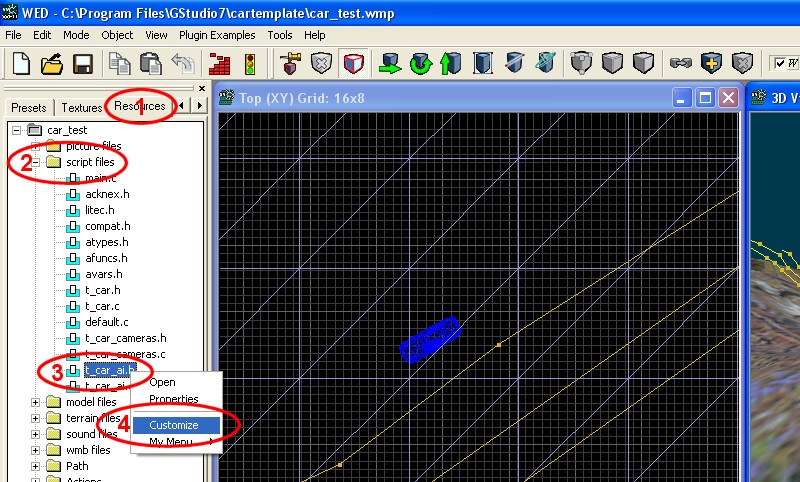
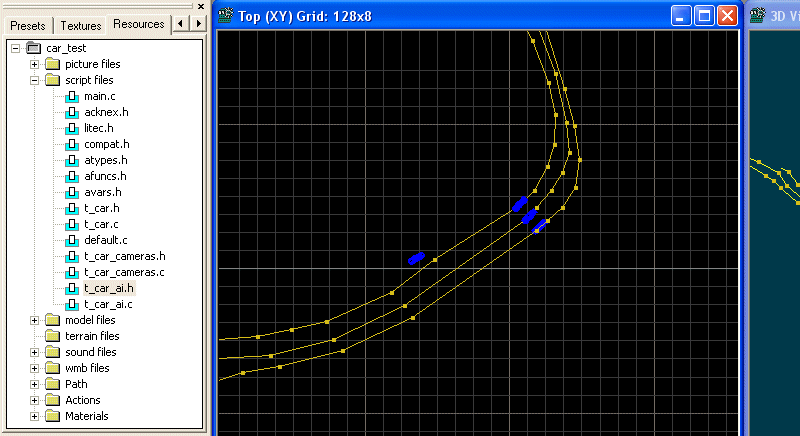
This demo comes with 3 enemy cars, which have a blueish color. Let's see what can be customized inside the t_car_ai.h file; click the "Resources" tab in Wed, select "script files", navigate to the t_car_ai.h file, right click it and then choose "Customize", just like in the picture below.
You will see the Enemy (AI) Car customization panel; let's go through all its fields.
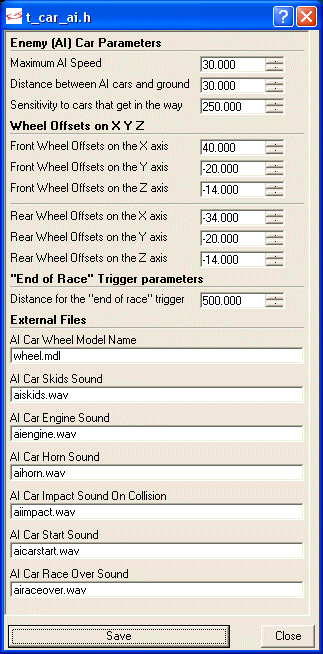
- "Maximum AI Speed" sets the maximum speed for the enemy cars. Each car moves with a slightly random speed, so each race will be different.
- "Distance between AI cars and ground" sets the distance in quants from the car body to the terrain below it. Play with this value until the wheels of the AI cars barely touch a flat area in your level.
- "Sensitivity to cars that get in the way" gives the distance that triggers the horn signals / speed slowdowns if another car, be it player's car or another AI car, gets in the way. The AI cars will slow down and use their horns, trying to avoid a collision whenever if it is possible. This value gives their sensitivity, with bigger values making them more alert.
- "Wheel offsets on X Y Z" give the offset of the wheels in relation to the car body, just like they do it for player's car. We are only setting the wheels on the left side; the ones on the right side will set themselves up automatically.
- "Distance to the "end of race" trigger" gives the maximum distance between the "race is over" trigger (more about it a bit later) and the AI cars, in order to stop them. The rest of the customization options are self-explanatory and deal with external files, which can be changed according to our needs.
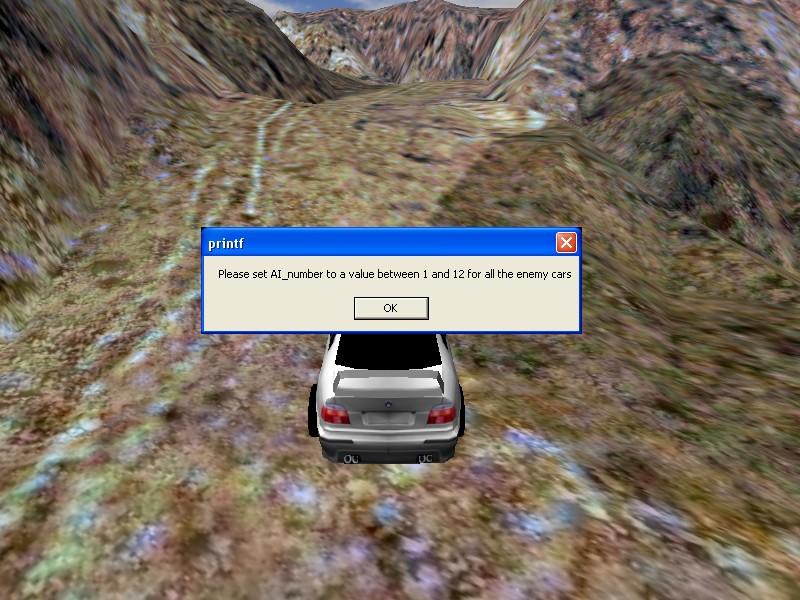
If you have examined the level in Wed, you have noticed that it is extremely easy to set up a car template demo. I have created 3 similar paths; I know that they aren't perfect, so feel free to pull some of their nodes up and down until they match the height of the terrain in that area. Then, I have placed 3 enemy cars (bmwai.mdl) close to the origins of the paths and I have attached them the same action - t7_ai_car. Each car will detect the closest path to it and it will use it automatically. Oh, and don't forget to set a unique Ai_number (skill1) for each enemy car; you can use values between 1 and 12 (the template allows us to have up to 12 enemy cars driving at the same time).

By the way, if you forget to set the Ai_number for one or more of the enemy cars, you will be reminded to do so:
Finally, I have placed player's car (bmw.mdl) in the level and I have attached it the t7_players_car action.
Please note that player's car has a small head start; I did that on purpose because the AI cars are allowed to move for a few frames at the very beginning, in order to align themselves on their paths, and this makes them move a bit towards the player.
I almost forgot about the "end of race" trigger. This is an entity that sits silently at the end of the level and stops all the cars (including player's car) that come close enough to it. You can use one or several "end of race" triggers in the same level if your racetrack is very wide and you can make them passable, invisible, etc (or not). Don't forget that you can also customize the distance that makes the cars stop at the end of the racetrack.
I don't know about you, but I really like the flexibility of this car template. And the good news is that there's more good stuff to discover. Open main2.c in Sed and let's take a good look at it:
#include <acknex.h>
#include "t_car.h" // template car code
#include "t_car_cameras.h" // car camera code
#include "t_car_ai.h" // enemy cars AI code
First of all we are including our regular .h files; there's nothing strange here.
var t7car_race_started = 0;
The line above is the most important in this script; it sets the variable named t7car_race_started to zero. This variable is also defined inside t_car.c and its value is set to 1 there, telling the cars to start moving as soon as the level is loaded. By setting it here to zero, we are stopping all the cars (including player's car) so that we can decide when the race will start.
SOUND* getready_wav = "getready.wav";
ENTITY* sky =
{
type = "skycube+6.tga";
flags2 = SKY | CUBE | SHOW;
}
PANEL* splash_pan =
{
bmap = "splash.pcx";
layer = 15;
pos_x = 0;
pos_y = 0;
}
PANEL* red_pan =
{
bmap = "red.tga";
layer = 15;
pos_x = 395;
pos_y = 267;
}
PANEL* yellow_pan =
{
bmap = "yellow.tga";
layer = 15;
pos_x = 395;
pos_y = 267;
}
PANEL* green_pan =
{
bmap = "green.tga";
layer = 15;
pos_x = 395;
pos_y = 267;
}
We have defined a getready_wav sound effect, our old sky cube entity, a splash screen panel and 3 different panels for the red, yellow and green colors of a semaphore / traffic light.
function main()
{
video_screen = 1; // start the game in full screen mode
video_mode = 8; // run at a 1024x768 pixels resolution
camera.arc = 100; // set a proper camera arc value
set (splash_pan, SHOW);
level_load("car_test.wmb");
wait (-6);
Function main does the regular things, and then displays the splash screen panel and loads the level. The splash screen will be visible for about 6 seconds (in fact, for fewer seconds, because the engine needs some time in order to display its window).
reset (splash_pan, SHOW); // now hide the splash screen
media_loop("trance.mp3", NULL, 80); // start the soundtrack
wait (-1);
set (red_pan, SHOW);
snd_play(getready_wav, 100, 0);
wait (-1);
reset (red_pan, SHOW);
wait (-0.5);
set (yellow_pan, SHOW);
snd_play(getready_wav, 100, 0);
wait (-1);
reset (yellow_pan, SHOW);
wait (-0.5);
set (green_pan, SHOW);
snd_play(getready_wav, 100, 0);
wait (-1);
reset (green_pan, SHOW);
wait (3);
t7car_race_started = 1; // now allow player's car and the enemy cars to start moving
}
The following lines of code hide the splash screen panel, start a trance.mp3 soundtrack, display the red / yellow / green panels and play the getready_wav sound effect. Finally, t7car_race_started is set to 1, allowing the enemy cars to start the race and allowing the player to control its car. Run main2.c and you'll see it all happening on your monitor.
And there you have it: a decent racing game which includes a splash screen, a semaphore and so on and was created using only 30-40 short, simple lines of code and the car template.This was all for today; I'm looking forward to seeing you all next month!