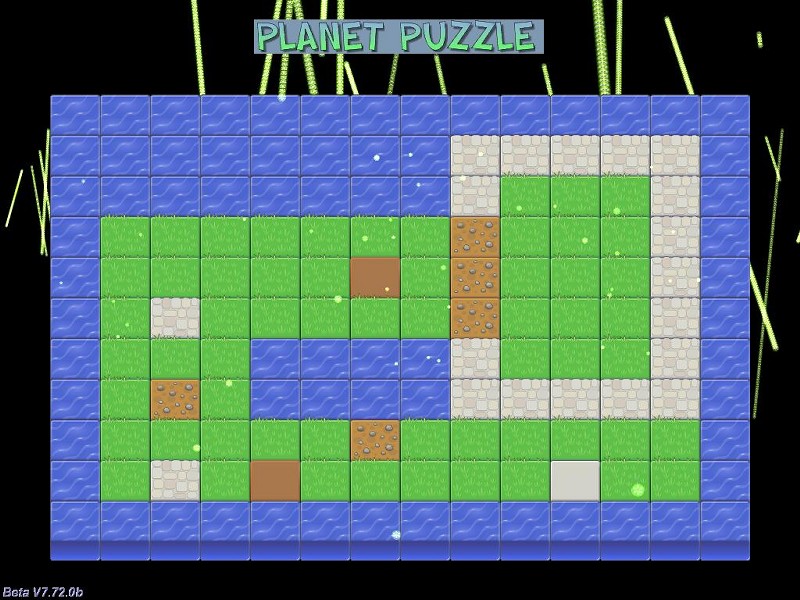
This time we will put together a 2D tile generator that can be used for logical games, RPG games and even action games. Let's start by loading and running 2dtiles1.c:
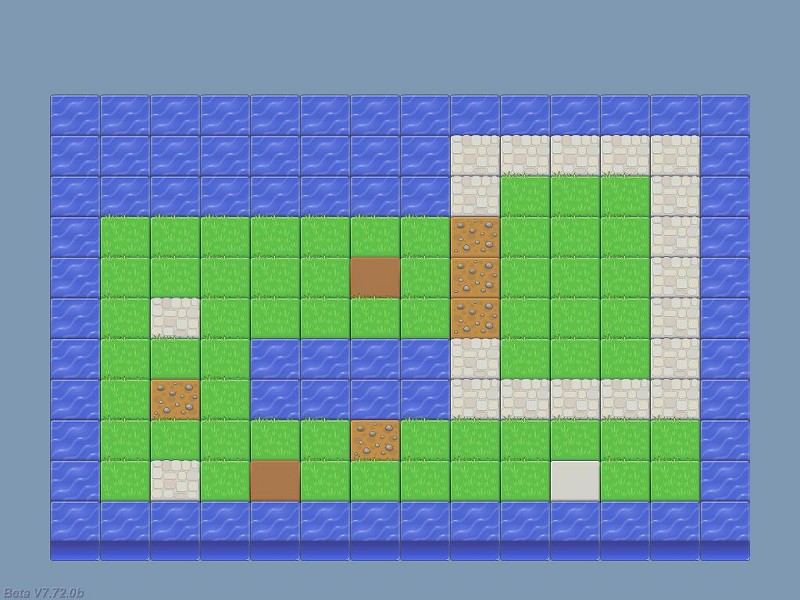
The nice looking graphics weren't created by me; they come from the Lost Garden Graphics package. Can you imagine how much time it took me to create this level out of individual tiles, placing them at their proper positions? Well, in fact it only took me about 1 minute, because the level data is read from this file (level.txt):
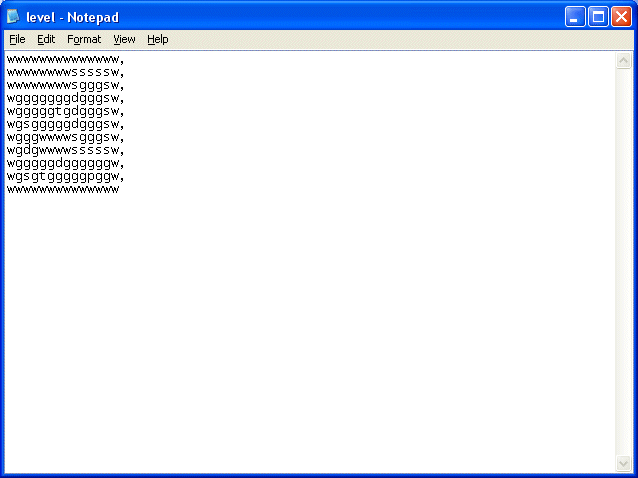
Each letter in the file represents a 2D panel tile: "w" stands for "water", "s" is a stone tile, "g" is a grass tile and so on. We place a comma at the end of each row and the code will read the data and convert it to our nice 2D level. Let's see how it's done right away:
#define init_x 64
#define init_y 90
#define tile_width 64
#define tile_height 52
STRING* data_str = "#20"; // the games can use up to 20 horizontal tiles
STRING* temp_str = "#20"; // just a temporary string
PANEL* temp_pan;
function main()
{
fps_max = 60;
video_mode = 8; // 1024x768
video_depth = 32; // 32 bit mode
video_screen = 1; // start in full screen mode
vec_set(screen_color, vector(178, 153, 128)); // set a pleasant, blueish background color
read_level_data(); // read the level elements
}
We have set init_x and init_y to the upper left corner of our 2D level; these will be the coordinates of the first water tile panel from my demo. We are also defining the size of tile_width and tile_height; these values work fine for my set of tiles, so make sure to put your own values here if you use a different set of tiles.
The "temp_pan" panel pointer is a temporary panel that allows us to create a tile, place it at its position and make it visible, then creates another tile and so on. We are only creating a panel at a time (although this happens very fast) so we don't need several panel pointers.
Finally, function main does the usual things, sets a pleasant, blueish background color and then calls the "read_level_data" function:
function read_level_data()
{
var level_handle, string_size, index, layer_value;
VECTOR tile_pos;
layer_value = 10;
tile_pos.x = init_x;
tile_pos.y = init_y;
level_handle = file_open_read("level.txt"); // open the level file
wait (3); // wait a bit
while (file_str_read(level_handle, data_str) != -1) // run the loop until we reach the end of the file
{
Function read_level_data( ) sets the initial tile position to the values given by init_x and init_y (the upper left corner), and then opens the level.txt file. The loop that follows this instruction will run until we reach the end of the file (until file_str_read returns -1)
index = 0;
string_size = str_len(data_str);
while (index < string_size) // go through all the characters of the string (row), one by one
{
str_cpy (temp_str, data_str); // let's copy data_str to temp_str (we don't want to destroy it)
str_clip(temp_str, index); // cut the needed number of characters from the beginning of the string
str_trunc(temp_str, string_size - index - 1); // and cut the needed number of characters from the end as well
At this point, an entire line from our level.txt file was read, so data_str could look like this: wgggggggdgggsw. We need to access the individual characters, in order to create their associated tiles. First of all, we compute the length of the string and we store it inside the variable named string_size. Then, we run a loop that gets us all the individual characters by clipping a part from the beginning of the string and truncating a part from the end of the string. All these operations would destroy the data from our initial string - data_str - so they are made on a copy of it (temp_str); this way, the loop can run as many times as needed, until all the rows are created.
if (str_cmp(temp_str, "d") == 1) // the character that was read is a "d"?
{
temp_pan = pan_create("bmap = dirt.png;", layer_value); // then create a dirt panel
temp_pan.pos_x = tile_pos.x; // and place it at its proper position
temp_pan.pos_y = tile_pos.y; // on the x and y axis
temp_pan.flags |= VISIBLE; // and then make it visible
}
If the individual character that was isolated from the string is a "d" (a dirt panel), we create a dirt.png panel at the position given by tile_pos.x and tile_pos.y, and then we make it visible. Please note that we aren't using a fixed layer value, but a variable; this way, we can control if the rows below will appear over the top rows or not.
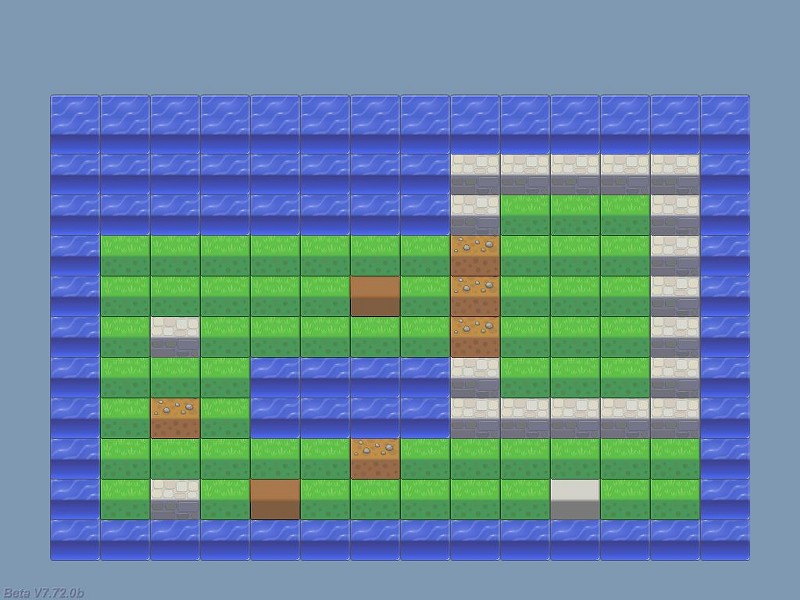
My demo increases the "layer" value for the panel rows as we move from the top to the bottom of the screen; if we wouldn't do that, the screen would look like this:
This might be exactly what you need for your tile set, depending on your imagination and its aspect. The code is similar for the rest of the tiles (grass, water, etc), so let's skip to the more interesting part.
if (str_cmp(temp_str, "g") == 1)
{
temp_pan = pan_create("bmap = grass.png;", layer_value);
temp_pan.pos_x = tile_pos.x;
temp_pan.pos_y = tile_pos.y;
temp_pan.flags |= VISIBLE;
}
if (str_cmp(temp_str, "p") == 1)
{
temp_pan = pan_create("bmap = plain.png;", layer_value);
temp_pan.pos_x = tile_pos.x;
temp_pan.pos_y = tile_pos.y;
temp_pan.flags |= VISIBLE;
}
if (str_cmp(temp_str, "s") == 1) // stone wall
{
temp_pan = pan_create("bmap = stone.png;", layer_value);
temp_pan.pos_x = tile_pos.x;
temp_pan.pos_y = tile_pos.y;
temp_pan.flags |= VISIBLE;
}
if (str_cmp(temp_str, "t") == 1)
{
temp_pan = pan_create("bmap = terrain.png;", layer_value);
temp_pan.pos_x = tile_pos.x;
temp_pan.pos_y = tile_pos.y;
temp_pan.flags |= VISIBLE;
}
if (str_cmp(temp_str, "w") == 1)
{
temp_pan = pan_create("bmap = water.png;", layer_value);
temp_pan.pos_x = tile_pos.x;
temp_pan.pos_y = tile_pos.y;
temp_pan.flags |= VISIBLE;
}
Right now, the code has checked what letter was read and has created the first tile in the row. The code below increases the value of tile_pos.x, preparing it for the second tile in the row. We increase index, making sure that the following character in the string is isolated, preparing for the following "str_cmp" check.
tile_pos.x += tile_width; // move on to the following tile (horizontally)
index += 1;
}
The last few lines run at the end of each row; the first one increases layer_value, making sure that the following tile row appears over the previous one. Once again, the picture above shows the aspect of the level if we comment the "layer_value += 1;" line of code. Then, we move at the left border of the 2D level and we increase the value of tile_pos.y, preparing for a new row of tiles. Finally, when all the rows were created, the level.txt file is closed.
layer_value += 1;
tile_pos.x = init_x; // move to the beginning of the following row
tile_pos.y += tile_height; // x is reset, y is incremented
}
file_close(level_handle); // so let's close the file
}
That's pretty much it! It's a simple snippet that gets the job done and can be used for huge 2D levels, even if they exceed the boundaries of the screen. Let's not forget that we are using a 2D / 3D engine, so let's unleash some of that 3D power right now! Open and run 2dtiles2.c:
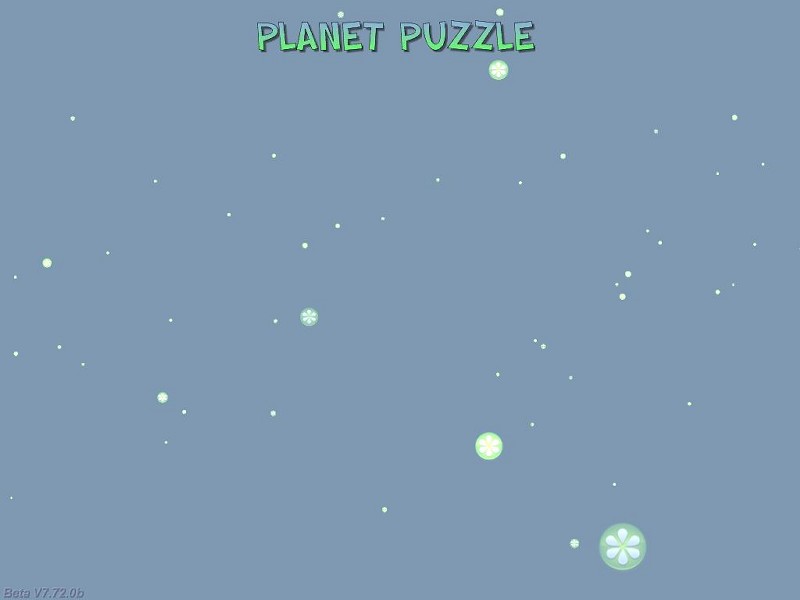
This time, we have got a title for our game and some green particles floating around. This demo builds on the previous example, so we'll only concentrate on the new stuff.
function main()
{
fps_max = 60;
video_mode = 8; // 1024x768
video_depth = 32; // 32 bit mode
video_screen = 1; // start in full screen mode
vec_set(sky_color, vector(178, 153, 128)); // set a pleasant, blueish background color
temp_pan = pan_create("bmap = title.tga;", 100);
temp_pan.pos_x = 325;
temp_pan.pos_y = 25;
temp_pan.flags |= VISIBLE;
level_load(NULL);
read_level_data(); // read the level elements
}
Function main might look similar to the one from the previous demo but it has two tiny, and yet significant differences:
- First of all we are using sky_color instead of screen_color because we are using a 3D level now, so screen_color can't do its job anymore.
- The second difference is the "level_load(NULL);" instruction, which loads an empty 3D level, allowing us to use the 3D power of the engine. As soon as this instruction is run, we can create 3D entities, place them in the level, move them around and so on. You will also note the lines of code that create the title bitmap, position it and make it visible.
function snow_startup()
{
VECTOR temp;
while (1)
{
temp.x = 1000 - random(2000);
temp.y = 1000 - random(2000);
temp.z = 200;
effect(snow_effect, 1, temp.x, nullvector);
wait (1);
}
}
function snow_effect(PARTICLE *p)
{
p->vel_x = 1 - random(2);
p->vel_y = 1 - random(2);
p->vel_z = -5 + random(3);
p.lifespan = 120;
p.alpha = 40 + random(50);
p.bmap = snow_png;
p.size = 3;
p.flags |= (BRIGHT | MOVE);
p.event = NULL;
}
The code that generates the snow particles is typical; it generates tiny snow_png bitmaps in an area that's placed -1000... +1000 quants around the origin on the X and Y axis and 200 quants above the origin on the Z axis. The particles have random vel_x and vel_y values and a negative vel_z value, so they always fall down. We aren't using an event function for the particles because we don't want them to fade.
Ok, but what do we do if we'd want the snow to cover our 2D tiles as well? The panels always cover the particles, right? As you know, GameStudio gets new features on an almost daily basis, and one of these newer features is the ability to define panels with negative layers, which will be rendered behind the particle effects. Here's what happens when I set layer_value to -100 at the beginning of function read_level_data( ).
All is well now, but our panels have disappeared completely; this happens because the sky_color vector isn't set to a transparent value. Let's change that right away by editing the line that sets the sky_color vector inside function main like this:
vec_set(sky_color, vector(0, 0, 0)); // set a transparent sky color
Now we're getting somewhere! The level is back, the particles appear over it, but the black borders around the screen aren't looking that nice, especially with those psychedelic particle trails over them. However, this can be easily fixed using a blueish panel frame that has a black (RGB = 000) cutout in the area that contains our 2D tiles.

I'm a nice guy, so I have included the border.tga file in the project folder in case that you want to achieve a similar effect. Another option would be to ent_create the snow, using sprites with a bigger layer instead of particles, but this would use more CPU resources. Now that we've got these things covered, let's move on to the 2dtiles3.c demo, which adds a few gameplay elements:
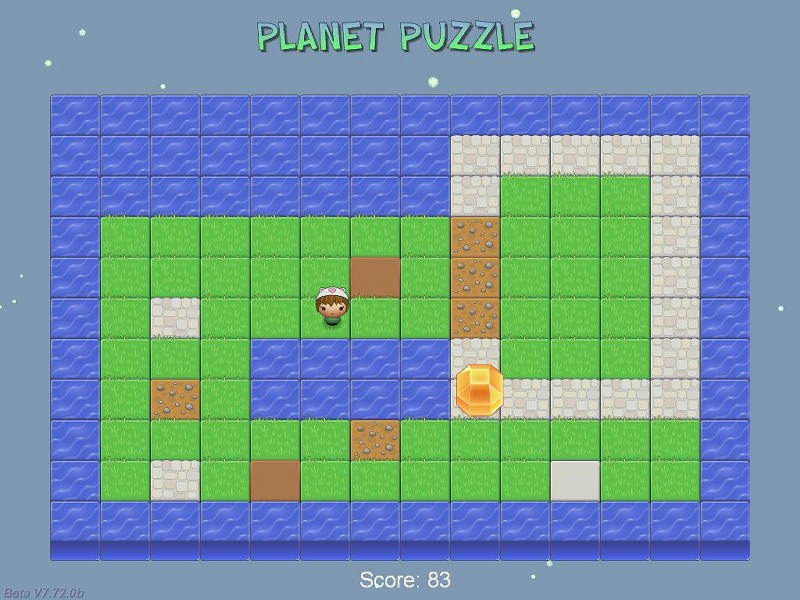
This time we can control a lovely player character using the arrow keys, collecting those huge yellow gems by running into them. Each time we collect a gem, a new one is created in another area of the level and the score value is increased. Let's see what has changed from the previous demo:
PANEL* player_pan;
PANEL* gem_pan;
PANEL* score_pan =
{
digits (460, 725, "Score: %.0f", arial_font, 1, game_score);
flags = SHOW;
}
First of all, we have defined two panel pointers for our player and for the gem, as well as a score panel that uses a "digits" instruction.
function player_startup()
{
VECTOR player_speed;
var horizontal_speed = 0;
var vertical_speed = 0;
player_pan = pan_create("bmap = player.png;", 150);
player_pan.pos_x = 383;
player_pan.pos_y = 225;
player_pan.flags |= VISIBLE;
player_pan.center_x = player_pan.size_x * 0.5;
player_pan.center_y = player_pan.size_y;
The function that controls the player creates its panel and places it at x = 383, y = 225 on the screen. As an alternative, we could have defined a special 2D tile symbol in our level.txt file for the player and create it, as well as a grass or dirt tile below it (with a smaller layer value) at the same time. We've only got a frame of our player, so we are going to rotate it a bit while it is moving, in order to create a simple, and yet fully functional animation effect. I have set the rotation point for the player panel at its feet.
while (1)
{
vec_set(player_speed.x, accelerate (horizontal_speed, 2 * (key_cur - key_cul), 0.3));
player_pan.pos_x += player_speed.x;
vec_set(player_speed.y, accelerate (vertical_speed, 2 * (key_cud - key_cuu), 0.3));
player_pan.pos_y += player_speed.y;
if (key_cul + key_cur + key_cuu + key_cud)
{
player_pan.angle += 0.3 * sin(40 * total_ticks);
}
else
{
player_pan.angle = 0;
}
wait (1);
}
}
We are using "accelerate" to move our player on the x and y axis; we can set individual values for acceleration (2) and friction (0.3). If at least one of the movement keys is pressed, the player panel will rotate a bit while it is moving; otherwise, the angle of the panel is set to zero.
function gem_startup()
{
VECTOR gem_pos;
while (1)
{
gem_pan = pan_create("bmap = gem.png;", 150);
gem_pan.pos_x = 200 + random(560);
gem_pan.pos_y = 150 + random(400);
gem_pan.flags |= VISIBLE;
while ((abs(player_pan.pos_x - gem_pan.pos_x) > 30) || (abs(player_pan.pos_y - gem_pan.pos_y) > 30))
{
wait (1);
}
snd_play(gem_wav, 100, 0);
game_score += 5 + random(10); // add a random score value to game_score
ptr_remove(gem_pan); // remove the gem - the player has collected it!
wait (1);
}
}
The function that controls the gem places it in a random position inside our 2D level and makes it visible. We are using a primitive collision detection mechanism (hey, it works!) to detect if the player has come close enough to the gem or not. As soon as the player has come close, a gem_wav sound is played, the score is increased with 5... 15 points and the gem panel is removed, allowing another gem to be created in another random area of the 2D level.
Right now, our player can walk over water and even outside of the level, but we will deal with these issues next month. I'll see you then!