Welcome to the last episode of this workshop series! I hope that you had a lot of fun as we've built various weapons during the past months; this time we are going to build a nuclear weapon and perimeter sensors, those laser rays that can protect our most valuable possessions (the fridge, for example). Let's start with the perimeter sensors; copy the \weapons6 folder inside Gamestudio's installation folder, and then open and run the weapons6.c script.
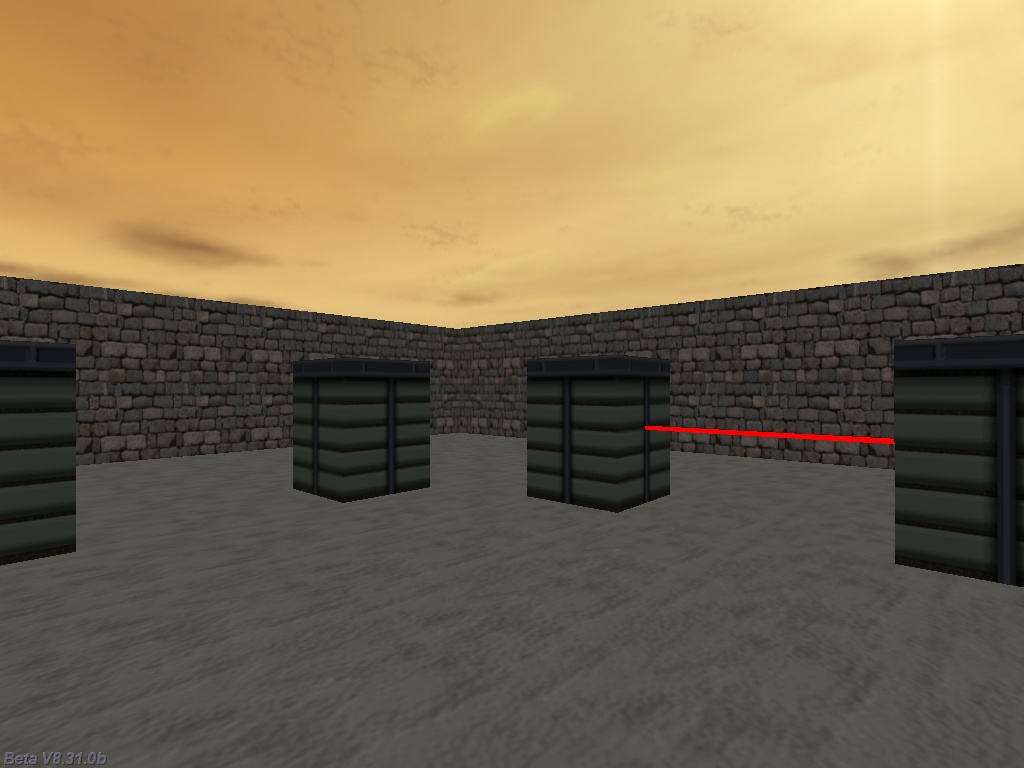
The red laser ray in front of you will be on forever, while the one on the left will blink, allowing you to pass without triggering the alarm if it is off. Why would they want to have these blinking laser rays in some movies goes beyond my imagination; I guess that they've either made a partnership with the intruders or they're trying to cut down the electricity bills. Anyway, if you run into one of the red laser rays you will trigger an alarm, so let's see the code that does that.
action sensor_alarm()
{
set (my, PASSABLE|LIGHT);
vec_set(my.blue, vector(0, 0, 255)); // and has a red color
while (!player) {wait (1);}
VECTOR trace_pos1, trace_pos2;
var alarm_handle;
while (1)
{
vec_for_vertex(trace_pos1, my, 26); // get the position of the 4th vertex of the laser barrier model
vec_for_vertex(trace_pos2, my, 25); // get the position of the 6th vertex of the laser barrier model
if ((c_trace(trace_pos1.x, trace_pos2.x, IGNORE_ME | IGNORE_PASSABLE | IGNORE_WORLD) > 0) && (you == player)) // the c_trace ray has hit the player?
{
if (!snd_playing(alarm_handle))
alarm_handle = ent_playsound(my, alarm_wav, 200);
}
wait (1);
}
}
You are right, it's a surprisingly simple action; it makes the laser ray model passable, setting its color to RGB = 255 0 0. We set the vertex tracing positions at the extremities of the red cylinder model which is used as a laser ray (vertices 25 and 26 in this case), and then we use a c_trace instruction which tries to detect the player, ignoring the cylinder model (IGNORE_ME), the passable entities (IGNORE_PASSABLE) and the walls (IGNORE_WORLD). We ignore the walls because our c_trace instruction should do its job even if a small part of the cylinder model has penetrated the walls.
If the player is detected and the alarm sound isn't playing yet, we start it - that's all! The code for the blinking perimeter sensor is very similar, so let's take a look at it as well.
action sensor_alarm2()
{
set (my, PASSABLE|LIGHT); // the laser ray model is made transparent
vec_set(my.blue, vector(0, 0, 255)); // and has a red color
while (!player) {wait (1);}
VECTOR trace_pos1, trace_pos2;
var laser_timer = 0;
var alarm_handle;
while (1)
{
set (my, INVISIBLE); // make the barrier invisible
wait (-1);
reset (my, INVISIBLE); // now display the barrier
laser_timer = 0;
while (laser_timer < 1) // for a second
{
laser_timer += time_step / 16; // add a value of 1 to laser_timer each second
vec_for_vertex(trace_pos1, my, 26); // get the position of the 4th vertex of the laser barrier model
vec_for_vertex(trace_pos2, my, 25); // get the position of the 6th vertex of the laser barrier model
if ((c_trace(trace_pos1, trace_pos2, IGNORE_ME | IGNORE_PASSABLE | IGNORE_WORLD) > 0) && (you == player)) // the c_trace ray has hit the player?
{
if (!snd_playing(alarm_handle))
alarm_handle = ent_playsound(my, alarm_wav, 200);
}
wait (1);
}
}
}
As you can see, the only significant difference can be found inside the while (1) loop; this is where we make the laser barrier invisible, and then visible, each second. We use a "wait (-1);" instruction to hide the red laser for 1 second, but we can't use a similar wait (-1) instruction for the part that shows the red laser for 1 second, because we want out c_trace instruction to run each and every frame while the laser barrier is being displayed.
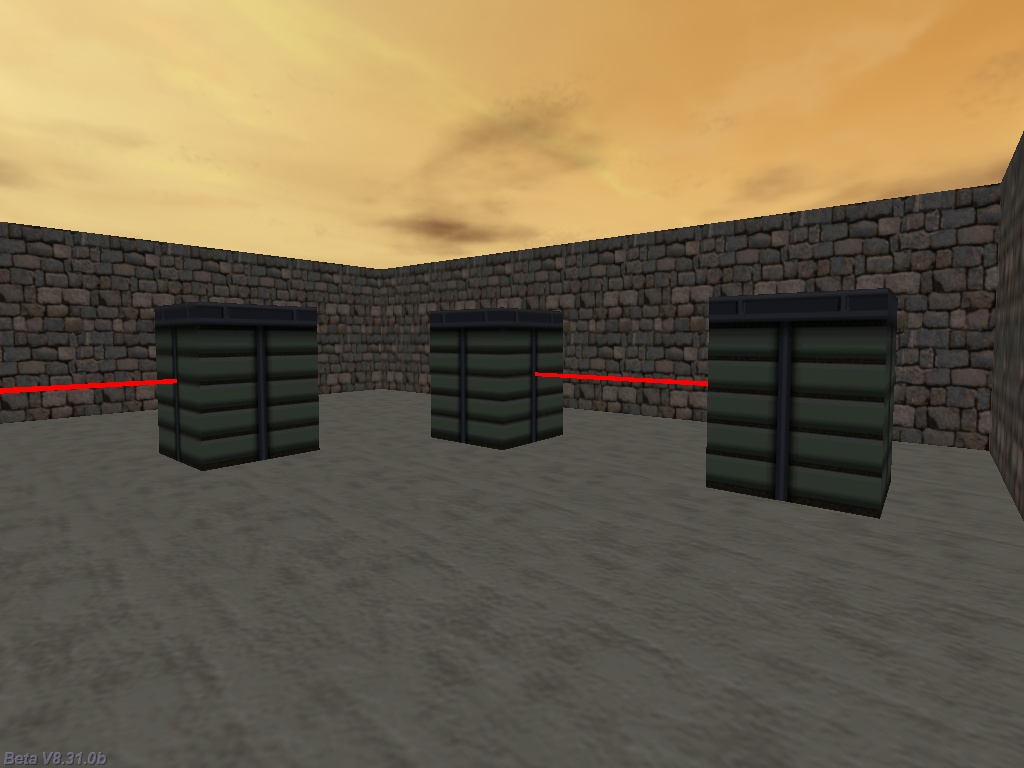
You might have noticed another laser barrier on the right side; this time we are using the sensor_damage( ) action, which detects the player and can kill it if it doesn't move away from the barrier fast enough.
action sensor_damage()
{
set (my, PASSABLE|LIGHT); // the laser ray model is made transparent
vec_set(my.blue, vector(0, 0, 255)); // and has a red color
while (!player) {wait (1);}
VECTOR trace_pos1, trace_pos2;
var alarm_handle;
while (1)
{
vec_for_vertex(trace_pos1, my, 26); // get the position of the 4th vertex of the laser barrier model
vec_for_vertex(trace_pos2, my, 25); // get the position of the 6th vertex of the laser barrier model
if ((c_trace(trace_pos1.x, trace_pos2.x, IGNORE_ME | IGNORE_PASSABLE | IGNORE_WORLD) > 0) && (you == player)) // the c_trace ray has hit the player?
{
if (t_players_health > 0)
{
t_players_health -= 1 * time_step;
camera.arc += 3 - random(6);
if (!snd_playing(alarm_handle))
{
alarm_handle = snd_play(scream_wav, 100, 0);
}
}
}
else
{
camera.arc = 90;
}
wait (1);
}
}
The only lines that need to be discussed are these ones:
if (t_players_health > 0)
{
t_players_health -= 1 * time_step;
camera.arc += 3 - random(6);
if (!snd_playing(alarm_handle))
{
alarm_handle = snd_play(scream_wav, 100, 0);
}
}
As you might remember from an earlier episode of the series, we are using the player template code, and the variable named t_players_health stores and sets its health value. If the c_trace instruction detects the player, it will reduce its health and will set a slightly random camera.arc value each frame - you can do some serious eye damage if you increase the "3" and "6" values, trust me!
Let's test the nuclear weapon, shall we? Open the weapons7.c script inside the \weapons7 folder, and then run it.
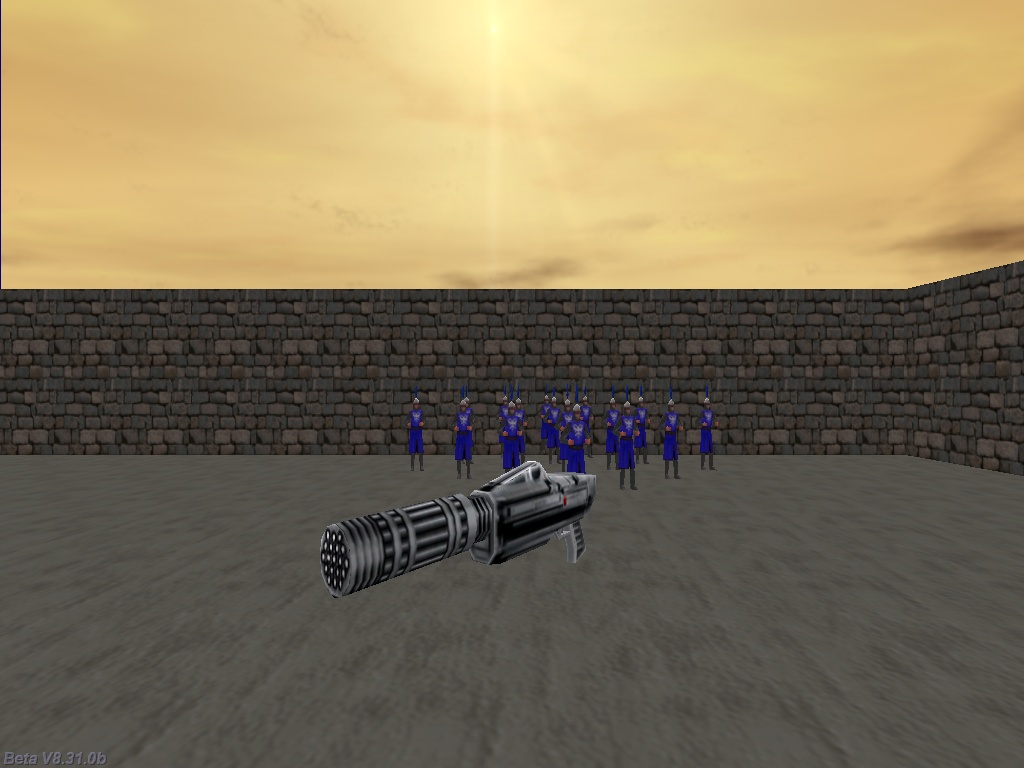
We've got a small army in front of us, but you don't have to worry about them; first of all, they're dummy enemies, so they're only able to die, and apart from that the weapon we've got is very powerful - see what I did after firing a single nuclear bomb.
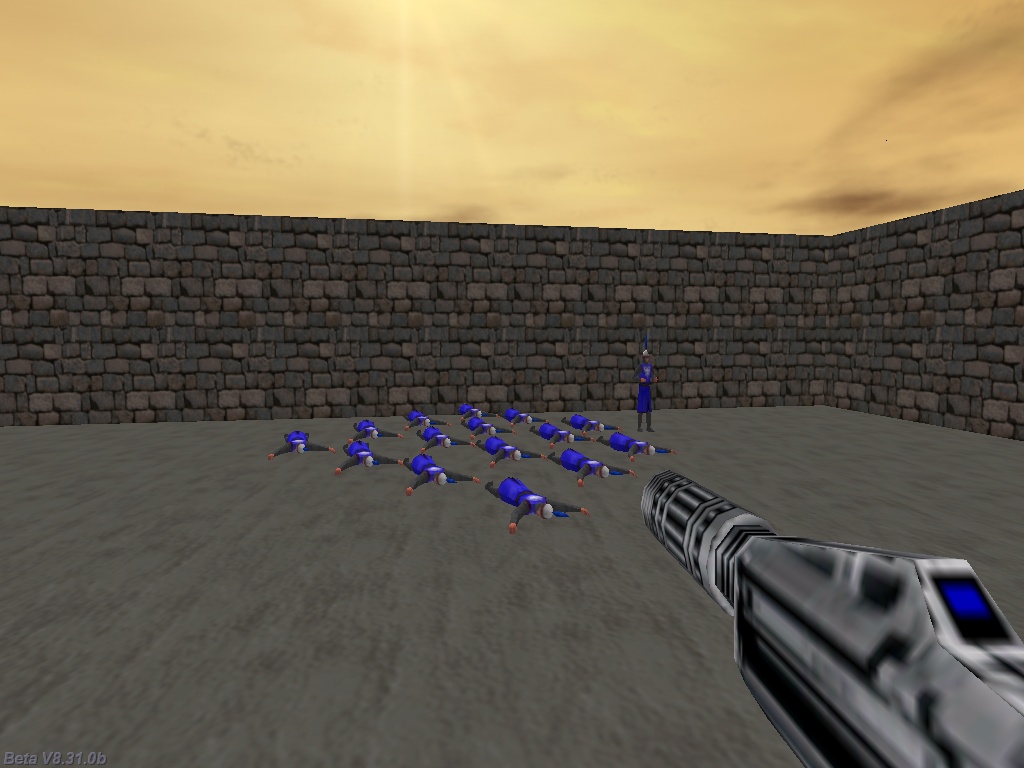
I've got a feeling that the guy that managed to survive doesn't feel too well either ;). Anyway, this weapon uses a c_scan instruction that runs for as long as the projectile is moving, killing all the entities in the area immediately. As an example, this weapon could kill even the enemies that are placed behind walls, drinking hot coffee in their evil homes, and so on.
The actual bomb is a rocket model with a huge particle-based trail; take a look at the picture below to see how it looks.

Time to examine the code that makes it all happen.
action nuke_launcher() // attach this action to your nuke weapon model
{
set (my, PASSABLE);
while (!player) {wait (1);}
while (vec_dist(player.x, my.x) > 50) // wait until the player has come close to the nuclear weapon model
{
my.pan += 3 * time_step; // rotate until the player picks up the nuke weapon
wait (1);
}
snd_play(gotweapon_wav, 80, 0); // play the "got the weapon" sound
nuke_weapon = ent_createlayer("nuke.mdl", 0, 20); // create the nuke entity on the 20th view layer
nuke_weapon.flags2 |= SHOW; // show the nuke weapon entity
nuke_weapon.x = 60; // 60 quants ahead of the view, play with this value
nuke_weapon.y = -35; // 35 quants towards the right side of the screen, play with this value
nuke_weapon.z = -25; // 25 quants below, play with this value
wait (1);
ent_remove (my); // remove the nume model from the ground
}
The nuke launcher is passable and will rotate with the speed given by 3 * time_step until the player comes closer than 50 quants to it. When this happens, we play a sound, and then we create a nuke.mdl entity, we display it and then we set its xyz position. We wait for a frame, and then we remove the model from the ground.
function fire_nukes() // this function is triggered by any left mouse button push
{
wait (1);
var firing_once = 1;
var init_nuke_pos;
VECTOR nuke_origin;
if (!nuke_weapon) return; // don't fire bullets if the player didn't pick up the nuke gun yet
vec_set(nuke_origin.x, vector(50, -12, -7)); // the origin of the nuke is offset by 50, -12 and 7 quants in relation to camera.x
vec_rotate(nuke_origin.x, camera.pan);
vec_add(nuke_origin.x, camera.x);
ent_create(nukebomb_mdl, nuke_origin, move_nukebomb);
init_nuke_pos = nuke_weapon.x;
while (nuke_weapon.x > (init_nuke_pos - 5)) // give the gun a recoil movement and move the player backwards a bit
{
nuke_weapon.x -= 15 * time_step;
c_move (player, vector (-30 * time_step, 0, 0), nullvector, IGNORE_PASSABLE | USE_BOX | GLIDE);
wait (1);
}
while (nuke_weapon.x < init_nuke_pos)
{
nuke_weapon.x += 10 * time_step;
wait (1);
}
nuke_weapon.x = init_nuke_pos;
}
function gun_startup()
{
on_mouse_left = fire_nukes; // call this function when the left mouse button is pressed
}
Function fire_nukes is run each time the player presses the left mouse button. When this happens, we set the origin of the bomb to xyz = 50, -12, 7 quants in relation to the center of the screen, and then we create the nukebomb_mdl entity, making it run the move_nukebomb() function. This is a big gun, so it will produce a big recoil, moving backwards quite a bit and also moving the player backwards. We use two short "while" loops for this; the first one moves the player backwards with the speed given by -30 * time_step.
function move_nukebomb()
{
VECTOR nuke_speed, nuke_pos;
var tempo_pos, vertical_speed = 0;
set (my, PASSABLE); // don't collide with the player
wait (1);
my.pan = camera.pan + 5;
my.tilt = camera.tilt;
my.emask |= (ENABLE_ENTITY | ENABLE_IMPACT | ENABLE_BLOCK);
my.event = remove_nuke;
my.skill40 = 1235; // I'm a nuke
my.skill20 = 0;
while (my.skill20 < 5000)
{
vec_for_vertex (nuke_pos, my, 13);
effect (nuke_trail, 2, nuke_pos.x, normal); // generate a particle trail
if (my.skill20 > 2) // the nuke has moved away from the player? Then let's reset its passable flag
reset (my, PASSABLE);
nuke_speed.x = 60 * time_step;
nuke_speed.y = 0;
nuke_speed.z = 0;
my.skill20 += 1 * time_step;
c_move (my, nuke_speed, nullvector, IGNORE_PASSABLE);
c_scan(my.x, my.pan, vector(360, 180, 200), IGNORE_ME | SCAN_ENTS); // play with 200, it gives the nuke destruction range
wait (1);
}
remove_nuke();
}
Function move_nukebomb() controls the movement of the projectile; it will be passable at first, until it moves away from the player. The bomb is sensitive to impact with other entities and level blocks and runs its remove_nuke() even function as soon as it collides with something. We are setting its skill40 to 1235 to uniquely identify this type of projectiles; it's something that might prove to be useful in the future, if we decide to (just an example) display different hit holes on the walls depending on the projective that was fired.
The projectile will explode after a certain amount of time even if it didn't hit anything; play with 5000 to adjust that. The nuke will generate particles from its 13th vertex and will move with a speed that is given by 60 * time_step. The c_scan instruction will damage all the entities that are sensitive to scanning on a range of 200 quants; you can change this value until it fits your needs, of course.
function remove_nuke()
{
my.event = NULL;
set(my, PASSABLE | INVISIBLE);
if (you)
you.skill99 = 0; // kill the enemies from the first shot
my.skill20 = 5000; // stop the nuke for good
wait (1);
ent_playsound (my, exploded_wav, 1000); // play the explosion sound
ent_create (explo13_tga, my.x, explode_nuke);
wait (-1);
ent_remove(my); // now remove it
}
function explode_nuke()
{
set(my, BRIGHT | PASSABLE);
VECTOR temp;
my.frame = 0;
wait (1);
while (my.frame < 13) // go through all the animation frames
{
my.frame += 2 * time_step;
vec_set (temp.x, camera.x);
vec_sub (temp.x, my.x);
vec_to_angle (my.pan, temp); // turn towards the player to make sure that the explo looks great
wait (1);
}
set (my, INVISIBLE); // hide the explosion sprite, keep the sound playing
wait (-4); // for 4 more seconds
ent_remove(me); // now remove the explosion sprite
}
The nuke explodes when it collides with something or when it has traveled a long distance without hitting anything. If it detects an enemy, it sets its skill99 to zero, killing it instantly. The explode_nuke function controls an animated sprite, rotating it towards the player at all times, making it invisible for 4 seconds, and then removing it.
function fade_trail(PARTICLE *p)
{
p.alpha -= 25 * time_step;
if (p.alpha < 0) {p.lifespan = 0;}
}
function nuke_trail(PARTICLE *p)
{
p->vel_x = 0;
p->vel_y = 0;
p->vel_z = 0.1 * random(3);
p.alpha = 10 + random(40);
p.bmap = trail_tga;
p.size = 30 + random(60);
p.flags |= (BRIGHT | MOVE);
p.event = fade_trail;
}
Finally, these standard particle functions will create the white trail, with a random particle size that ranges from 30 to 90.
I hope that you have managed to learn at least a few things from these workshops; the weapon series is over, so next time we are going to start creating something new. I'll see you then!