Our community project is progressing, even though it's making smaller steps these days because the team consists of a single artist, two programmers and a sound / music designer. I'm going to post news about the J, j & BUM project from time to time, but I figured that meanwhile I should fill the Aum51... Aum66 workshops gap; there's a lot of good info in those workshops, but they need to be updated because the engine has evolved a lot since then, so the code needs to be improved and converted to lite-C. For those of you that didn't know it, the first magazine that uses the new lite-C programming language is Aum67 and Aum51 was the first magazine to continue the official tutorial workshops.
These things being said, let's revisit c_trace and learn how we can use it in our projects, shall we?
The c_trace instruction is very powerful; its role is to trace a virtual line between two positions chosen by us, trying to detect if there's an obstacle in the way or to measure the distance to a certain obstacle. The tracing ray can be taught to ignore certain entities, level blocks, sprites, etc and can be thin or thick, depending on our needs. In addition to this, the c_trace ray can trigger the events for our entities, can detect the texture name and the brightness for the surface that was hit, the number of the closest vertex on the model that was hit by the tracing ray, and so on.
You can find out everything about c_trace by looking it up in the manual, but I hope that my brief description has demonstrated its power - I know I could barely create an interesting game without using it! Whenever you want to create a good weapon, want to detect if an enemy can see the player or simply want to place player's feet on the ground, c_trace is the answer. OK, enough talk! Let's fire up the first example by opening and running the ctrace1.c script.
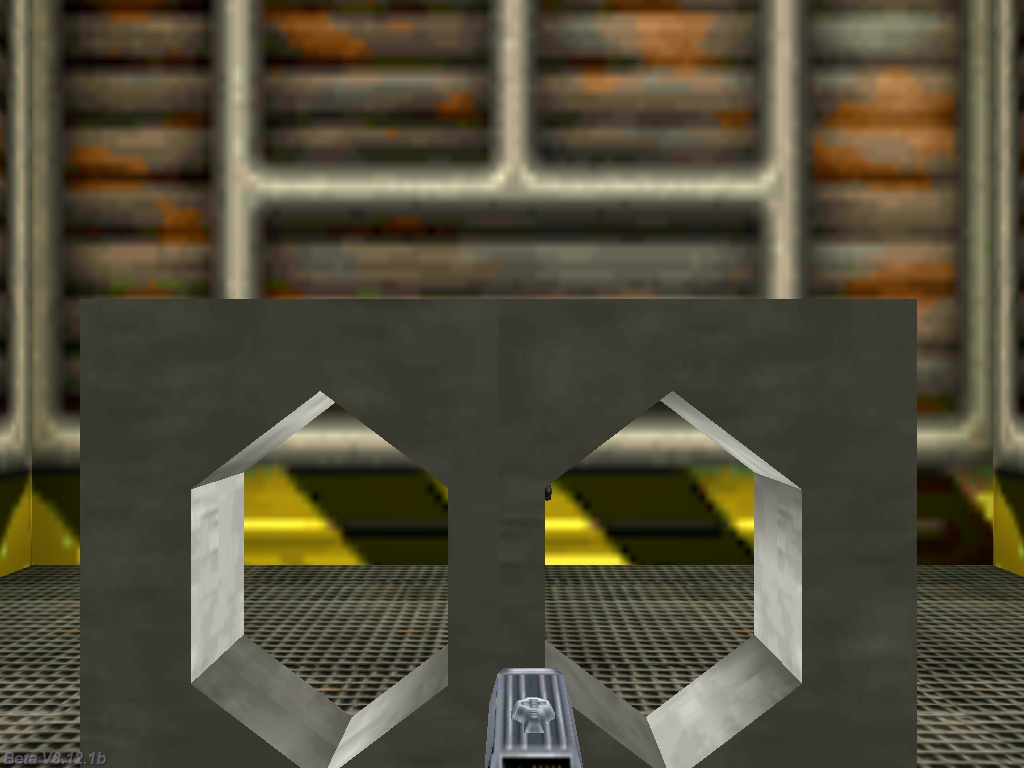
As you can see, the player has got a weapon, but he can't move (that was intended) and there's a wmb entity that's blocking its view. Use the mouse wheel or the "Z" and "X" keys to move the entity sideways, and then press and hold the left mouse button.
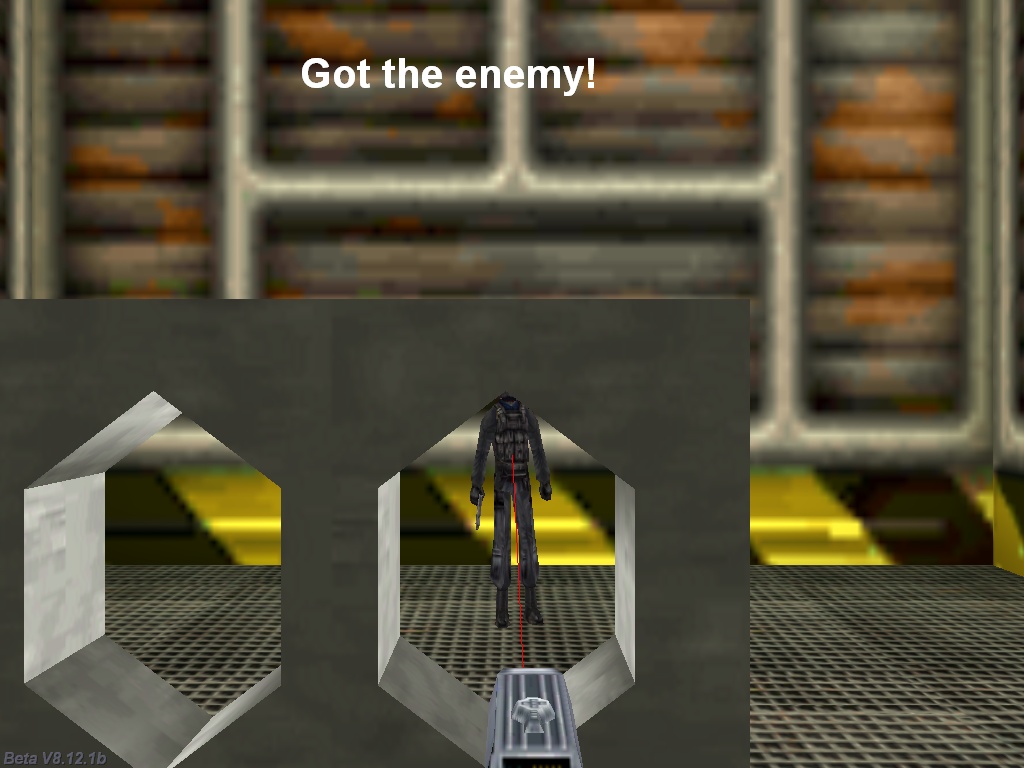
You will notice a thin red line that emerges from our weapon model and triggers a "Got the enemy!" message at the top of the screen if it hits the enemy.
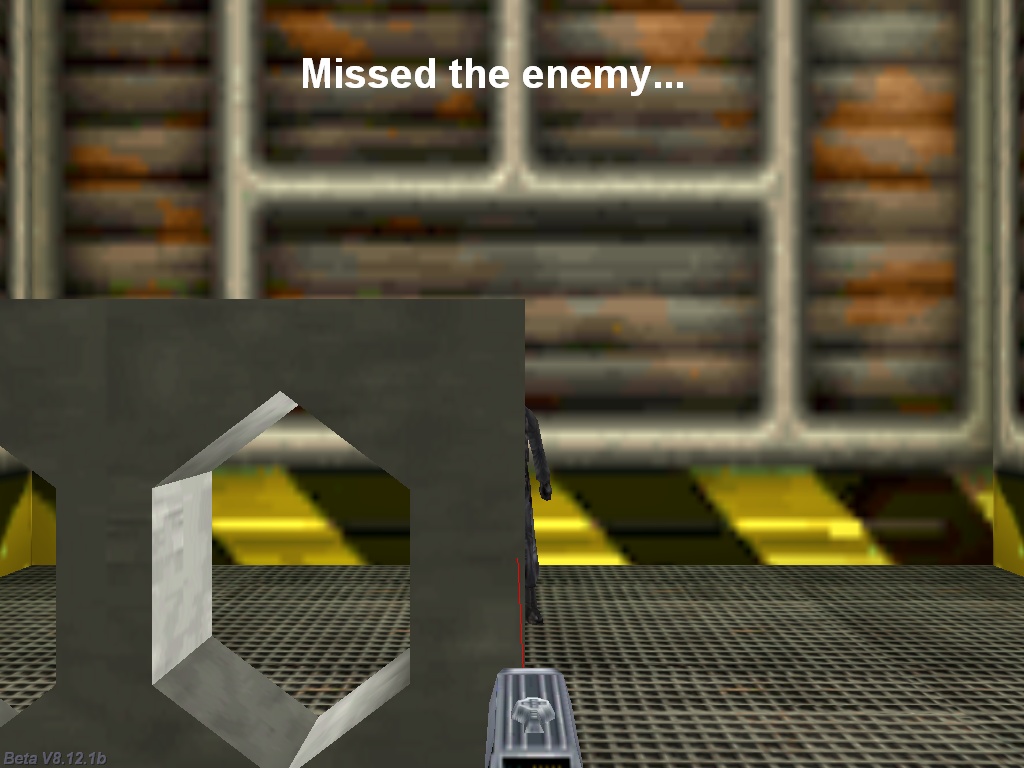
A "Missed the enemy..." message will be displayed if player's weapon can't hit the enemy. That thin red line is drawn on purpose, but our c_trace instruction behaves just like that (the c_trace ray isn't visible, though). Let's examine the code inside the ctrace1.c file:
STRING* ctrace1_wmb = "ctrace1.wmb";
ENTITY* enemy;
ENTITY* weapon;
FONT* arial_font = "Arial#48b";
function fire_weapon();
TEXT* status_txt =
{
pos_x = 300;
pos_y = 50;
font(arial_font);
}
function main()
{
video_mode = 8; // 1024x768 pixels
video_screen = 1; // start the engine in full screen
level_load (ctrace1_wmb);
on_mouse_left = fire_weapon;
}
There isn't too much to talk about until now; the only important thing to mention is the fire_weapon( ) function, which will be triggered each time the player presses the left mouse button.
action my_enemy()
{
enemy = my; // I'm the enemy!
}
action my_weapon()
{
weapon = my; // I'm player's weapon
}
action moving_wall() // moves the wall directly by changing its y coordinate
{
while (1)
{
my.y += 0.1 * (mickey.z + 5 * (key_x - key_z)) * time_step;
wait (1);
}
}
The actions above give meaningful names (using previously defined entity pointers) to our enemy and weapon and allow us to control the movement of the wmb entity using the mouse wheel or the "Z" and "X" keys.
function fire_weapon()
{
while (mouse_left)
{
c_trace (weapon.x, enemy.x, IGNORE_ME); // trace from the weapon to the enemy
draw_line3d(weapon.x, NULL, 100);
draw_line3d(enemy.x, vector(0, 0, 255), 100);
set(status_txt, SHOW); // show the text
if (you == enemy) // got the enemy?
{
str_cpy ((status_txt.pstring)[0], "Got the enemy!");
}
else // an obstacle was hit along the c_trace ray?
{
str_cpy ((status_txt.pstring)[0], "Missed the enemy...");
}
wait (1);
}
wait (-1); // display the text for one more second
reset(status_txt, SHOW); // and then hide the text
}
As you know, the function above is run each time the player presses the left mouse button. The "while" loop inside it traces between the weapon and the enemy and the two draw_line3d lines of code draw that thin red line; they aren't needed, but I thought that they will help you understand c_trace's mechanism better. The first draw_line3d line simply initializes the instruction, while the second line does the actual line drawing.
The following line of code makes status_txt visible; if our c_trace instruction has hit the enemy (you == enemy) we display the "Got the enemy!" text; otherwise, we will display the "Missed the enemy..." message. The loop will run until the left mouse button is released; the message will be displayed for one more second, and then it will be removed.
It's time to examine the inner works of the c_trace instruction; its general form is:
c_trace(start, target, mode);
First of all, we need to specify the starting point, which can be vector, an entity's position, etc; the same thing applies to the "target". Finally, "mode" sets the behavior of the tracing ray. The manual includes a comprehensive "mode" list, but the most often parameters are these ones:
- IGNORE_ME, which ignores the "me" entity;
- IGNORE_YOU, which ignores the "you" entity;
- IGNORE_PASSABLE, which ignores all passable blocks and entities.
- USE_BOX, which uses the bounding box of the me (my) entity, tracing a thick ray rather than a thin c_trace line;
- SCAN_TEXTURE, which retrieves the texture name, vertex number, flags, brightness and light color of the hit surface.
These modes can be combined, but don't forget that USE_BOX and SCAN_TEXTURE are mutually exclusive, so only use one of them in a c_trace instruction; it's OK to use two different c_trace instructions one after the other if you need to use both modes for a single entity.
OK, let's throw in a few quick examples:
c_trace (weapon.x, enemy.x, IGNORE_ME);
Believe it or not, this is the exact c_trace instruction from our demo! It uses our weapon's xyz coordinates as its starting point and the enemy's xyz coordinates as the target, ignoring the "me" entity - this would come in handy if the tracing would be performed in the action attached to (let's say) our player model and we wouldn't want our c_trace line to hit its body and count it as an obstacle. Btw, c_trace sets the "you" pointer to the name of the entity that was hit by the tracing ray; in our demo it will be set to "enemy" if we manage to shoot the enemy.
c_trace (player.x, vector(1000, 2000, 3000), IGNORE_ME | USE_BOX);
The example above uses player's coordinates as a starting point, a position at x = 1000, y = 2000, z = 3000 as the target and tells the tracing ray to ignore the potential intersection with player's model (IGNORE_ME), using a thick tracing line that's got the size of player's bounding box (USE_BOX). Without USE_BOX, our tracing ray would easily go through small spaces / holes, just like in our demo, but with a big gun model and USE_BOX, the player wouldn't be able to shoot an enemy through a crack in a wall, etc.
Time for another example: open ctrace2.c and then run it.
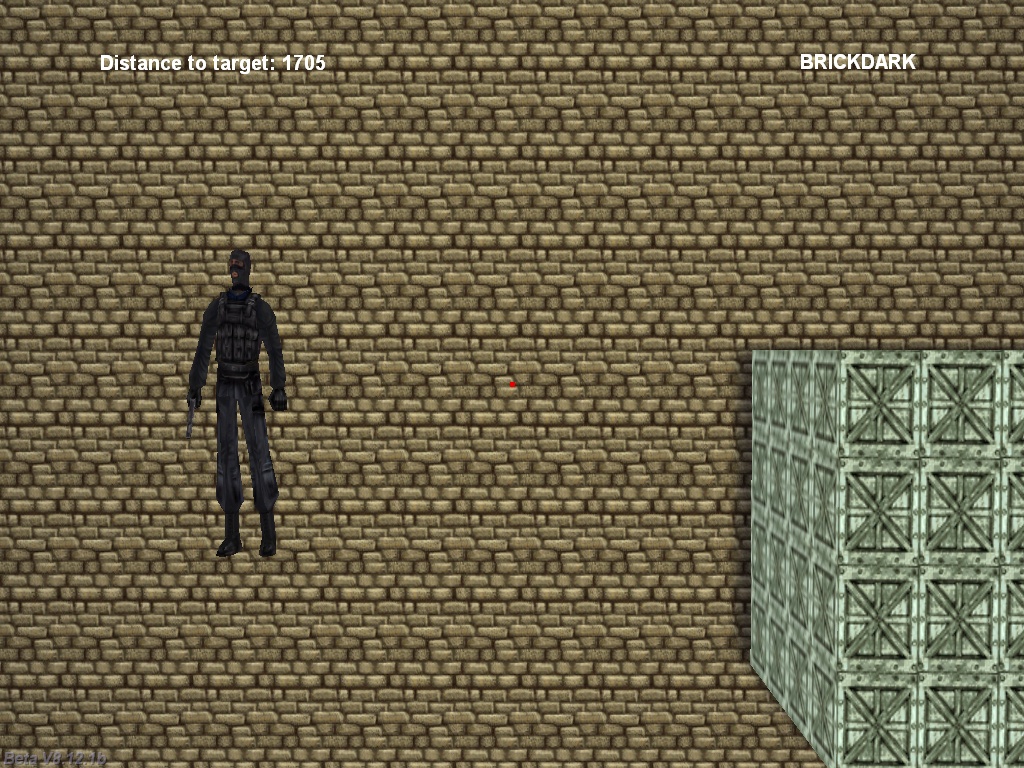
You can see two indicators at the top of the screen: "Distance to target" and "BRICKDARK"; the first one shows the distance from the camera to the red dot (actually, it's a red model), while the second one shows the name of the texture that was hit by the tracing ray. Move the camera around using the mouse and you will see that the distance changes.
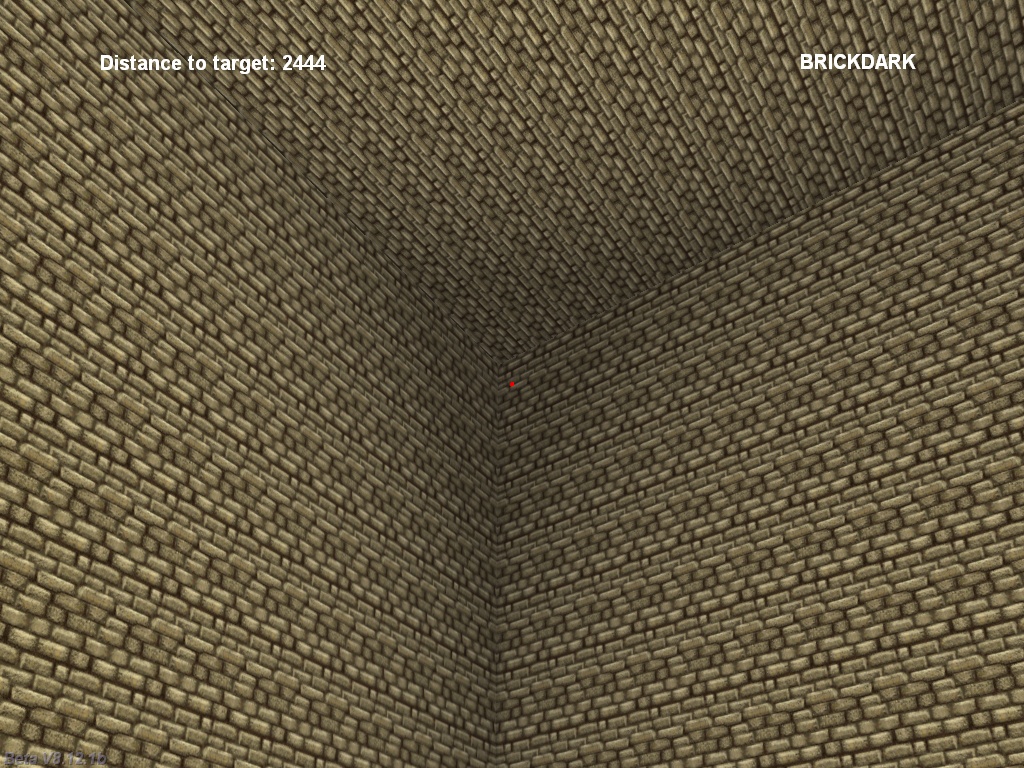
This would easily allow you to add a distance indicator to your sniper gun, right? Also, make sure to rotate the camera until the red dot hovers above the enemy soldier, the way I did it in the picture below.
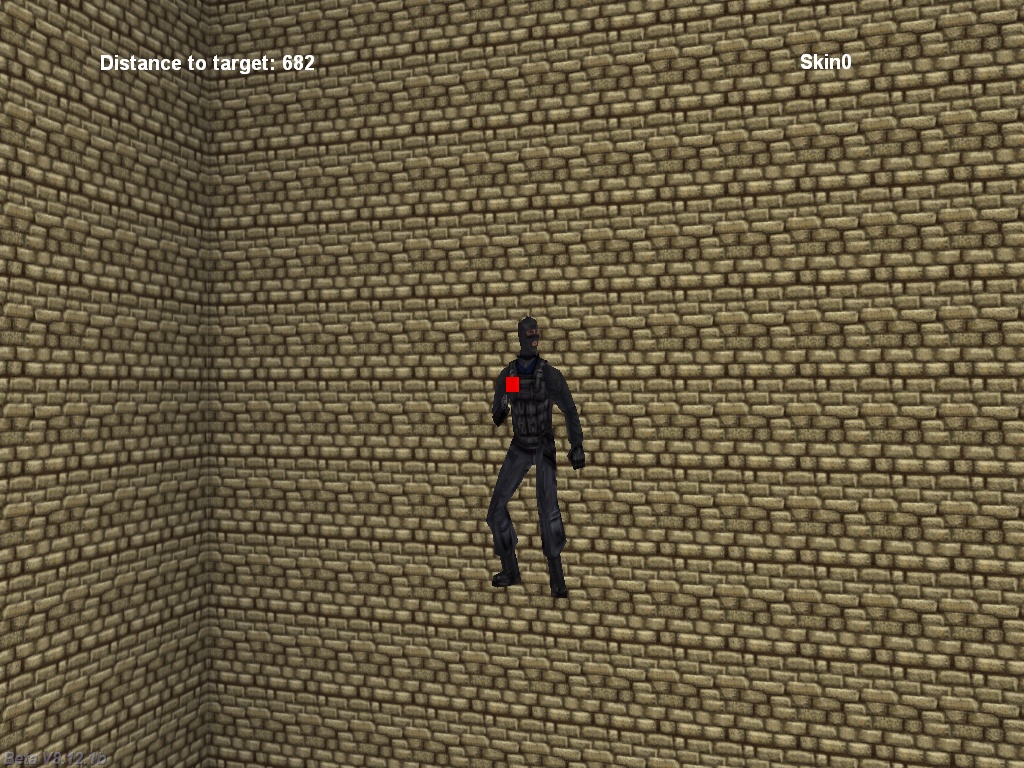
As you can notice, the name of the texture has changed to Skin0, which is the exact name of our enemy model skin. Finally, move the red dot above the gray boxes; the name will change to "BOXMETAL" because the tracing ray has hit a new texture named "BOXMETAL".

While getting the distance to any object can be very useful for most games, getting the texture name might not appear to be very useful - why would we want to do that? I'm sure that you might have your own ideas, but let me give you a simple example: we've got this Thief-like game where the player needs to sneak inside a castle and its footsteps make different noises depending on the surface he walks on: carpets, stone, grass, etc. I'd say that this is powerful stuff, so let's examine the code for ctrace2.c and see how it's done.
var trace_dist = 0;
STRING* ctrace2_wmb = "ctrace2.wmb";
FONT* arial_font = "Arial#24b";
function create_target();
TEXT* name_txt =
{
pos_x = 800;
pos_y = 50;
font(arial_font);
string(tex_name);
flags = SHOW;
}
The text definition above displays the name of the texture that was hit by our tracing ray; as you can see, that name is stored inside the predefined "tex_name" string. It's a regular string, so we could use something like "if (str_cmpi(tex_name, "DARKBRICK") == 1) do something" to track a certain texture name and it will work fine.
PANEL* distance_pan =
{
pos_x = 100;
pos_y = 50;
digits (0, 0, "Distance to target: %.0f", arial_font, 1, trace_dist);
flags = SHOW;
}
This panel displays the distance to the target using a simple "digits" instruction.
function main()
{
video_mode = 8; // 1024x768 pixels
video_screen = 1; // start the engine in full screen
level_load (ctrace2_wmb);
}
function trace_startup()
{
VECTOR target_pos;
vec_set(camera.x, vector(200, 0, 0));
while (1)
{
camera.pan -= 7 * mouse_force.x * time_step;
camera.tilt += 5 * mouse_force.y * time_step;
vec_set (target_pos.x, vector(10000, 0, 0));
vec_rotate (target_pos.x, camera.pan);
vec_add (target_pos.x, camera.x);
trace_dist = c_trace (camera.x, target_pos.x, SCAN_TEXTURE);
ent_create("target.mdl", hit.x, create_target);
wait (1);
}
}
The function above does the bulk of the job and it's not complicated at all! We define a vector named "target_pos", which will serve as the target for our c_trace instruction, and then we set the camera in the level as x = 200, y = 0, z = 0. The "while" loop allows us to control the camera orientation (pan / tilt) using the mouse. Then, we've got 3 lines of code which place our target_pos vector 10,000 quants in front of the camera, regardless of its orientation, just like in the picture below.
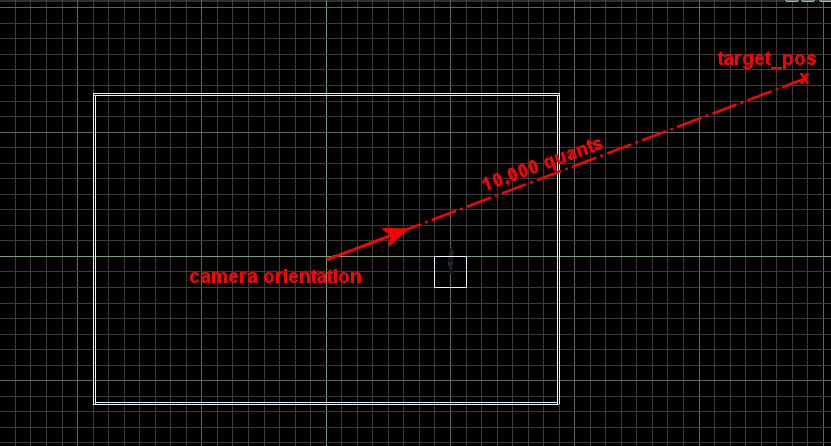
Just imagine that target_pos is a point that's placed far, far away from you, being placed 10,000 quants in front of your eyes no matter how you rotate your head - that's what we've coded here. As you can see, target_pos is actually placed way outside the level border, but c_trace will just return the distance between the starting point (the camera) and the wall area that is hit by the tracing ray. Let's copy the last few lines inside function trace_startup( ) below, so that we can take a better look at them:
trace_dist = c_trace (camera.x, target_pos.x, SCAN_TEXTURE);
ent_create("target.mdl", hit.x, create_target);
As you see, our c_trace instruction uses the camera as its starting point and the target_pos vector as its destination, the tracing mode being "SCAN_TEXTURE", which does just that - it return the name of the texture that was hit by the tracing ray. The name of the hit texture is copied to the tex_name string and the distance to the target is returned as a result of the c_trace instruction, so we use our previously defined variable named "trace_dist" to store it. The second line of code creates our red "target.mdl" model at the position given by "hit", a structure that can offer us a lot of valuable information, such as the hitting position of the c_trace ray, the texture color, etc.
function create_target()
{
set(my, PASSABLE);
wait (1);
ent_remove(my);
}
This last function simply lets the little red square live for a frame, and then it removes it because a fresh red little square will be create by our constantly running "while (1)" loop.
I'll see you all next month, when we will have a revamped version of the "c_trace reloaded" workshop which discusses more advanced c_trace techniques (using fresh examples, of course).