This workshop will teach us all there is to know about sounds and music. First of all, let's take a quick look at a table that shows the most important multimedia instructions.
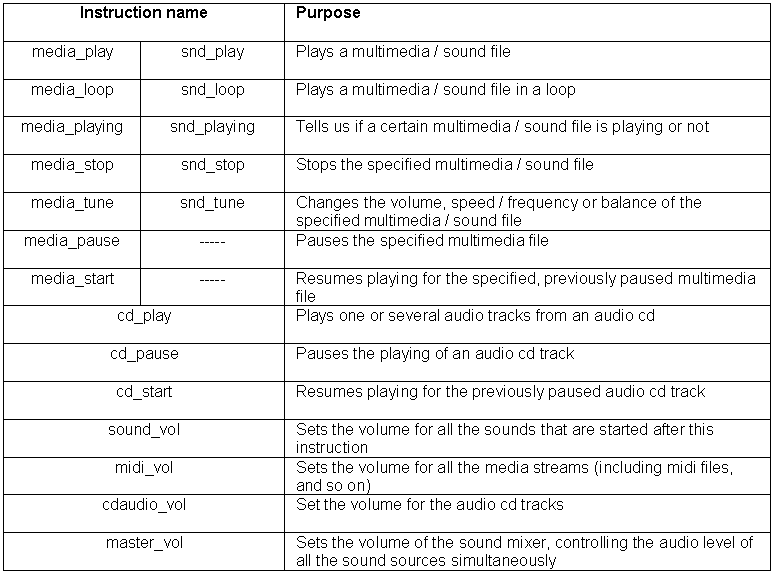
As you can see, we can use media_xyz and snd_xyz instructions for most operations; however, the older snd_xyz instructions are still useful because they load the sounds in memory at game start and keep them there, while the media_xyz instructions load the multimedia files (sounds, movies, etc) from the hard disk at runtime, so they aren't the best option when it comes to playing a long sound instantly or when we want to play a bigger sound in a loop. Don't worry, we'll get to play with these things quite soon.
If you don't like to code, you can play with sounds by simply placing them in the level in Wed, as indicated below.
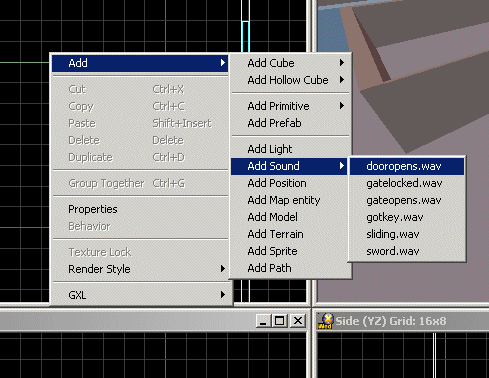
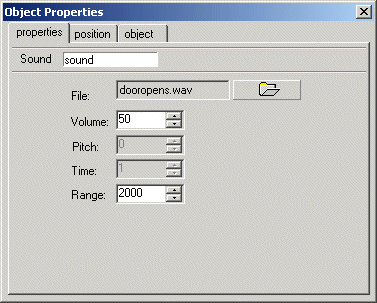
This will place a 3D sound in our level; the sound's "Object Properties" window allows us to set a few parameters.
This method works great when you are trying to put some of those humming or creepy sounds in your levels, in order to make the player more nervous in certain areas of the level; however, there aren't too many other things that can be obtained without writing a few lines of code.
So what are we waiting for? Let's start by playing a sound! Start Wed, load the work38.wmp file, and then run it using script38.wdl.
I have to admit that the screen doesn't look too exciting, but we're only dealing with multimedia files this time. Press the "1" key to play a sound; if you have a pair of headphones or a decent set of speakers you will notice that we are playing a stereo sound. Don't be shy; press "1" several times! Here's the code that plays the sound for us:
function play_media()
{
media_play("hammer.wav", NULL, 80);
}
on_1 = play_media;
As you see, the instruction that plays the sound takes 3 parameters:
media_play (name, target, volume);
- name is the name of the sound or video file that needs to be played. Yes, this tiny function can play video files as well;
- target is the name of a pointer to a bitmap that can serve as a target texture for the video stream (if any). We don't plan to do this here, so we are going to use NULL. If you want to play a movie on a sprite or on a model's skin read the older AUMs to see a few examples;
- volume sets the volume of the sound that will be played (0...100).
Time to press the "2" key; this one triggers a function that plays a piece of music in a loop.
function loop_media()
{
media_loop("atmosphere.wav", NULL, 80);
}
on_2 = loop_media;
As you can see, the "media_loop" instruction has the same syntax with media_play. Listen to the loop a few times and you will notice a small gap - this is the interval that's needed in order to load the file from the hard drive, because all the media_xyz instructions use Windows' player, so they have to be available for it. The solution to this problem is simple: we can use Acknex's built-in, MCI-based player. MCI stands for "Media Control Interface", in case that you were wondering.
You can safely forget the previous phrase; I had to look it up in a tech dictionary as well ;) Press "3" to hear the same loop being played with snd_loop:
sound atmosphere_wav = <atmosphere.wav>;
function loop_media_ok()
{
snd_loop(atmosphere_wav, 80, 0); // use snd_play and snd_loop for short sounds that have to be preloaded in memory
}
on_3 = loop_media_ok;
This time the sound loops perfectly because the sound was defined in advance and thus was loaded and kept in the memory. The snd_loop instruction has a slightly different syntax:
snd_loop (name, volume, balance);
- name is the name of the sound that needs to be played. Make sure to define a sound before using it - snd_loop needs that;
- volume sets the volume of the sound (0...100);
- balance can be set to (-100...+100) and tells the engine to play the sound from the left, right or a combination of both speakers. The default value (zero) sends the sound with the same amplitude to both channels.
A useful instruction is snd_play, which has the same syntax with snd_loop and plays a sound only once, using MCI; I have used snd_play in some of my previous workshops, so you should be familiar with it. You will want to use snd_play every time when you want to play sound effects in your games because the sounds are defined and loaded in the memory at game start. If you would fire 10 bullets a second, it wouldn't be wise to wait until the sound of each bullet is loaded from the disk, so you wouldn't use media_play for your bullets, right? On the other hand, the media_xyz instructions can play stereo sounds, use fewer resources and aren't limited to 32 simultaneous sounds, so they have their advantages. Knowing these things, you should be able to pick the proper sound playing method each time.
How do we control these sounds? At this point, I have used a brute-force method which stops all the sounds when the player presses the "0" (zero) key. But how can we stop or control a certain sound? First of all, we must assign the sound an unique ID, just like a pointer name is assigned to an entity. I'll let the code do the talking for now.
var music_handle; // the built in "media_handle" can be used as well
function stoppable_media()
{
music_handle = media_loop("atmosphere.wav", NULL, 80); // play the sound in a loop
sleep (5);
media_stop (music_handle); // stop the playback after 5 seconds
}
on_4 = stoppable_media;
We define a regular variable named music_handle; a predefined variable named media_handle can be used as well, but if you are going to play more than a stream (sound, picture of movie) it's better to define a handle for each one of them. This handle is then assigned to the result of the media_loop instruction and can control that sound, movie or picture. On a side note, I don't know why you would want to play a picture using media_play or media_loop, but I'm not an inventive guy.
Back to our code: press the "4" key and you will hear the loop being played for 5 seconds, because the media_stop instruction does its job and stops the sound with the given music_handle. I have to admit that the sound stops a bit too abrupt for my taste; it would be nice to have a gentle fade-out, right?
Right! So why don't you press the "5" key while I copy and paste the code for the following function?
var musicok_handle;
function stoppable_media_fade()
{
var tune_factor = 80; // play the sound at an initial volume of 80
musicok_handle = media_loop("atmosphere.wav", NULL, 80); // use the same value here
sleep (7); // play the sound for 7 seconds
while (tune_factor > 0) // now change its volume, decreasing it gently
{
media_tune(musicok_handle, tune_factor, 100, 0);
tune_factor -= 0.8 * time_step; // with the speed given by 0.8
wait (1);
}
media_stop (musicok_handle); // the volume is zero here, so we can stop the sound
}
on_5 = stoppable_media_fade;
Now that's what I call a gentle fade-out function! The key instruction here is media_tune, who has the following syntax:
media_tune(handle, volume, speed, balance);
- handle is the name of the handle for the desired sound or movie file;
- volume is the volume of our sound / movie and can be changed by setting a value of 1...100 here. Setting a value of 0 here won't change the volume at all;
- speed is the speed with which the sound or the movie is being played. A value of 50 will play the movie at 50% of its original speed, while a value of 200 will double the playback speed. Put a value of 100 here to keep the initial playback speed;
- balance can change the balance of the sound, with negative values shifting the sound more towards the left channel, while positive values shift the sound towards the right channel. You can use values of -100...+100 here; a value of 0 won't affect the sound at all.
Let's examine our media_tune based function; the first line of code defines a variable named tune_factor and sets its value to 80. This variable will store the volume of our musical loop and will decrease its value gently as the time passes. We are using a musicok_handle as a handle for our sound and we allow it to play for 7 seconds.
The while loop decreases tune_factor until its value is smaller than or equal to zero, with a speed given by 0.8 * time_step. As you see, our media_tune instruction will modify the sound whose handle is musicok_handle, changing its volume (the second parameter) and keeping its speed (100) and balance (0). This means that the sound will be played with a volume that decreases from 80 to 0, being stopped completely at the end of the loop because of the media_stop instruction.
What else can we do now? I know! Let's press the "6" key and see how media_tune affects the speed of our sound!
var tune_handle;
function tune_media()
{
tune_handle = media_loop("atmosphere.wav", NULL, 80); // play the sound as it is
sleep (7); // for 7 seconds
media_tune(tune_handle, 100, 70, 0); // then decrease its frequency to 70%
sleep (7); // for 7 seconds
media_tune(tune_handle, 100, 130, 0); // now increase its frequency to 130%
sleep (7); // and play it this way for 7 seconds
media_pause(tune_handle); // pause the sound
sleep (2); // for 2 seconds
media_start(tune_handle); // and then resume the playback
}
on_6 = tune_media;
Did you hear that? The music was played at 100% of its speed for 7 seconds, then at 70% of its speed for 7 seconds, and then at 130% of its speed for another 7 seconds. Finally, the media_pause instruction has paused the sound and media_start has started it again after 2 seconds. As you can see from the code above, the speed variations were obtained by playing with the speed (third) parameter of the media_tune instruction.
var movie_handle;
function tune_movie()
{
movie_handle = media_loop("globe.avi", NULL, 80); // play this movie at its regular speed
sleep (7); // for 7 seconds
media_tune(movie_handle, 100, 40, 0); // now play it much slower (at 40% of its speed)
sleep (7); // for 7 seconds
media_tune(movie_handle, 100, 200, 0); // now play the movie faster (200% faster)
sleep (7); // for 7 seconds
media_pause(movie_handle); // pause the movie
sleep (2); // for 2 seconds
media_start(movie_handle); // and the resume the playback
}
on_7 = tune_movie;
Yes, I know it's an almost identical function, but this one plays a movie at its normal speed, at 40% of its speed, and then at 200% of its speed, pauses the movie for 2 seconds and then resumes it - press "7" to try it out. As you know, media_play can play not only sounds, but plays movies (with or without sound) as well. I have used a small avi file here, but you can try and play huge cut scene movies using this instruction - it works! Make sure that the target PC has the proper codecs installed on it (if you have used a weird codec to encode the movie).
function play_cd()
{
cd_play (1, 1); // play the first cd track
sleep (10); // for 10 seconds
cd_play (2, 2); // now play the second cd track
sleep (10); // for 10 seconds
cd_pause(); // pause the playback
sleep (5); // for 5 seconds
cd_start(); // resume playback, continues to play the second track
}
on_8 = play_cd;
The function above plays regular audio CDs, so you'd better have one in our cd / dvd-rom drive. Press "8" and you will hear the first music track being played for 10 seconds and then the second track being played for 10 seconds. After a pause of 5 seconds, the playback is resumed, so the second track will continue to play until it ends.
As you have guessed, cd_pause( ) pauses the playback and cd_start( ) resumes it; let's see the syntax of cd_play:
cd_play (start_track, end_track);
Yes, it's that easy! If the audio part of our cd or dvd contains 12 tracks (our game's soundtracks) we would use something like this to play them all:
cd_play (1, 12);
I wouldn't want to say good bye without showing you the function that stops all the sounds using the brute-force method:
function stop_all()
{
snd_stopall(4); // stop all the sounds
media_stop (tune_handle); // stop this stream as well (if it is playing)
media_stop (movie_handle); // stop this stream as well (if it is playing)
}
on_0 = stop_all;
The snd_stopall instruction stops all the sounds (but not the streams). The following media_stop instructions stop the tune_handle and media_handle sound handles if those sounds are playing. Feel free to add more media_stop instructions here if you want to stop other streams as well. That's all!
Those of you that didn't get any homework for today can play with sound_vol, midi_vol, cdaudio_vol and master_vol, which are predefined variables and control the volume of the sounds, streams, audio cd tracks and the general mixer volume. Extend my script: put four sliders on a panel and use them to adjust the values of these variables in the 0...100 range - they should have an impact on the sounds that are being played. I'll see you soon!
P.S. If you are lazy you can type something like midi_vol = 30; at the console and see what happens.