This month we will learn to create a c_trace based weapon. For those of you that don't remember our previous workshop, a weapon like this doesn't use "real" bullets, but traces an invisible ray from the target (our weapon) to the destination (our enemy). The main advantage for this type of weapon is the huge bullet speed that can be obtained because (go figure) we don't use bullets at all.
Let's examine our main script file; it's short and simple because we are including several scripts in it.
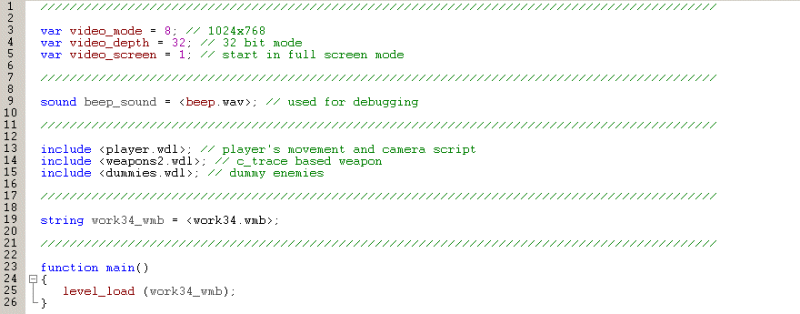
Player.wdl contains our old player / camera script and dummies.wdl contains the slightly modified code for our dummy targets; the good stuff is placed inside the weapons2.wdl script file, so let's get to work.
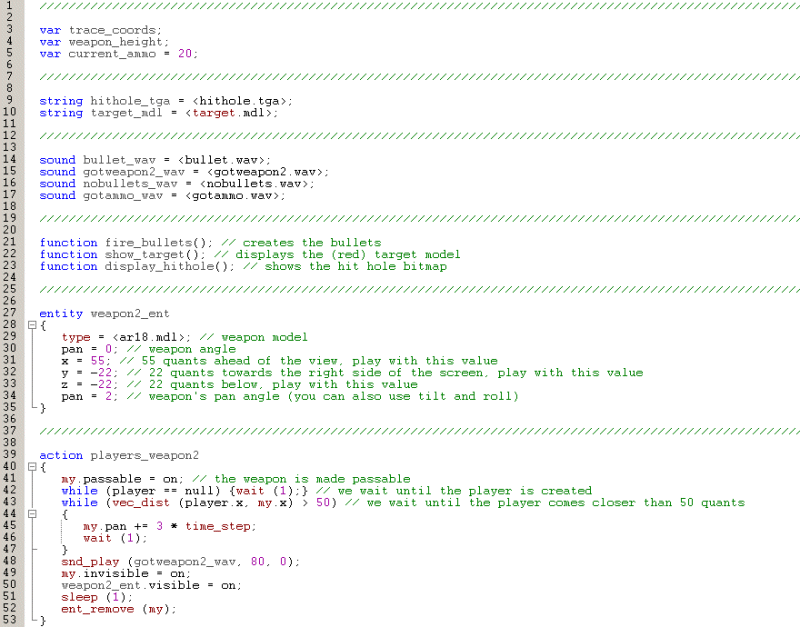
We start with a few var definitions; current_ammo gives the initial number of bullets that come with the gun. We are also defining the hit hole bitmap and the target model, which is nothing more than a small red cube. Finally, we've got some sound definitions and the function prototypes. Are you ready for action?
Several Aum readers from Kentucky ask if it is possible to create weapons that don't penetrate the walls. (Actually, I don't know if they are from Kentucky or not but I had to add a location because it makes this article look more serious and professional). Dear Readers, it certainly is possible to create weapons that don't penetrate the walls; all you need is an "entity" definition:
entity weapon2_ent
{
type = <ar18.mdl>; // weapon model
pan = 0; // weapon angle
x = 55; // 55 quants ahead of the view, play with this value
y = -22; // 22 quants towards the right side of the screen, play with this value
z = -22; // 22 quants below, play with this value
pan = 2; // weapon's pan angle (you can also use tilt and roll)
}
These entities aren't placed in the level; they are attached to a view (the camera, by default) so they exist at all times, even when the level isn't loaded. They are visible, but they don't get in the way. They can be manipulated by changing their x, y, z, pan, tilt, roll, and so on. Just give them the real name of the model or sprite that they're supposed to display and they'll do the rest. Our weapon entity is named weapon2_ent and uses the ar18.mdl model; as soon as we define the weapon this way, we will be able to show it or hide it using something like "weapon2_ent.visible = on;" etc.
action players_weapon2
{
my.passable = on; // the weapon is made passable
while (player == null) {wait (1);} // we wait until the player is created
while (vec_dist (player.x, my.x) > 50) // we wait until the player comes closer than 50 quants
{
my.pan += 3 * time_step;
wait (1);
}
snd_play (gotweapon2_wav, 80, 0);
my.invisible = on;
weapon2_ent.visible = on;
sleep (1);
ent_remove (my);
}
The action above takes care of the weapon while it is sitting on the ground, before being picked up by the player. Yes, you've got it right; we are using two different weapons: the "real" one, which appears in the level and can be picked up by the player and another "entity" based weapon which will replace the old one as soon as we pick up the "real" weapon.
The code makes the "real" weapon passable, and then waits until the player is created. We've got a while loop which runs until the player comes closer than 50 quants to the gun, making it rotate with the speed given by 3 * time_step. By the way, "time" was replaced with "time_step" in the newer versions of the engine because "time" is a c++ keyword with a different meaning and would lead to errors in future (lite-c based) engine versions.
Back to our code: if the player comes closer than 50 quants, the loop ends, we play a gotweapon2_wav sound, we hide the "real" weapon model, we show the "weapon2_ent" entity, we wait for a second and then we remove the invisible aka the "real" weapon model. It might sound a bit complicated, but that's how it's supposed to be done: we must hide the weapon that is picked up from the level and show the "entity" based weapon. Time to discuss the code for two more functions:
starter use_weapon2()
{
proc_late();
var player1_pos; // stores the initial position of the player
var player2_pos; // stores the position of the player after a frame
while (player == null) {wait (1);}
while (1)
{
vec_set (player1_pos.x, player.x); // store the initial player position
if (weapon2_ent.visible == on) // the weapon is visible?
{
vec_set(trace_coords.x, vector(10000, 0, 0)); // the weapon has a firing range of up to 10,000 quants
vec_rotate(trace_coords.x, camera.pan);
vec_add(trace_coords.x, camera.x);
if (c_trace(camera.x, trace_coords.x, ignore_me | ignore_passable) > 0) // hit something?
{
ent_create (target_mdl, target.x, show_target); // then show the target model
}
}
wait (1);
vec_set (player2_pos.x, player.x); // store player's position after 1 frame
if (vec_dist (player1_pos.x, player2_pos.x) != 0) // the player has moved during the last frame?
{
weapon_height += 30 * time_step; // then offset weapon_height (30 = weapon waving speed)
weapon2_ent.z += 0.03 * sin(weapon_height); // (0.03 = weapon waving amplitude)
}
}
}
The starter function does several things. First of all, proc_late() elliminates the jerks of the red target model by telling the engine function scheduler to run this function at the end of the list, after all the regular functions have been run. This means that the player has moved already and its new position is known, so the red target model will appear where it is supposed to. We are also declaring two variables, which will take care of the weapon bobbing, just like they did in the previous workshop. If the weapon is visible, we create a position that's placed 10,000 quants in front of the player at all times, and then we trace from the camera to that position, just like in the picture below.

If we have hit something (a wall or an entity, it doesn't matter) we create the red target_mdl entity at the position given by target.x (the hit point for c_trace) and we assign it the function named show_target(). I'm not going to discuss the code that makes the weapon bob; please read Aum58's workshop for a detailed explanation.
function show_target()
{
my.passable = on; // the target model is passable
my.ambient = 100; // and should look bright enough
my.scale_x = min (6, vec_dist (my.x, camera.x) / 500); // play with 6 and with 500
my.scale_y = my.scale_x;
my.scale_z = my.scale_x;
wait (1);
ent_remove (my);
}
This function displays the red mdl target; it makes it passable, sets its ambient to 100 and changes its scale depending on the distance between itself and the camera. Why would we want to do that? The answer is simple: our tiny red model will be barely visible when target.x is far away from the camera, so we have to compensate this effect by increasing its scale by up to 6 times.
The target model lives for a single frame and then it is removed; don't worry; another target model is created next frame, so the player won't see anything wrong.

The last chunk of code takes care of the bullets, the hit holes and the ammo packs. Bring them on!
on_mouse_left = fire_bullets; // call this function when the left mouse button is pressed
function fire_bullets()
{
if (current_ammo > 0) // got ammo?
{
c_trace(camera.x, trace_coords.x, ignore_me | ignore_passable | activate_shoot);
if (you == null) // hit a wall?
{
ent_create (hithole_tga, target.x, display_hithole); // then create a bullet hit hole
}
snd_play (bullet_wav, 100, 0); // play the bullet sound at a volume of 100
current_ammo -= 1; // decrease the number of bullets
}
else // no ammo left?
{
snd_play (nobullets_wav, 100, 0); // then play the noammo.wav sound
}
}
Function fire_bullets() runs if the player presses the LMB. If we've got ammo, we perform a new c_trace instruction, but this time (please pay attention) we are using the "activate_shoot" option, which will trigger the event function for all the entities that are hit by c_trace and have their "enable_shot" on.
If you is null (c_trace has hit a wall, and not an entity), we create a hithole_tga bitmap at the location given by target.x and we assign it the display_hithole() function. We play the bullet_wav sound, and then we decrement current_ammo. On the other hand, if current_ammo is smaller than or equal to zero, we simply play the nobullets_wav sound.
function display_hithole()
{
vec_to_angle (my.pan, normal); // orient the hit hole sprite correctly
vec_add(my.x, normal.x); // move the sprite a bit away from the wall
my.passable = on; // the hit hole bitmap is passable
my.transparent = on; // and transparent
my.ambient = 50;
my.flare = on;
my.oriented = on; // the sprite is oriented
my.roll = random(360); // and has a random roll angle (looks nicer this way)
my.scale_x = 0.5; // we scale it down
my.scale_y = my.scale_x; // on the x and y axis
sleep (20); // show the hit hole for 20 seconds
ent_remove (my); // and then remove it
}
The first line of code orients the hit hole sprite correctly by changing its pan and tilt angles according to "normal". What's "normal"? Nothing is normal these days if you ask me, but I bet that you aren't interested in my opinions about the meaning of life... Anyway, a "normal" is a vector with a length of 1 which points perpendicularly away from a surface. Take a look at the picture below to see a few "normal" examples.
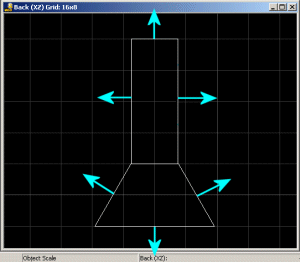
See what I mean? The following line of code adds normal.x to the position of the hit hole sprite (my.x), allowing it to get out of the wall. As you know, target.x gives us the exact position where the invisible c_trace ray has hit the wall surface and we wouldn't want to place the hit hole sprite exactly there. Why? Because if it is placed at the same coordinates with the surface of the wall, it might be hidden by the wall surface from time to time, depending on the position and angles of the camera (advanced users: think z buffer errors). The line that adds normal.x to my.x gets the job done by moving the hit hole sprite 1 quant away from the wall surface.
The hit hole bitmap is passable, transparent and has an ambient of 50; its "flare" and "oriented" flags are set. We choose a random roll angle for our hit hole sprite; this way, if we shoot a walls several times, each hit hole will look different. We scale down the sprite to 0.5 and then we wait for 20 seconds before removing it. Each hit hole sprite is another entity which uses precious cpu resources so we must remove the older sprites; however, if you want to have bullet holes that stay in the level forever, you can simply comment the "ent_remove (my);" line of code.
action ammo_pack
{
my.passable = on;
while (player == null) {wait (1);}
while (vec_dist (player.x, my.x) > 50)
{
my.pan += 3 * time_step;
wait (1);
}
snd_play (gotammo_wav, 80, 0);
my.invisible = on;
current_ammo += 20; // use your own value here
sleep (1);
ent_remove (my);
}
This simple action increases current_ammo by 20 when the player comes close to it; you will notice that most of its code was borrowed from the action named players_weapon2.
I want to keep my younger readers off the streets, so here's a new homework: add a progressive zoom-in effect which is activated when the player is pressing and holding the right mouse button. Next month we will learn to throw a few grenades, so make sure to be here!
Hey! Don't peek!
Solution: paste this code at the end of the weapons2.wdl script.
function zoom_in()
{
while (mouse_right == on) // the right mouse button is being kept pressed?
{
// decrease camera.arc quickly (zoom in) and limit it to 20
camera.arc = max(20, camera.arc - 10 * time_step); // 10 = zoom in speed
wait (1);
}
// the right mouse button was released here
camera.arc = 60; // so restore the default camera.arc value
}
on_mouse_right = zoom_in;