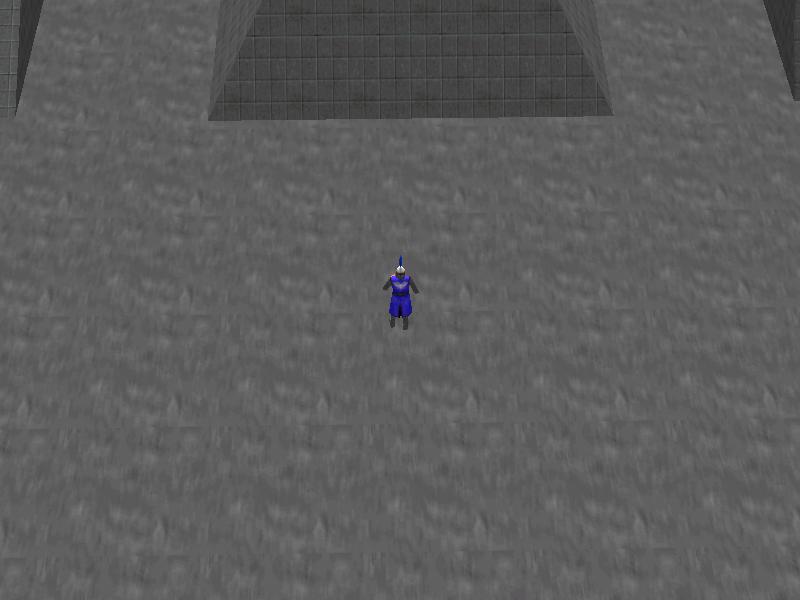
We have begun to study c_trace in Aum51; this time we will use it to create the code for a fully working player action that includes animation, movement and gravity. Copy the \workshop27 folder inside your 3DGS folder, start Wed, open the level named work27.wmp, and then build it and run it using the script27.wdl file; you will be greeted with the following image:
Press and hold the right mouse button until you can see the entire level:
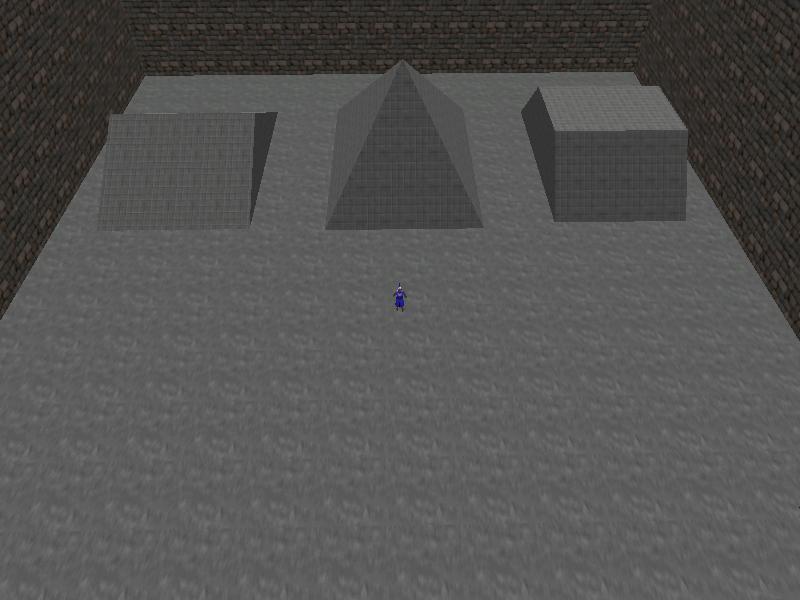
You've got it: you can use the left mouse button to zoom in and the right mouse button to zoom out. I wanted to have this feature in our project because we will want to study player's movement quite a bit. Now let's take a look at the script file:
It looks a bit complicated, but now that we've started to master C-Script we won't have any problem going through it. Before I begin, please remember that you have promised to read the 18th and the 21st workshop; we will need some information from there. If you have forgotten about it, here's your chance to do that; go and read those workshops - I won't go anywhere until you return. It's a promise!
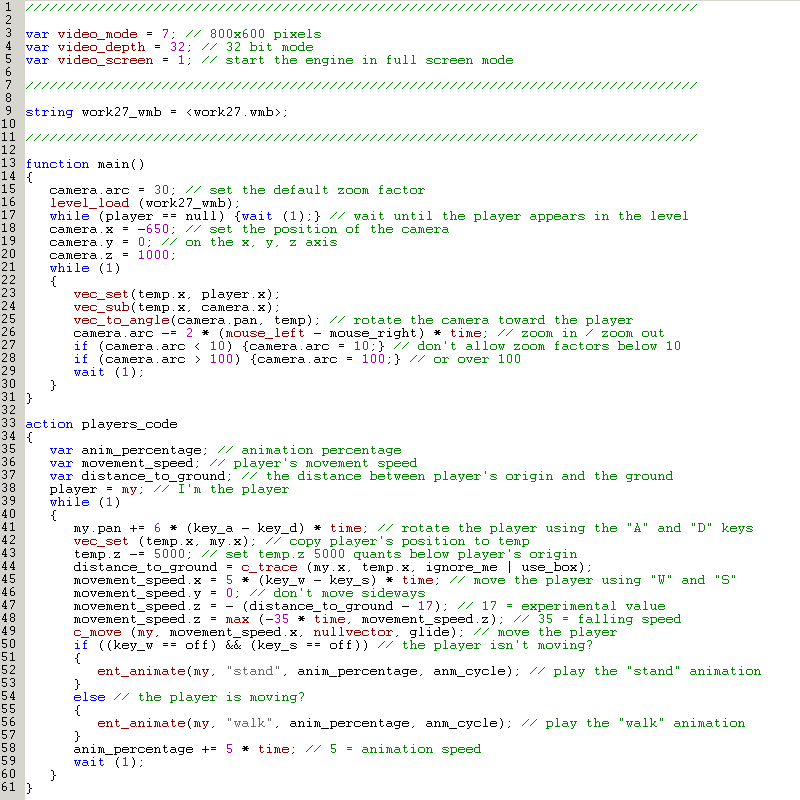
function main()
{
camera.arc = 30; // set the default zoom factor
level_load (work27_wmb);
while (player == null) {wait (1);} // wait until the player appears in the level
camera.x = -650; // set the position of the camera
camera.y = 0; // on the x, y, z axis
camera.z = 1000;
while (1)
{
vec_set(temp.x, player.x);
vec_sub(temp.x, camera.x);
vec_to_angle(camera.pan, temp); // rotate the camera toward the player
camera.arc -= 2 * (mouse_left - mouse_right) * time; // zoom in / zoom out
if (camera.arc < 10) {camera.arc = 10;} // don't allow zoom factors below 10
if (camera.arc > 100) {camera.arc = 100;} // or over 100
wait (1);
}
}
Let's examine function main: it sets the default zoom (camera.arc) factor, it loads the level and then it waits until the "player" pointer is created. Now why would we want to wait for that?
The answer is simple: if you take a look a few lines below the "while (player == null)" line, you will see a few instructions that use the predefined "player" pointer. If we don't wait until the player pointer is valid (until the player model is loaded in the level and its action starts running) those instructions will give errors, because they need "player" and the player isn't there yet. I'm a nice guy, so I'm going to comment the "while (player == null)" line for you and see what happens:
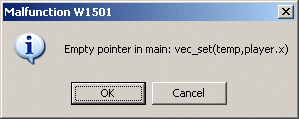
See what happens? I'll remove the comment write away! The following 3 lines set the proper camera position on the x, y and z axis.
camera.x = -650; // set the position of the camera
camera.y = 0; // on the x, y, z axis
camera.z = 1000;
Let's examine the first few lines inside the following loop:
while (1)
{
vec_set(temp.x, player.x);
vec_sub(temp.x, camera.x);
vec_to_angle(camera.pan, temp); // rotate the camera toward the player
These lines, being placed inside the while loop, are executed each and every frame. Their purpose is to rotate the camera towards the player all the time; let's see how how they manage to do that:
1) vec_set(temp.x, player.x) copies player's coordinates (x, y and z) inside temp; this means that after this instruction, temp.x = player.x, temp.y = player.y and temp.z = player.z.
2) vec_sub(temp.x, camera.x) subtracts the camera position from temp, thus creating a vector (stored in temp) that points towards temp (towards the player):
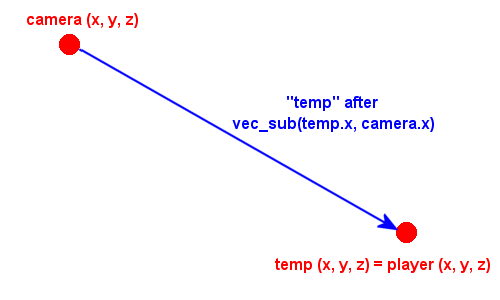
3) vec_to_angle(camera.pan, temp) is an extremely useful instruction; it computes the pan and tilt angles that are given by the "temp" vector and feeds these values to the camera, changing its pan and tilt angles as needed. This means that if the player moves, its coordinates change, temp changes as well and the angles of the camera are adjusted automatically, keeping the player in the center of the view.
What is it with this "temp" variable, you ask? It's a predefined, global variable that can be used for any purpose; if you need another variable like this simply define a global variable and you are set:
var my_temp_variable;
Back to our code! The following line adjusts the zoom factor (camera.arc) depending on the mouse_left and mouse_right status; these two are nothing more than a pair of predefined variables that are set to 1 if the proper mouse button is pressed and are set to 0 if the mouse button isn't pressed.
camera.arc -= 2 * (mouse_left - mouse_right) * time; // zoom in / zoom out
This means that the (mouse_left - mouse_right) parenthesis can have one of the following values:
a) 1, if the player presses and holds down the left mouse button (LMB);
b) 0, if the player presses and holds both mouse buttons;
c) -1, if the player presses and holds the right mouse button (RMB).
If we press and hold the LMB, camera.arc will be decreased with -2 * 1 * time = -2 * time every frame, causing the camera to zoom in. If both mouse buttons are held down, camera.arc doesn't change its value, and if the RMB is held down, camera.arc will increase by -2 * (-1) * time = 2 * time every frame. Change "2" if you want to alter the zoom in / zoom out speed.
if (camera.arc < 10) {camera.arc = 10;} // don't allow zoom factors below 10
if (camera.arc > 100) {camera.arc = 100;} // or over 100
wait (1);
The lines above limit camera.arc in this range: (10...100); if camera.arc decreases its value below 10, it is set to 10, and so on. You can use values that are smaller than 10 and bigger than 100, but be ready for some weird looking effects :)
That wraps up function main; let's examine the action that is attached to the player:
action players_code
{
var anim_percentage; // animation percentage
var movement_speed; // player's movement speed
var distance_to_ground; // the distance between player's origin and the ground
player = my; // I'm the player
I have defined three local variables; anim_percentage will set the proper animation frame, movement_speed will be used to move the player and distance_to_ground will be used to determine the distance between player's origin and the ground surface below it. The last line of code tells the engine that the "player" is the entity that has this (players_code) action attached to it.
while (1)
{
my.pan += 6 * (key_a - key_d) * time; // rotate the player using the "A" and "D" keys
The first line of code sets the proper orientation for the player, changing its pan angle if we press and hold the "A" or "D" keys; my.pan will be increased or decreased by 6 * time depending on which key is pressed. Feel free to replace 6 with another value if you want to modify player's rotation speed.
vec_set (temp.x, my.x); // copy player's position to temp
temp.z -= 5000; // set temp.z 5000 quants below player's origin
distance_to_ground = c_trace (my.x, temp.x, ignore_me | use_box);
It's time to see c_trace in action again! The 3 lines of code from above will help us add gravity to the player; this means that the player won't float in the air and won't sink in the floor, but will follow the exact shape of the ground that he walks onto. Let's see how these things work together:
1) vec_set(temp.x, my.x) copies player's coordinates (x, y, z) inside temp.
2) temp.z -= 5000 computes a position that is placed 5000 quants below the player. We can use almost any big value here; the point is that by subtracting the big value we should create a position that is placed below the floor level at all times.
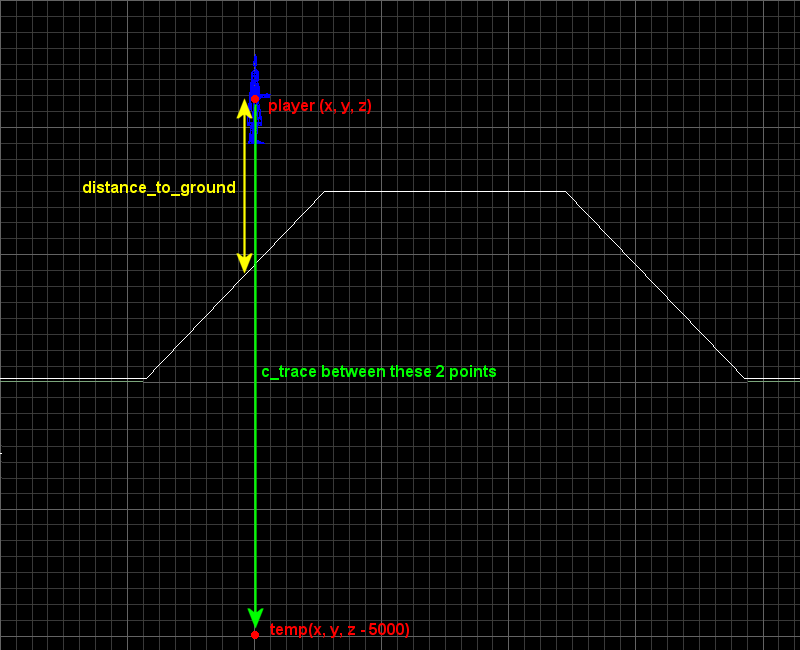
3) distance_to_ground = c_trace (my.x, temp.x, ignore_me | use_box) traces between my.x (player.x) and temp.x, returning the distance between player's origin and the ground in the variable named distance_to_ground.
What is it with that "returning the distance in a variable..." thing? George, I'm all confused now!
Ok, let's explain that. Most C-Script instructions, like c_trace, are in fact functions and these functions can be of 2 types:
a) Functions that don't return anything, also known as void functions, like beep(). You call them in your scripts and that's all!
b) Functions that return something, that is, functions that can set an external variable to a value as a result of their run. As an example, c_move can return the distance that was covered by the entity that was moved, and in our case, c_trace returns (or stores, if you like that better) the distance between the two tracing points in distance_to_ground.
movement_speed.x = 5 * (key_w - key_s) * time; // move the player using "W" and "S"
movement_speed.y = 0; // don't move sideways
The lines above control the player; we allow it to move using the "W" and "S" keys, the speed being set by 5. We have set movement_speed.y to zero because we don't want to move the player sideways.
movement_speed.z = - (distance_to_ground - 17); // 17 = experimental value
The movement speed on the z axis is negative; we push the player downwards with the speed given by (distance_to_ground - 17). This keeps it glued to the floor, but where did that 17 come from? Each model has its origin placed in a different point, and this would make the model float a bit or sink a bit in the ground; play with 17 until your model's feet are placed perfectly on a horizontal floor.
movement_speed.z = max (-35 * time, movement_speed.z); // 35 = falling speed
This line makes sure that the player falls in a realistic way. If you have tried to fall from the platform on the right side of the screen you might have noticed that the player falls down nicely - this is happening because of the single line of code from above. You see, c_trace is a brutal instruction; it would happily glue the player to the ground in less than 1 frame even if the player would fall from 10,000 feet! This line limits the falling speed, making sure that it remains bigger than or equal to -35 * time every frame.
How does "max" work? An instruction like temp = max (-5, 10) will set temp to 10 because that's the MAXimum, the biggest value, right? This means that, as an example, temp = max (-5, temp) will make sure that temp can't be smaller than -5. In a similar way, movement_speed.z can't be smaller than -35 * time, which translated to human language means that the player can't fall suddenly, but in a more realistic way, with the speed given by -35 * time. Feel free to play with 35 if you want to alter the falling speed.
c_move (my, movement_speed.x, nullvector, glide); // move the player
All is set now! We've got all the components for the movement_speed variable set, so we can move the entity using its relative speed (we move it in the direction given by its pan angle), making sure that it glides along the potential obstacles.
if ((key_w == off) && (key_s == off)) // the player isn't moving?
{
ent_animate(my, "stand", anim_percentage, anm_cycle); // play the "stand" animation
}
else // the player is moving?
{
ent_animate(my, "walk", anim_percentage, anm_cycle); // play the "walk" animation
}
anim_percentage += 5 * time; // 5 = animation speed
wait (1);
The last few lines in the loop take care of the animation; if the "W" or "S" keys aren't pressed (if the player isn't moving), we animate the player using its "stand" animation; otherwise, if at least one of the keys is pressed, we animate the player using its "walk" animation. The animation speed is given by 5 * time; play with 5 if you want to adjust the animation speed.
We've learned quite a few new things today, haven't we? The following workshop will teach us how to create several camera types for our games, so stay tuned!