Car AI
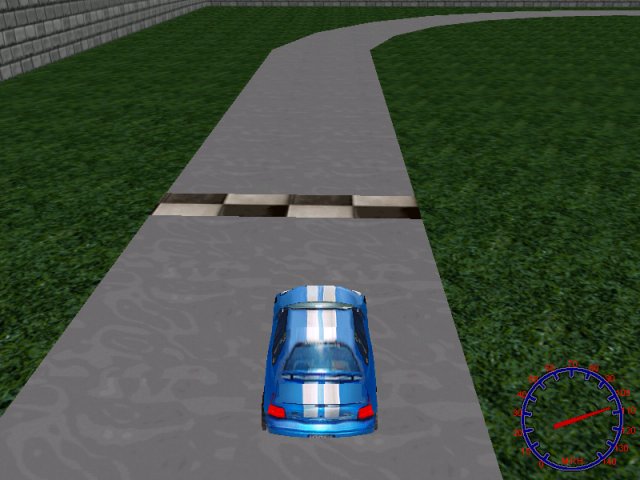
This month we will learn to create the code that will be used for player's car. Our code creates a car that changes its gears automatically, uses its horn, its brake lights, includes a speedometer, and more! One more thing: the car can use 3 different cameras.
All the new code can be found in playercar.wdl, which was included in carai3.wdl, a slightly modified version of the carai2.wdl file. Let's start with a few simple definitions:
panel speedo_pan
{
bmap = speedo_pcx;
pos_x = 640;
pos_y = 450;
layer = 10;
flags = overlay, refresh, visible;
}
entity needle
{
type = <needle.tga>;
layer = 20;
scale_x = 0.15;
scale_y = 0.25;
x = 200;
y = -91.5;
z = -65;
view = camera;
flags = overlay, nofilter, visible;
}
I am using the panel and the needle entity to create a speedometer. Why do I need to use an entity for the needle? Well, because a panel can't be rotated, but an entity that changes its roll angle will do the job. You can change scale_x and scale_y to adjust the width and length of the needle; change x to set the proper position of the needle in front of the camera, y and z to set the position on the screen (on the x and y axis).
starter set_needle()
{
var needle_angle;
while (player == null) {wait (1);}
while (1)
{
needle_angle = player.skill2 * 12.17 - 140; // -140...+140 degrees = 0...140 mph
needle.roll = max (-140, needle_angle);
wait (1);
}
}
The function above will run by itself; its purpose is to set a correct roll angle for the needle entity, depending on the real speed of the car. We define a local variable named needle_angle, we wait until the player entity is loaded, and then we encounter a while (1) loop with some weird numbers inside it. Where did they come from?
The speed ranges from 0 to 140 m.p.h. but the needle must change its roll angle from -140 to 140 degrees. I know that player.skill2 ranges from 0 to 23 quants / frame. How do I know that? I have used a simple panel with a digit that displays player.skill2 to measure these values with the car being stopped or driven at its maximum speed. Let's take a look at the weird looking formula again:
needle_angle = (0 to 23) * 12.17 - 140
a) needle_angle = 0 * 12.17 - 140 = -140 degrees
b) needle_angle = 23 * 12.17 - 140 = 139.91 degrees
The formula above prooves that needle will change its angle from -140 to 139.91 degrees when the speed ranges from 0 to 23 quants / frame. The next line of code inside the while loop makes sure that the roll angle of the needle doesn't go below -140 degrees.
I'm not going to discuss the function that was used for player's horn because it is way to simple - see for yourself:
function horn()
{
snd_play (plhorn_wav, 100, 0);
}
on_h = horn;
Here's another simple function called from within player's action; that's the function that allows us to select one of the 3 cameras I've told you about:
function car_camera()
{
if (key_1 == on) {camera_number = 1;}
if (key_2 == on) {camera_number = 2;}
if (key_3 == on) {camera_number = 3;}
if (camera_number == 1) // top view
{
camera.x = player.x;
camera.y = player.y;
camera.z = player.z + 900; // play with this value
camera.pan = player.pan;
camera.tilt = -90;
}
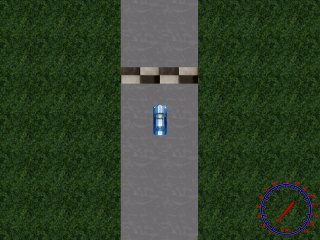
The player can choose one of these cameras by pressing the "1", "2" or "3" keys on the keyboard. If we press "1", the camera will have the same x and y positions with the car, but it will be placed 900 quants above the car, looking downwards.
if (camera_number == 2) // simulated first person view
{
camera.x = player.x - 20 * cos(player.pan);
camera.y = player.y - 20 * sin(player.pan);
camera.z = player.z + 18;
camera.pan = player.pan;
camera.tilt = 0;
}
If the player presses "2", he will get a first person view. This is, in fact, an isometric view that is placed 20 quants behind the origin of the car and 18 quants upwards.
if (camera_number == 3) // true isometric view
{
camera.x = player.x - 200 * cos(player.pan); // 200 = distance
camera.y = player.y - 200 * sin(player.pan); // same value here
camera.z = player.z + 150; // above the player
camera.pan = player.pan;
camera.tilt = -27; // look down at the player
}
wait (1);
}
If the player presses "3", he will get a true isometric view. The camera is placed 200 quants behind the car anf 150 quants above it; its tilt angle of -27 degrees ensures us that the player will see a good part of the road ahead.
That was the easy part of the article. Prepare to meet the action that drives player's car (insert creepy laughter here).
action players_car
{
var players_engine; // engine sound handle
var player_dist;
var player_speed;
var minimum_z;
player = my; // I'm the player
players_engine = ent_playloop (my, plengine_wav, 50);
I have declared a bunch of local variables and I have associated the "player" pointer to "my" car entity. The car will play the plengine_wav sound in a loop.
while (1)
{
player_speed.x = movement_speed * (key_cuu - 0.4 * key_cud); // backwards movement speed = 40%
my.skill1 = player_speed.x * time + max (1 - time * 0.02, 0) * my.skill1;
player_dist.x = my.skill1 * time;
player_dist.y = 0;
vec_set (temp, my.x);
temp.z -= 1000;
trace_mode = ignore_me + scan_texture;
player_dist.z = -trace (my.x, temp) - my.min_z;
The player accelerates / decelerates when we press the "up" / "down" arrow keys. Please note that the backwards movement speed can be up to 0.4 = 40% off the maximum speed. The following line of code computes the speed of the car; I have set a friction factor of 0.02 but you might want to try a different value here. The car will move using a time - corrected player_dist.x; the y component of the speed will be zero.
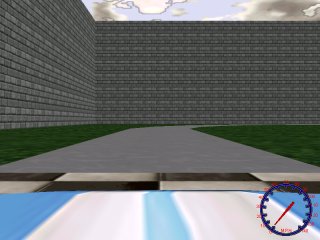
The next lines of code sets the proper height (z) for the car. We use a trace instruction to get the floor level and the name of the texture below the car.
The red line simulates the trace, while the green arrow shows the distance returned by trace. Finally, we subtract my.min_z, which is the distance between the point with the lowest z value and the origin of the car. If you plan to use an animated (for example, destroyable) model for your car, you should use vec_for_min to set the proper min_z value every frame. You will find the code that does this in the playercar.wdl script file.
if (str_cmpi (tex_name, "tilegrass"))
{
if (movement_speed > 0.1)
{
movement_speed -= 5 * time;
}
else
{
movement_speed = 0.1;
}
}
else
{
if (movement_speed < 0.9)
{
movement_speed += 10 * time;
}
else
{
movement_speed = 0.9;
}
}
If the name of the texture below the wheels is "tilegrass", the car will decrease its movement speed until it goes below 0.1. If the name of the texture detected by trace isn't "tilegrass", the car will increase its speed until it goes up to 0.9. This way the player will not be encouraged to cheat by using "shortcuts".
move_mode = ignore_passable + glide;
my.skill2 = ent_move (player_dist, nullvector); // now ent_move the player
if (my.skill2 > 0) // change gears automatically, depending on the value stored in skill2
{
engine_freq = 15;
}
if (my.skill2 > 8)
{
engine_freq = 20;
}
if (my.skill2 > 15)
{
engine_freq = 22;
}
if (my.skill2 > 19)
{
engine_freq = 23.5;
}
The car moves ignoring passable entities and gliding along the obstacles that come its way; we store the result (the distance covered each frame) in my.skill2. If the value stored there is positive, the car will choose the proper gear, depending on the speed of the car (my.skill2). I chose the sound tuning factors and the values for skill2 by trial and error; feel free to choose your own values.
player_speed.pan = rotation_speed * (key_cul - key_cur) * my.skill2;
my.skill3 = time * player_speed.pan + max (1 - time * 0.7, 0) * my.skill3;
my.pan += my.skill3 * time;
my.skill4 = max (50, my.skill2 * engine_freq); // play an engine sound at the minimum speed too
snd_tune (players_engine, 50, my.skill4, 0); // tune the engine sound
The car can rotate (change its pan) only if my.skill2 is bigger than zero, which happens when the car is moving. We use a similar formula to compute the rotation speed, this time using a bigger friction factor. The rotation speed is also a time - corrected value.
We want to tune the engine sound using the value stored in my.skill4 - let's take another look at the line below to see how that skill4 value is computed:
my.skill4 = max (50, my.skill2 * engine_freq); // play an engine sound at the minimum speed too
I wanted to hear an engine sound even when the car isn't moving; therefore, my.skill4 will choose the biggest value between 50 and my.skill2 * engine_freq every frame. If the car is stopped, the engine sound will be tuned using "50"; otherwise, the engine will be tuned depending on the speed of the car (my.skill2) and on the gear number (given by the value set for engine_freq).
if (key_cud == on)
{
my.skin = 2;
}
else
{
my.skin = 1;
}
car_camera(); // update the camera position
wait(1);
}
}
If we press the "down" arrow key, we've hit the brakes, so the car will use its second skin, the one that has the light breaks on. If we don't press "down", the car will use its first, normal skin. That's a simple and efficient method but uses additional video memory (about 100Kb more for player's car). The last few lines call the function car_camera and instruct the engine to wait for a frame.
Come on, the code for the car wasn't that complicated! I wanted to write the code for a simple arcade game after all, not the code for a simulator! Next month we will put together what we've learned so far and we will add what's missing to our racing game.
Rpg movement
There comes a time in a man's life when he needs to prove that he is a real man. And then he grabs his trusty mouse and starts killing hordes after hordes of monsters, eager to prove that he isn't just a dreamer, but a poet, a guitar player and a... oh, yeah, and a mighty warrior.
I wanted to create a standalone project; this way you will be able to add more stuff to it easily. What will you get? A player that moves using gravity, plays its "walk" and "stand" animation sequences and moves to the target indicated by clicking on the map with the left mouse button. You can choose any angle and position for the camera because it won't matter; in fact, I have decided to use a freely movable camera to prove that the target is set correctly no matter what.
function main()
{
level_load (rpg1_wmb);
mouse_map = pointer_pcx;
mouse_mode = 2;
camera.x = player.x;
camera.y = player.y;
camera.z = 200;
camera.pan = 90; // initial pan angle
camera.tilt = -60;
while (1)
{
mouse_pos.x = pointer.x;
mouse_pos.y = pointer.y;
if ((mouse_pos.x < 2) && (camera.x > -2500)) {camera.x -= 10 * time;}
if ((mouse_pos.x > screen_size.x - 2) && (camera.x < 2500)) {camera.x += 10 * time;}
if ((mouse_pos.y > screen_size.y - 2) && (camera.y < 2500)) {camera.y -= 10 * time;}
if ((mouse_pos.y < 2) && (camera.y > -2500)) {camera.y += 10 * time;}
wait (1);
}
}
Function main loads the level, sets pointer_pcx as the mouse pointer, shows the pointer and then it sets the initial x, y, z, pan and tilt for the camera. You can play with these initial values until your game looks great (tip: choose a huge camera.z value to mask those horrible looking models :)
The code inside the loop updates the position of the mouse every frame and creates a freely movable camera. This camera will move from -2500 to 2500 quants on x and y. I've got these values in Wed as level boundaries but you can use any other values here, depending on the size of your level.
Let's discuss the first picture: if we move the mouse at the left side of the screen (mouse_pos.x < 2) and if camera.x > -2500 (left boundary on x), we subtract 10 * time from camera.x, moving it to the left. The things work the same way when we move the mouse pointer towards the right side of the screen, upwards or downwards.
Time to take a look at the action that controls our player:
entity* destination;
action warlock
{
player = me;
while (1)
{
my.skill1 = 5 * time;
my.skill2 = 0;
vec_set (temp, my.x);
temp.z -= 3000;
trace_mode = ignore_you + ignore_passable + use_box;
my.skill3 = -trace (my.x, temp);
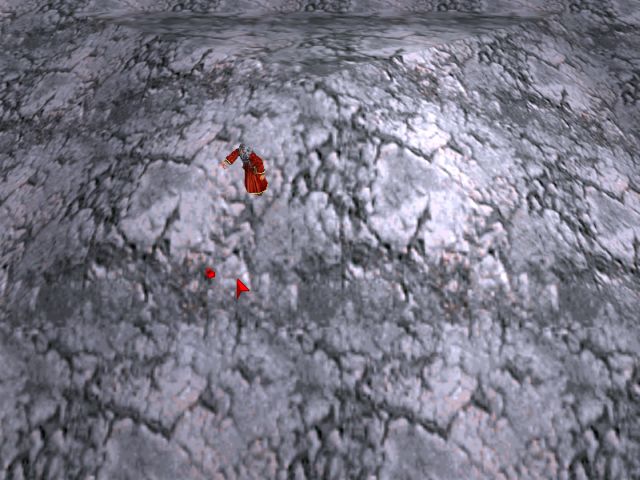
Please note that I have defined a pointer named destination; every time the player clicks a point on the map, we will assign "destination" to the target entity (the red potion that appears close to the mouse pointer). The player moves using its skills1 (which gives the speed) and skill3 (used for gravity).
if (destination != null)
{
vec_set (temp.x, destination.x);
vec_sub (temp.x, my.x);
vec_to_angle (my.pan, temp);
my.tilt = 0; // don't bow :)
if (vec_dist (my.x, destination.x) > 40)
{
move_mode = ignore_passable;
ent_move (my.skill1, nullvector); // moves using skill1..3
ent_cycle("walk", my.skill46);
my.skill46 += 10 * time; // "walk" animation speed
my.skill46 %= 100; // loop animation
}
else
{
destination.invisible = on;
ent_cycle("idle", my.skill46); // play "stand" frames animation
my.skill46 += 2 * time; // "stand" animation speed
my.skill46 %= 100; // loop animation
}
}
wait (1);
}
}
If the pointer named "destination" isn't null the player rotates towards "destination" (the red potion); this rotation would change its tilt angle too, so the next line of code resets the tilt value to zero. If the distance between the player and the red potion is below 40 quants, the player will move ignoring all the passable objects and it will play its "walk" animation in a loop. If the distance between the player and "destination" is smaller than or equal to 40 quants ("else") the red potion becomes invisible; the player model will play its "stand" animation in a loop until the player presses the left mouse button again.
on_mouse_left = set_target;
Every time we press the left mouse button, function set_target will run. Let's pretend for a moment that somebody could take a picture of you while you are playing with this demo from within the level.
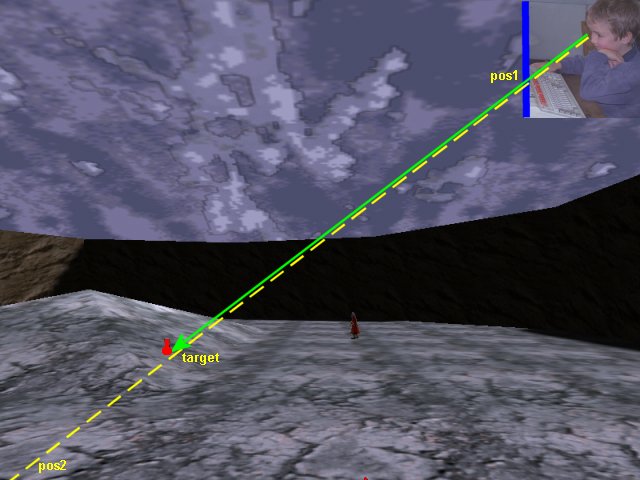
I didn't know that you are so young!
The thick blue line is the very surface of your monitor. You have clicked the left mouse button somewhere on the screen and now you expect the warlock to move to that position in the 3D world! How does this stuff work? Let's get back to function set_target.
function set_target()
{
var pos1;
var pos2;
pos1.x = mouse_pos.x;
pos1.y = mouse_pos.y;
pos1.z = 0;
vec_for_screen (pos1, camera);
pos2.x = mouse_pos.x;
pos2.y = mouse_pos.y;
pos2.z = 20000; // use a big value here
vec_for_screen (pos2, camera);
trace (pos1, pos2); // now "target" holds the coordinates of the hit point
destination = ent_create (destination_mdl, target, show_target);
}
I have defined two local variables that will be set this way:
- pos1 will store the position of the mouse as a 3D world coordinate that is placed close to the surface of your monitor;
- pos2 will store the position of the mouse as a 3D world coordinate that is placed 20,000 quants in front of player's eyes.
That's what vec_for_screen does! You give it the x, y position in the 2D world and the depth and it returns a position in the 3D world. Our function traces between pos1 and pos2 in order to get the "target" coordinates. Target is a predefined vector that is set automatically to the 3D world coordinates where trace (pos1, pos2) hits the ground, as indicated by the green arrow in the picture above.
The last line in the function creates the "destination" entity at the position given by "target" and attaches it the show_target() function:
function show_target()
{
my.passable = on;
while (mouse_left == 1) {wait (1);}
while (mouse_left == 0) {wait (1);}
ent_remove (me);
}
This small function makes the target entity (the red potion) passable and then it waits until the player releases the left mouse button. As soon as the player presses the left mouse button again (a new target is set) the old target entity is removed.
You can (and you should) combine the code in this article with Aum12's sword combat code to get a good starting point for your game.