Car physics
This time I have decided to write the code for an article that will teach you how to create a really simple car or a tank that uses the physics engine. You will need to have A6 professional because I'm using 5 physics objects: the body and four wheels. I'm afraid that you can't create a car that behaves in a realistic way using a single physics object (the current limit for A6 commercial).
function main()
{
time_smooth = 0;
fps_max = 140;
fps_lock = on;
level_load (carph_wmb);
wait (3);
ph_setgravity (vector(0, 0, -386));
ent_create (car_mdl, vector(0, 0, 100), players_car);
while(player == null) {wait(1);}
We stop smoothing the "time" variable (this prevents the jerks), and then we set fps_max to 140, because the physics engine is locked to 70 fps, so fps_max should better be a multiple of 70. We lock the "time" variable to the value that was set by fps_max, and then we load the test level. I have set the gravity to a value that is equal to Earth's gravity.
We create the car 100 quants above the origin on the z axis, attaching it the function named players_car(). Finally, we wait until the player is created.
while (1)
{
motor_left = 0;
motor_right = 0;
if(key_cuu == on)
{
motor_left = -20;
motor_right = -20;
}
if(key_cud == on)
{
motor_left = 20;
motor_right = 20;
}
if(key_cul == on)
{
motor_left = 0;
}
if(key_cur == on)
{
motor_right = 0;
}
The first 2 lines inside the while loop reset the speed of the motors (just 2 variables, but wait a bit more); if the player presses the "cursor up" key, both motors (one on the left side and the other one on the right side) will move. The same thing happens if we press the "cursor down" key, but the motors will rotate backwards. If we press the "curson left" key, we allow the movement only for the motor that controls the right side of the car, thus turning the car to the left. The same thing happens when we press the "cursor right" key.
phcon_setmotor (joints[0], vector(motor_right, 10000, 0), nullvector, nullvector);
phcon_setmotor (joints[2], vector(motor_right, 10000, 0), nullvector, nullvector);
phcon_setmotor (joints[1], vector(motor_left, 10000, 0), nullvector, nullvector);
phcon_setmotor (joints[3], vector(motor_left, 10000, 0), nullvector, nullvector);
camera.x = player.x - 300 * cos(player.pan);
camera.y = player.y - 300 * sin(player.pan);
camera.z = player.z + 1000;
camera.pan = player.pan;
camera.tilt = -60;
wait (1);
}
}
We use phcon_setmotor to turn the joints into motorized joints for every wheel, limiting the force (read maximum speed) to 10,000. I have defined a vector named joints, with four elements, and each one of them is a unique identifier of a constraint (a wheel that is bound to the car). That's what makes our wheels turn! The last few lines create a camera that sits 300 quants behind the car and 1000 quants above it, looking down at the player.
function players_car()
{
player = my;
my.scale_x = 1.5;
my.scale_y = my.scale_x;
my.scale_z = my.scale_x;
my.shadow = on;
phent_settype (my, ph_rigid, ph_box);
phent_setmass (my, 100, ph_box);
phent_setgroup (my, 2);
phent_setfriction (my, 20);
phent_setdamping (my, 20, 30);
phent_setelasticity (my, 30, 10);
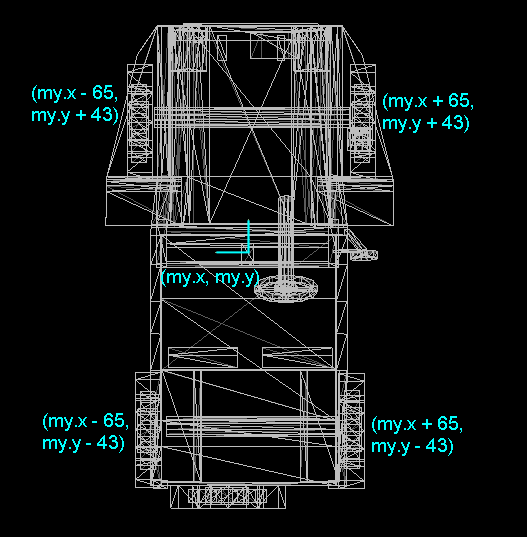
ent_create(tyreleft_mdl, vector(my.x - 65, my.y - 43, my.z - 35), cars_tyre);
ent_create(tyreright_mdl, vector(my.x - 65, my.y + 43, my.z - 35), cars_tyre);
ent_create(tyreleft_mdl, vector(my.x + 48, my.y - 43, my.z - 35), cars_tyre);
ent_create(tyreright_mdl, vector(my.x + 48, my.y + 43, my.z - 35), cars_tyre);
}
The function above is attached to the body of the car; it sets a proper scale for the car model, turns its shadow on, and then tells the engine that the car has a rigid body and behaves like a box as far as collision detection is concerned. The car weighs 100 kilograms (~220 pounds) and its id is set to 2; the friction coefficient is 20, while the velocity damping is set to 20 (linear) and 30 (angular).
We use phent_setelasticity to set the bounciness factor, and then we create the wheels of the car, attaching each and every one of them the cars_tyre() function.
function cars_tyre()
{
my.shadow = on;
my.scale_x = 2;
my.scale_y = my.scale_x;
my.scale_z = my.scale_x;
phent_settype (my, ph_rigid, ph_sphere);
phent_setmass (my, 10, ph_sphere);
phent_setgroup (my, 2);
phent_setfriction (my, 60);
phent_setdamping (my, 40, 5);
phent_setelasticity (my, 30, 10);
joints[index] = phcon_add (ph_hinge, player, my);
phcon_setparams1 (joints[index], my.x, vector(0, 1, 0), nullvector);
phcon_setparams2 (joints[index], vector(-360, 360, 0), nullvector, nullvector);
index += 1;
}
The tyres have their shadows turned on; their scale is set to 2. They'll have a rigid body, behaving like sphere and weighing 10 kilograms (~22 pounds). We set the id for the wheels to 2, the friction coefficient to 60, the damping factor to 40 and 5, the bounciness to 30 and 10. We use phcon_add to bind the wheel to the car, returning the identifier of the constraint in joints[index], and then we set the anchor point for the hinge to be the origin of the wheel model (my.x) and the hinge axis to y (0, 1, 0). The allowed angles for the joints are (-360, 360, 0), which set no limits. The last line increases the index, moving on to the following wheel.
This was the hard part! You can see that the code isn't complicated, but the car lacks a few features. In fact, the motors that move the car are identical to the ones that would be used for a tank! A "real" physics car would have different behaviors for the wheels placed in front and at its back; all the wheels in my demo use the same function. I strongly recommend that you should examine Marco's physics car code which is available at Conitec's download page; his script is about 5 times bigger but it behaves like a real car.
Let's see some small helper functions:
function flip_it()
{
phent_addtorquelocal (player, vector((random(-200000) + 100000), 0, 0));
}
on_mouse_right = flip_it;
This function runs when you press the right mouse button; it allows you to flip the car if it rolls over by applying an angular force to it.
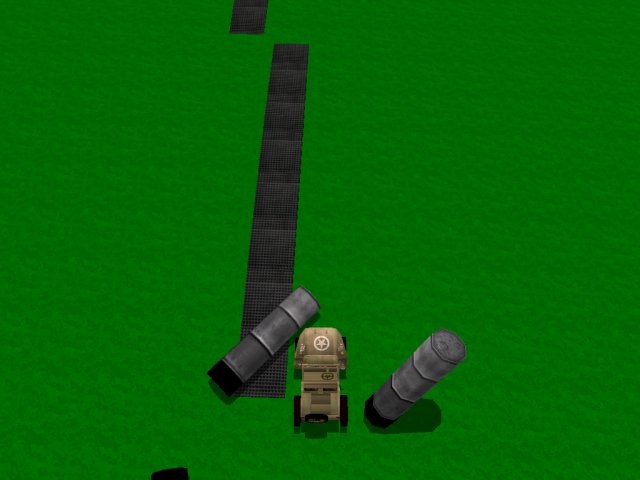
action barrel
{
my.shadow = on;
phent_settype (my, ph_rigid, ph_box);
phent_setmass (my, 20, ph_box);
phent_setfriction (my, 50);
phent_setdamping (my, 50, 50);
phent_setelasticity (my, 30, 30);
}
The action above is attached to the barrels; it turns their shadow on and then it tells the engine that each barrel has a rigid body and it behaves like a box that has 20 kilograms (~44 pounds). We set the friction coefficient to 50, the damping factor to 50 and 50, and then bounciness to 30 and 30.
The car moves with about 25-30 mph; you can increase its speed (the force that is applied to the wheels) but you will have to play with the mass of the car and wheels, their friction, damping, and so on. Special thanks go to Marco Grubert, who took the time to look at my code and made valuable suggestions. Here's a list with his advice:
1) With the physics engine, mass is always located at the center of an object, even though the bottom of a car is much heavier than its roof. This results in the car easily flipping over at high speed turns, which is bad for the insurance premium. To counter this behavior and give the car more stability make the car body lighter than the car wheels. This way the whole assembly will have a low center of gravity. There are also other solutions that people have done, e.g. add an invisible bar underneath the ground to lower the CG.
2) Now for the global variables: ph_fps_max_lock defaults to 70; fps_max should be a multiple of ph_fps_max_lock (plus a fudge factor of a few frames), e.g. fps_max= 2* ph_fps_max_lock. This is to ensure that there are N physics frames for 1 display frame. If you don't follow this rule the car might move 1 unit in the first frame then 2 units in the second, again 1 unit in the third frame,etc. Due to rounding errors the above will end up being something like 1.99*ph_fps_max_lock, so if you see some stuttering in the motion increase fps_max by a few frames. Don't forget fps_lock=on. Finally time_smooth (default:0.5) ruins the above calculations by constantly adjusting the time value. This is especially noticeable at startup, after 10 seconds it should stabilize. The good solution is to have very good camera code that prevents jerks due to time interpolation. The easy solution is setting time_smooth=0 as the first line of your main function.
3) Physics mass values should be between 0.1 and 100 for improved reliability. Use those values and then adjust gravity, damping and everything else accordingly.
4) Ph_setcorrections should be left as is because it affects everything in the level. For changing the wheels behavior instead you can use phcon_setparams2() and alter the third vector. It sets the ERP/CFM values just like phset_corrections but does so only for the specified constraint. This allows you to alter shock/strut behavior.