Infinite levels
This article will tell you how to create a level that never ends. Well, you can end the game whenever you want to, but the action can run for ever if you want that. I call this system a "treadmill" and here's how it works:
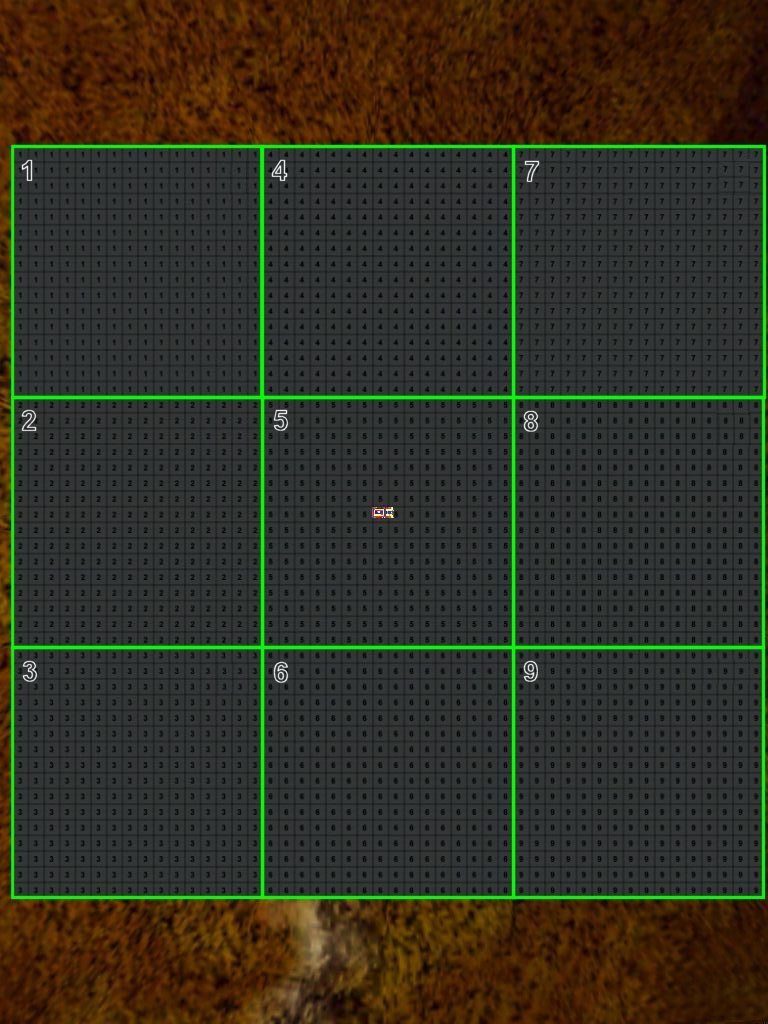
- We create a level with 9 prefabs that are placed like in the picture below. Each prefab has a different texture (named "one" ... "nine" in my demo) in fact, each prefab texture in my demo has a figure printed over it, allowing you to see how the treadmill works. Please note that the green squares and the big figures don't appear on the screen; they were added with a painting program.
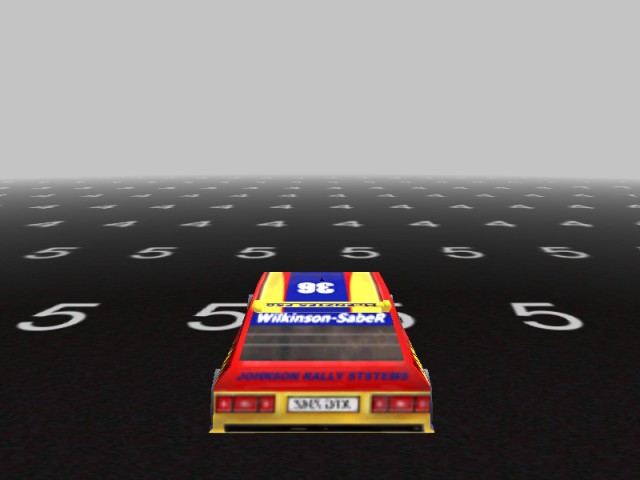
- We place our player (a car in my example) in the middle (the 5th prefab in my demo).
- The code does the rest :)
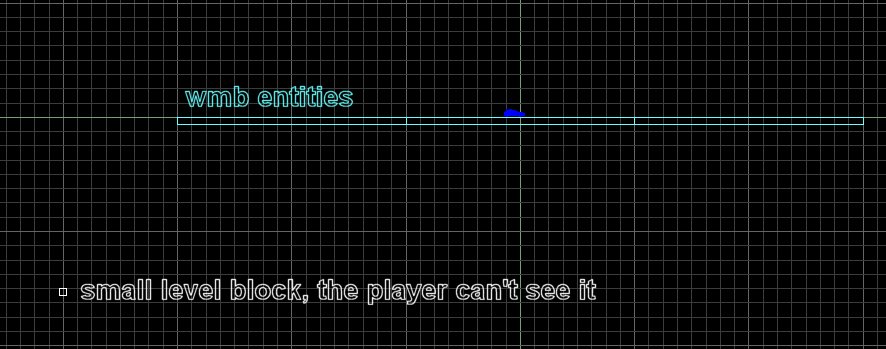
If you want to create a new level you will have to add at least a level block to it; otherwise the engine will display an error message because a level can't consist only of wmb entities.
Let's examine the code for a moment:
function main()
{
level_load(start_wmb);
fps_max = 60;
}
entity* tile1;
entity* tile2;
entity* tile3;
entity* tile4;
entity* tile5;
entity* tile6;
entity* tile7;
entity* tile8;
entity* tile9;
action tile_1 // just name these prefabs
{
tile1 = me;
}
..................
action tile_9
{
tile9 = me;
}
Function main is common. Each tile has a simple action attached to it; that action gives the tile (the prefab) a meaningful name (tile1... tile9).
action car
{
var car_speed;
while ((tile1 == null) || (tile1 == null) || (tile3 == null) || (tile4 == null) || (tile5 == null) || (tile6 == null) || (tile7 == null) || (tile8 == null) || (tile9 == null)) {wait (1);}
player = me;
while (1)
{
if(car_speed != 0) // can't rotate the car if it isn't moving
{
my.pan -= 0.2 * key_force.x * car_speed * time;
}
car_speed = 3 * key_force.y * time + max (1 - time * 0.2, 0) * car_speed;
ent_move (car_speed, nullvector);
if (key_t == 0) // normal 3rd person camera view
{
camera.x = player.x - 300 * cos(player.pan);
camera.y = player.y - 300 * sin(player.pan);
camera.z = player.z + 100;
camera.pan += 0.2 * ang (player.pan - camera.pan);
camera.tilt = -10;
}
else // press and hold "T" to get a top view
{
camera.x = player.x;
camera.y = player.y;
camera.z = 8000;
camera.pan = player.pan;
camera.tilt = -90;
}
if (total_frames % 31) // trace twice a second, starting with the 1st frame
{
trace_below(); // trace the name of the texture below the car
}
wait (1);
}
}
The action above is attached to our player (a car); it waits until all the nine level tiles are loaded, and then it allows us to control the car using the arrow keys. I have used a simple car action because I wanted to allow you to travel and notice the changes quickly; you should use your player action instead. Oh, and you can press and hold the shift key if you want to double the speed of the car.
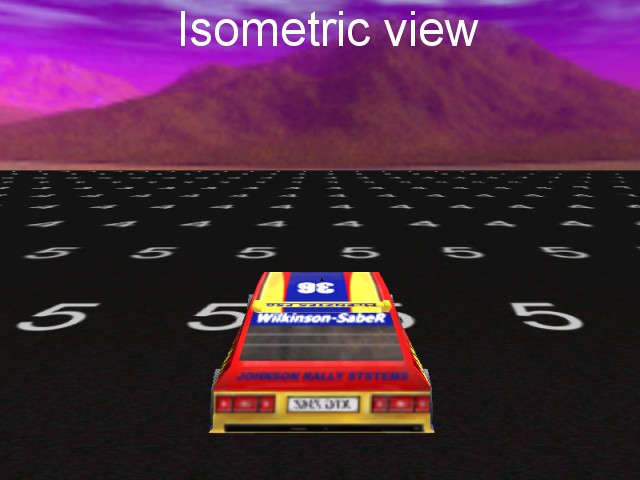
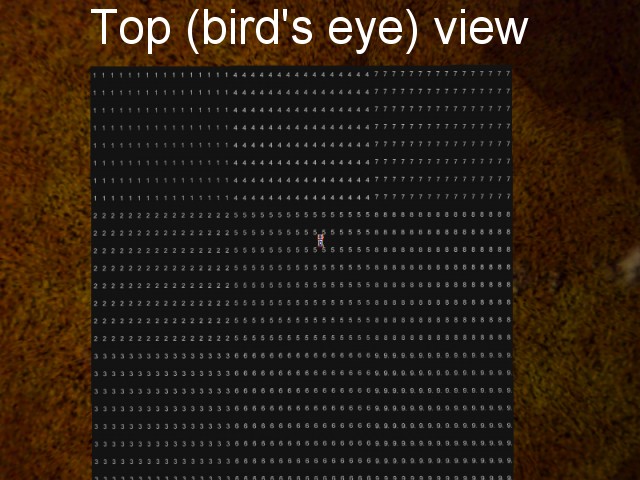
The action includes 2 different cameras: an isometric view and a top view; press and hold the "T" key to see the action from a bird's eye perspective.
The same "action car" calls the function named "trace_below" twice a second:
function trace_below()
{
vec_set(temp.x, player.x);
temp.z -= 10000; // trace 10,000 quants below the car
trace_mode = ignore_me + ignore_passable + ignore_models + ignore_sprites + scan_texture;
trace (player.x, temp);
if (str_cmpi ("one", tex_name)) // if the texture below the car is named "one" in wad
{
tile2.x = tile1.x;
tile2.y = tile1.y - 2048;
tile3.x = tile1.x - 2048;
tile3.y = tile1.y - 2048;
tile4.x = tile1.x + 2048;
tile4.y = tile1.y;
tile5.x = tile1.x + 2048;
tile5.y = tile1.y - 2048;
tile6.x = tile1.x - 2048;
tile6.y = tile1.y;
tile7.x = tile1.x + 2048;
tile7.y = tile1.y + 2048;
tile8.x = tile1.x;
tile8.y = tile1.y + 2048;
tile9.x = tile1.x - 2048;
tile9.y = tile1.y + 2048;
}
.....................
if (str_cmpi ("nine", tex_name)) // if the texture below the car is named "nine" in wad
{
tile1.x = tile9.x + 2048;
tile1.y = tile9.y - 2048;
tile2.x = tile9.x;
tile2.y = tile9.y - 2048;
tile3.x = tile9.x - 2048;
tile3.y = tile9.y - 2048;
tile4.x = tile9.x + 2048;
tile4.y = tile9.y;
tile5.x = tile9.x - 2048;
tile5.y = tile9.y + 2048;
tile6.x = tile9.x - 2048;
tile6.y = tile9.y;
tile7.x = tile9.x + 2048;
tile7.y = tile9.y + 2048;
tile8.x = tile9.x;
tile8.y = tile9.y + 2048;
}
}
This function does all the hard work, trust me! It traces between player's origin and a point that is located 10,000 quants below, returning the name of the texture that is hit by the tracing ray. If the name of the texture is "one", the player is driving the car on the first prefab, so some of the other prefabs behind the player are moved in front of it. Each prefab has 2048 x 2048 quants, so if I would add that amount to a tile it would replace another tile, get it? The things repeat for all the 9 prefabs and the code moves the proper prefabs every time, creating the illusion (or the reality!) of a level that never ends. If you want to understand how the treadmill works simply run the level, press and hold the "T" key and then move the car around using the arrow keys.
The player starts from the 5th tile (prefab); here's what happens if it moves over one of the neighboring prefabs:

Are you a bit confused? Ok, let's discuss the example in the first picture. The player is on the 5th tile and, at a certain moment, while it is driving the car, it moves over the 1st tile. At that moment, the tiles behind its back (3, 6, 9, 8 and 7), which can't be seen, are moved in front of the player - these are the red squares 3, 6, 9, 8, 7. This means that the player won't see anything wrong and we will get what we wanted - an infinite level. What happens if the player returns to the 5th tile? Nothing special; all the pieces are moved back just the way they were before.
Hold on, I've got two more tricks:
action sky_sphere
{
my.passable = on;
while (player == null) {wait (1);}
while (1)
{
my.x = player.x;
my.y = player.y;
wait (1);
}
}
The first idea is to have a huge sky sphere that moves together with the player, creating the illusion of a huge level. The passable sphere will wait until the player is loaded, and then it will get its x and y coordinates every frame.
function toggle_fog() // toggles fog if you press the "F" key
{
fog_color = (fog_color == 0); // set fog_color to 0 (no fog) or 1
camera.fog_start = 500; // the fog starts at 500 quants
camera.fog_end = 2500; // and ends at 2500 quants
}
on_f toggle_fog;
The second trick is the usage of fog; the fog is your friend because it can hide the transitions. In my example the fog can be toggled with the "F" key. If your tiles are bigger than 2048 quants (and they should be bigger) you will be able to use thinner fog (bigger camera.fog_end values) and get better results.
Where do we go from here? Well, we could use tilable terrains for our level prefabs and / or we can create different level parts that use the same tiles. Let me rewind a little.
Let's assume that our car is placed on the first tile (tile1) and moves towards right, as indicated by the yellow arrow. At a certain moment, tile1 will be moved at 1', which includes 3 trees (those big blue dots) and then, as the player advances, tile1 will be moved from 1' to 1", which includes 4 trees. Those trees were placed in Wed, at the proper height, in the air, but when tile1 moves below them (to its new position) they'll look natural. You can add trees, houses, whatever you'd like to use in your level. A good level design method would be to copy and paste tile1 several times, place the level details on the copies as needed, and then remove all the tile1 prefabs excepting the original tile1.