Painting skins and sprites
A6 has many interesting features, one of them being the ability to draw anything on any bitmap using C-Script instructions. I chose to paint a red cross over guard's skin for this article:

bmap* heros_skin; // bitmap pointer, will be used for the skin
action my_hero
{
heros_skin = bmap_for_entity(my, 0); // get a pointer to guard.mdl's skin
temp.red = 255; // paint the skin using the red color
temp.green = 0;
temp.blue = 0;
format = bmap_lock (heros_skin, 0); // lock the skin bitmap
pixel = pixel_for_vec(temp, 100, format);
draw_cross(31, 108);
bmap_unlock (heros_skin); // unlock the bitmap
// put the rest of the code for your hero here
}
This is beginner's corner, so the code can't be too complicated: we set the previously defined bitmap pointer named heros_skin to guard.mdl's skin (that's what bmap_for_entity does) and then we set temp.red to 255. This means that we will do all our pixel drawing using a red color. We lock the skin using bmap_lock, and then we create a pixel that has a red color, a transparency factor of 100 (completely opaque) and the right pixel format for our painting. The last two lines call the function that draws the red cross and unlock the skin.
Here's the code for the scary draw_cross function:
function draw_cross(coords_x, coords_y)
{
pixel_to_bmap(heros_skin, coords_x + 3, coords_y + 0, pixel);
pixel_to_bmap(heros_skin, coords_x + 4, coords_y + 0, pixel);
pixel_to_bmap(heros_skin, coords_x + 5, coords_y + 0, pixel);
pixel_to_bmap(heros_skin, coords_x + 6, coords_y + 0, pixel);
pixel_to_bmap(heros_skin, coords_x + 3, coords_y + 1, pixel);
pixel_to_bmap(heros_skin, coords_x + 6, coords_y + 1, pixel);
pixel_to_bmap(heros_skin, coords_x + 3, coords_y + 1, pixel);
pixel_to_bmap(heros_skin, coords_x + 6, coords_y + 1, pixel);
pixel_to_bmap(heros_skin, coords_x + 0, coords_y + 2, pixel);
pixel_to_bmap(heros_skin, coords_x + 1, coords_y + 2, pixel);
pixel_to_bmap(heros_skin, coords_x + 2, coords_y + 2, pixel);
pixel_to_bmap(heros_skin, coords_x + 3, coords_y + 2, pixel);
pixel_to_bmap(heros_skin, coords_x + 6, coords_y + 2, pixel);
pixel_to_bmap(heros_skin, coords_x + 7, coords_y + 2, pixel);
pixel_to_bmap(heros_skin, coords_x + 8, coords_y + 2, pixel);
pixel_to_bmap(heros_skin, coords_x + 9, coords_y + 2, pixel);
pixel_to_bmap(heros_skin, coords_x + 0, coords_y + 3, pixel);
pixel_to_bmap(heros_skin, coords_x + 9, coords_y + 3, pixel);
pixel_to_bmap(heros_skin, coords_x + 0, coords_y + 4, pixel);
pixel_to_bmap(heros_skin, coords_x + 9, coords_y + 4, pixel);
pixel_to_bmap(heros_skin, coords_x + 0, coords_y + 5, pixel);
pixel_to_bmap(heros_skin, coords_x + 1, coords_y + 5, pixel);
pixel_to_bmap(heros_skin, coords_x + 2, coords_y + 5, pixel);
pixel_to_bmap(heros_skin, coords_x + 3, coords_y + 5, pixel);
pixel_to_bmap(heros_skin, coords_x + 6, coords_y + 5, pixel);
pixel_to_bmap(heros_skin, coords_x + 7, coords_y + 5, pixel);
pixel_to_bmap(heros_skin, coords_x + 8, coords_y + 5, pixel);
pixel_to_bmap(heros_skin, coords_x + 9, coords_y + 5, pixel);
pixel_to_bmap(heros_skin, coords_x + 3, coords_y + 6, pixel);
pixel_to_bmap(heros_skin, coords_x + 6, coords_y + 6, pixel);
pixel_to_bmap(heros_skin, coords_x + 3, coords_y + 6, pixel);
pixel_to_bmap(heros_skin, coords_x + 6, coords_y + 6, pixel);
pixel_to_bmap(heros_skin, coords_x + 3, coords_y + 7, pixel);
pixel_to_bmap(heros_skin, coords_x + 4, coords_y + 7, pixel);
pixel_to_bmap(heros_skin, coords_x + 5, coords_y + 7, pixel);
pixel_to_bmap(heros_skin, coords_x + 6, coords_y + 7, pixel);
}
Yes, I know it's a long function, but did you notice that all the lines are almost identical? Let's examine the first one in detail:
pixel_to_bmap(heros_skin, coords_x + 3, coords_y + 0, pixel);
This instruction uses the patented :) pixel_to_bmap instruction to draw over heros_skin, at the coordinates given by (coords_x + 3, coords_y + 0), using that red, 100% opaque pixel value. So our call to function draw_cross:
draw_cross(31, 108);
draws a pixel for every line inside the function, with the first line drawing a red pixel to x = 34, y = 108 (31 + 3, 108 + 0). How did I get those values for the draw_cross call? Take a look at the skin:
The rest is simple: you decide what you want to display (a star, a symbol, etc) and you draw it on something, even on paper. Here's how my cross looked like on paper (those grey pixel borders were drawn in order to make the things easier for you):
Use a pixel_to_bmap instruction for every pixel, and don't forget that you can paint on sprites too! This means that you can create a digital clock entity, weird signs and many more things using this piece of code.
Poor man's underwater effect
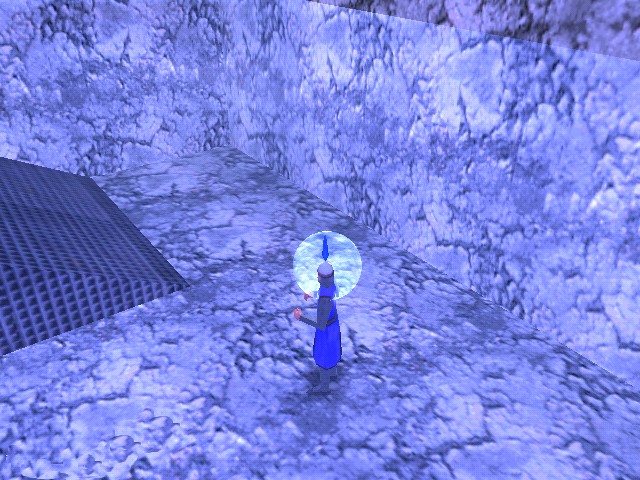
Ok, so we know how to create a good looking water surface. But what's happening when the player goes under it? Will he or she see the same, nice looking waves? This article will describe a simple underwater effect that works with any engine edition. The idea is simple: we monitor player's height in a while (1) loop, and if it goes below a certain value we put its head inside a blue, rotating sphere model :)
starter create_water()
{
sleep (1); // wait until the level is loaded
ent_create (sphere_mdl, nullvector, move_sphere);
}
It all begins with a starter function that waits until the level is loaded, and then it creates a sphere and attaches it the move_sphere() function:
function move_sphere()
{
while (player == null) {wait (1);}
proc_late();
my.passable = on;
my.transparent = on;
my.unlit = on;
my.bright = on;
my.ambient = -100;
my.alpha = 90; // play with this value
while (1)
{
my.x = player.x;
my.y = player.y;
my.z = player.z + 40; // 40 = experimental value
my.pan = sin(total_frames * water_speed) * amplitude;
my.tilt = sin(total_frames * water_speed) * amplitude;
my.roll = cos(total_frames * water_speed) * amplitude;
if (my.z < -38) // experimental value, depends on the height of the water surface
{
my.invisible = off;
}
else
{
my.invisible = on;
}
wait(1);
}
}
This function waits until the player is loaded and then makes the sphere model passable, transparent, unlit and bright. I chose a negative ambient, but you can also darken the skin in a painting program. You will also want to play with the transparency factor - alpha. The sphere is kept 40 quants above player's head; that's an experimental value and it depends on the height of your player.
I am using the sin and cos functions to rotate the sphere around; feel free to use any combination of sin and cos for the angles, and don't forget to tweak the values for water_speed and amplitude. Like I said, the code checks if player's z is below 38 quants or not, making the sphere model visible or not. This value depends on the height of the water surface and needs to be changed according to your needs.
I have used a simple, transparent sprite for the water surface, but you can use any other method, including the terrain-based water system that was presented in AUM a while ago.