Volumetric fog
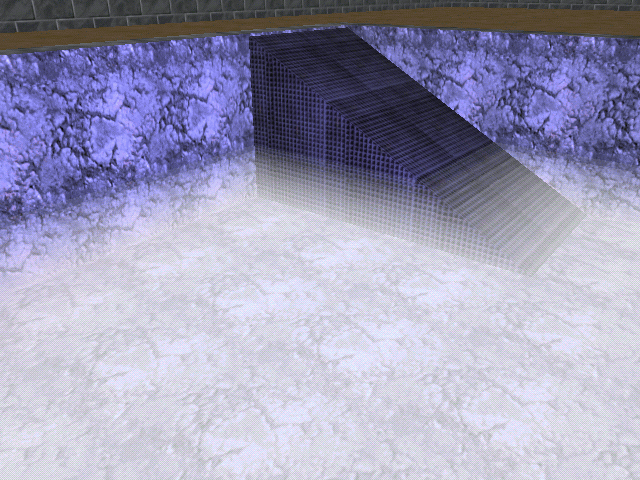
Acknex uses a simple fog system that is supported by all the 3D cards that are available on the market, even by the older ones. The engine is mapping the z value of the pixels to a function that controls the fog color, strength, etc. The result is the good looking fog we all know and like (read Aum25 for more info). But what if we want to put some fog only in a certain area of our level, for example on the floor of that slimy dungeon? We would need to use volumetric fog.
I'm sure that some of you have asked this questions many times: how can I add volumetric fog to my levels? This article will teach you how to fake volumetric fog using the Acknex engine. The results look good and the performance hit is practically inexistent.
1) Create a simple model that looks like this in Med:
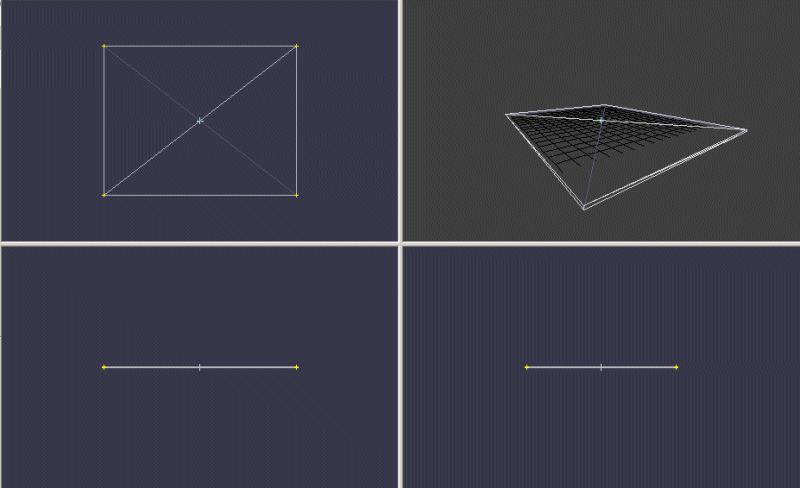
Add a cube in Med and change its size until it fits your needs. Don't forget to make it extremely thin. Use a plain color for the skin; I have used a white texture of 32 x 32 pixels.
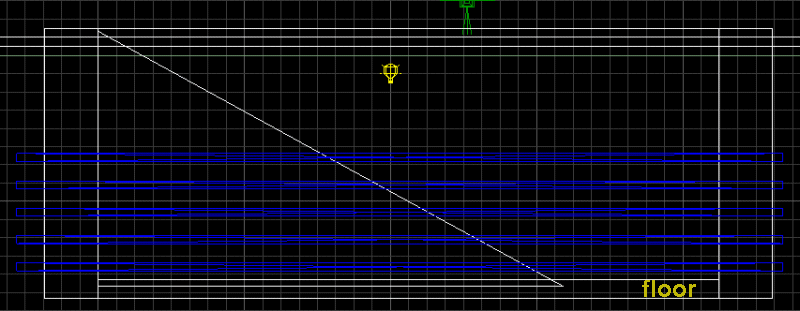
2) Place the model in your level, close to the floor, adjust its scale (if you need to) and attach it the action named fog_layer.
3) Add more models that have the same action attached to them, using a different z value for each one of them. The picture below shows 5 "layers" (5 models) placed above the floor level; my demo level uses 10 layers.
Time to take a look at the code:
action fog_layer
{
my.passable = on;
my.transparent = on;
while (1)
{
my.alpha = max (0, (camera.z - my.z) / 20);
wait (1);
}
}
I know it might sound weird, but that's all the code that it is needed in order to create volumetric fog! The model is made transparent and passable; its alpha changes depending on the distance (on the z axis) between the camera and the model used as a fog layer. When the camera comes closer to a layer, that layer will become more and more transparent, until it disappears.
You can adjust the transparency factor by changing "20", you can change the color of the fog by simply changing the color of the skin, you can create several actions with different names and different "20" values if you need several different fog effects in the same level, you can use more or fewer models (thinner or thicker) to adjust the quality of the fog, you can... well, you can do a lot of stuff.
Split screen shooter
If you have a twin brother (or a sister) prepare for the confrontation of your life!
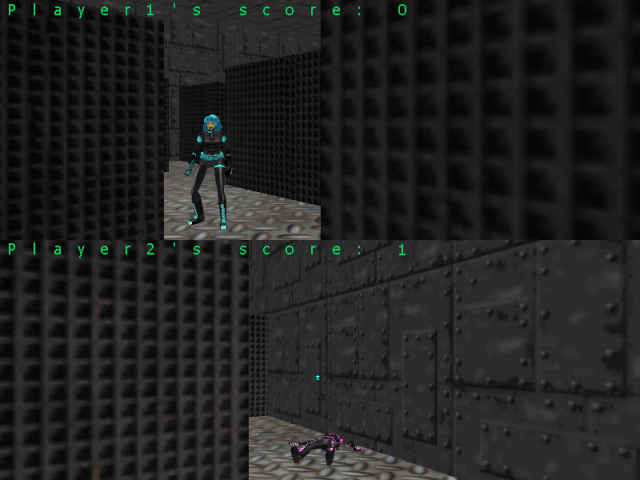
First of all we create two views:
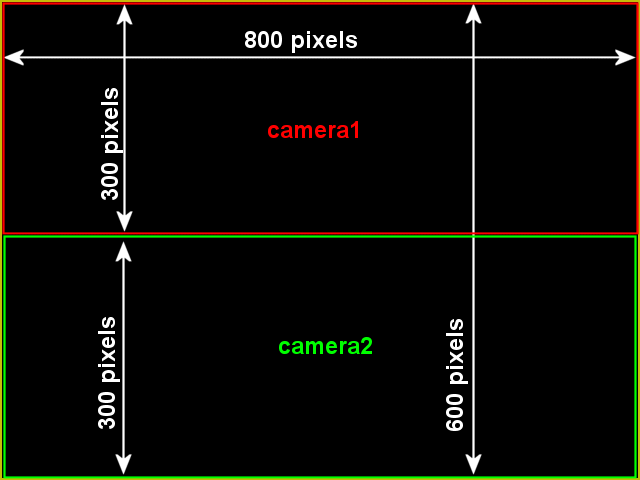
view camera1
{
layer = 15;
pos_x = 0;
pos_y = 0;
size_x = 800;
size_y = 300;
arc = 80;
flags = visible;
}
view camera2
{
layer = 15;
pos_x = 0;
pos_y = 300;
size_x = 800;
size_y = 300;
arc = 80;
flags = visible;
}
These view definitions will divide the screen in two equal parts, like in the picture below:
I have used a simple text definition to put a string on the screen:
text score_text
{
pos_x = 0;
pos_y = 0;
font = verdana_font;
string = "Player1's score:\n\n\n\n\n\n\n\n\n\n\n\n\nPlayer2's score:";
flags = visible;
}
I'm sure that you remember what "\n" does: it continues to display the string on a new line. This way I can display "Player1's score" and "Player2's score" using a single text. I use a single panel definition and two digits to display the score for both players:
panel score_panel
{
pos_x = 0;
pos_y = 0;
digits = 460, 0, 2, verdana_font, 1, score1;
digits = 460, 300, 2, verdana_font, 1, score2;
flags = refresh, visible;
}
This is a standalone project, so it has its own main function:
function main()
{
fps_max = 40;
level_load(split_wmb);
wait (3);
camera.visible = off;
}
The only thing that should be mentioned here is the last line of code: it hides the default view (camera) because we have defined two views for our project (camera1 and camera2).
I have duplicated most of the code used for both players, so the action and the functions associated to the first player are identical with the ones associated to the second player.
action player_one
{
player1 = me;
my.enable_entity = on;
my.enable_impact = on;
my.event = kill_player1;
ent_create (handgun1_mdl, nullvector, weapon1);
The entity attached to this action will become player1 and it will be sensitive to other entities; when another entity hits it, its event (kill_player1) will run. The last line will create the weapon associated to player1; the weapon that was created is controlled by the function named weapon1( ).
while (p1_alive == 1)
{
my.pan += 5 * (key_a - key_d) * time;
player1_dist.x = 15 * (key_w - key_s) * time;
player1_dist.y = 0;
player1_dist.z = 0;
move_mode = ignore_passable + glide;
ent_move (player1_dist, nullvector);
camera1.pan = my.pan;
camera1.x = my.x;
camera1.y = my.y;
camera1.z = my.z + 30;
As long as player1 is alive (p1_alive is set to 1 at game start), it can move using the "W", "S", "A" and "D" keys. Player1 ignores the passable entities and glides along the walls for smoother movement. The view named camera1 follows player1 all the time, using its x and y position and being placed 30 quants above its origin.
if (key_w + key_s > 0) // if the player is moving
{
ent_cycle("run", my.skill46);
my.skill46 += 10 * time;
my.skill46 %= 100;
}
else // the player is standing or shooting
{
if (key_space == 1) // if this player is shooting
{
ent_cycle("attack", 100); // display the last "attack" animation frame
if (bullet1 == null)
{
wait (3);
ent_create (bullet_mdl, bullet1_coords, move_bullet1);
}
}
else
{
ent_cycle("idle", my.skill46); // play "stand" frames animation
my.skill46 += 2 * time; // "stand" animation speed
my.skill46 %= 100; // loop animation
}
}
wait (1);
}
}
If the player is moving (key_w or key_s are pressed), player1 plays its "run" animation in a loop. If the player isn't moving, there are two possibilities:
1) The player is shooting ("space" is pressed). If this is true, the player will display its last "attack" animation frame, shooting a bullet as soon as its previous bullet has disappeared.
2) The player is standing still ("space" isn't pressed). If this is the case, the player will play its "idle" animation in a loop.
Let's see the function that takes care of the weapon used by player1:
function weapon1()
{
proc_late();
my.passable = on;
while (1)
{
vec_for_vertex (bullet1_coords, my, 148); // get the vertex coords for the bullet
my.x = you.x;
my.y = you.y;
my.z = you.z;
my.pan = you.pan;
my.tilt = you.tilt;
my.roll = you.roll;
my.frame = you.frame;
my.next_frame = you.next_frame;
wait (1);
}
}
The first line of code makes sure that the weapon isn't lagging one frame behind the player. We use a while loop to get the vertex coordinates for the bullet all the time; this way, the bullet will appear at the same position with vertex #148 used for the weapon model. The weapon has the same position, angles and frames with its creator (player1) all the time.
When we press the "space" key, the function below starts to run:
function move_bullet1()
{
bullet1 = me;
my.skill10 = 1;
my.pan = you.pan;
my.enable_entity = on;
my.enable_impact = on;
my.enable_block = on;
my.event = remove_bullet;
while (my != null)
{
my.skill1 = 15 * time; // bullet speed
my.skill2 = 0;
my.skill3 = 0;
move_mode = ignore_you + ignore_passable;
ent_move (my.skill1, nullvector);
wait (1);
}
}
Every bullet fired by player1 is named "bullet1". We are using the action associated to player1 to make sure that a single entity named "bullet1" can exist at a certain moment; this way, we disable auto fire.
We set skill10 to 1 in order to give the bullet a unique id number and then we make sure that the player and the bullet have the same angle at the moment of creation. The bullet will be sensitive to entities and level blocks; when it collides with something, its remove_bullet event will run.
The bullet moves in a while loop, ignoring the entity that has created it (player1) and any passable objects it might encounter on its way. You've guessed it; the event associated to the bullet is really simple:
function remove_bullet()
{
snd_play (hit_wav, 100, 0);
wait (1);
ent_remove (me);
}
The function plays a sound and then it removes the bullet. Let's see the code for the event function associated to player1:
function kill_player1()
{
if (you.skill10 != 1) {return;}
my.event = null;
p1_alive = 0;
score2 += 1;
my.skill46 = 0;
snd_play (scream_wav, 100, 0);
while (my.skill46 < 80)
{
ent_cycle("death", my.skill46);
my.skill46 += 3 * time;
wait (1);
}
}
The first line of code checks if player1 was hit by a bullet or not; it wouldn't be nice to be able to kill your opponent by simply running into it! The second line of code tells the player to stop from being sensitive to other events - the player is already dead now. We set p1_alive to zero (this stops the animations), we increase score2 (player1 has died), we play a sound and then we run the "death" animation once.
The last function that needs to be discussed is the one that restarts the game:
function play_again()
{
snd_play (restart_wav, 100, 0);
p1_alive = 1;
p2_alive = 1;
wait (2);
main();
}
on_p play_again;
This function runs when you press the "P" key. It plays a sounds, revives both players (although only one of them is dead) and then runs function main( ) again. Please note that score1 and score2 aren't changed so you can play all day long without loosing the score.