Night vision
Imagine yourself walking inside a dark level - but you've got the night vision binoculars! Let's see how it is done!
We create panels for the common resolutions:
panel nvision640_pan
{
bmap = nvision640_map;
layer = 20;
pos_x = 0;
pos_y = 0;
flags = overlay, refresh, d3d;
}
panel nvision800_pan
{
bmap = nvision800_map;
layer = 20;
pos_x = 0;
pos_y = 0;
flags = overlay, refresh, d3d;
}
panel nvision1024_pan
{
bmap = nvision1024_map;
layer = 20;
pos_x = 0;
pos_y = 0;
flags = overlay, refresh, d3d;
}
Then we create a sprite entity:
entity fog_sprite
{
type = <fog+5.pcx>;
layer = 15;
x = 200;
y = 0;
z = 0;
flags = flare, bright;
}
The key function is called from main at game start:
function init_nvision()
{
while (1)
{
if (key_n == 1) // press and hold "N" for night vision
{
if (video_mode == 6) // 640x480
{
nvision640_pan.visible = on;
nvision800_pan.visible = off;
nvision1024_pan.visible = off;
}
if (video_mode == 7) // 800x600
{
nvision640_pan.visible = off;
nvision800_pan.visible = on;
nvision1024_pan.visible = off;
}
if (video_mode == 8) // 1024x768
{
nvision640_pan.visible = off;
nvision800_pan.visible = off;
nvision1024_pan.visible = on;
}
camera.ambient = 100;
fog_sprite.visible = on;
if (random(1) > 0.97) // every few seconds
{
fog_sprite.frame = random(5); // pick a random "fog" frame number
}
}
else
{
nvision640_pan.visible = off;
nvision800_pan.visible = off;
nvision1024_pan.visible = off;
fog_sprite.visible = off;
camera.ambient = 0;
}
wait (1);
}
}
If we press the "N" key, we make the proper panel visible and the other 2 panels invisible, depending on the screen resolution. The "night vision" effect is obtained by setting camera.ambient to 100.
Do you remember the fog_sprite entity that was defined a few lines above? Its role is to give the greenish appearance of the lenses. It is a sprite with several frames that is placed in front of the player; from time to time its frame changes in order to simulate noise, etc. You can add green fog to the level to make the things look "real".
If we release the "N" key, all the panels are made invisible, the sprite disappears and camera.ambient is set to zero again.
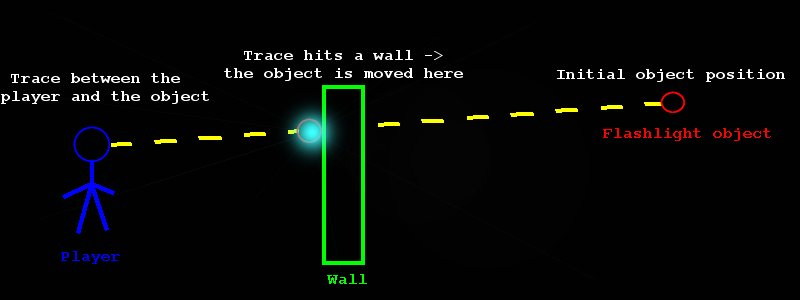
Flashlight with batteries
The regular flashlight code uses this idea: create an invisible object at a big distance in front of the player and trace between the player and the invisible object. If something is hit (a wall, etc) move the object at hit point and let it generate light, like in the picture.
Let's take a look at the action associated to the flashlight:
var max_dist = 10000; // use it for distances smaller than 10,000 quants
action flashlight_pickup
{
while (player == null) {wait (1);}
my.passable = on;
while (vec_dist (player.x, my.x) > 100) {wait (1);}
my.invisible = on;
my.lightred = 250;
my.lightgreen = 250;
my.lightblue = 170;
while (1)
{
while (energy > 0 && key_f == 1) // press the "F" key to use the flashlight
{
my.lightrange = 200;
temp.x = max_dist * cos(player.pan) * cos(camera.tilt) + player.x;
temp.y = max_dist * sin(player.pan) * cos(camera.tilt) + player.y;
temp.z = max_dist * sin(camera.tilt) + player.z;
trace_mode = ignore_models + use_box;
my.skill1 = trace (player.x, temp);
if (my.skill1 != 0)
{
temp.x = (my.skill1 - 30) * cos(player.pan) * cos(camera.tilt) + player.x;
temp.y = (my.skill1 - 30) * sin(player.pan) * cos(camera.tilt) + player.y;
temp.z = (my.skill1 - 30) * sin(camera.tilt) + player.z;
vec_set (my.pos, temp);
}
energy -= 0.5 * time;
wait (1);
}
my.lightrange = 0;
wait (1);
}
}
The flashlight model is passable; as soon as the player comes close enough, it will become invisible. If we have enough energy (batteries) left and we press the "F" key, we compute a position 10,000 quants in front of the player. If you like math you can check the formulas; I'll explain the easiest one:
temp.z = max_dist * sin(camera.tilt) + player.z;
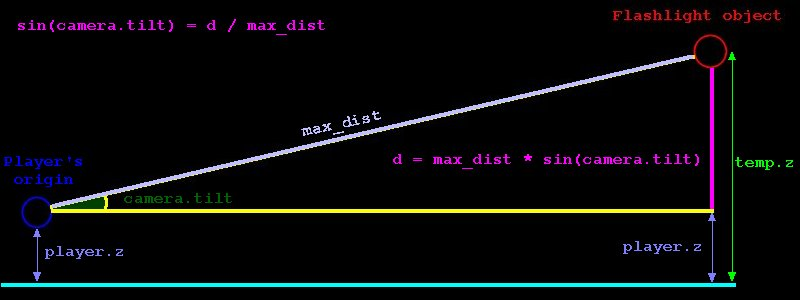
We trace between the player and the flashlight object and we store the result in skill1. If the result isn't zero we have hit something, so we compute a new position for the flashlight spot, replacing max_dist with the distance returned by trace. We don't want our light spot to be placed inside the wall, so we substract 30 quants from the distance given by skill1. Please note that I am using the flashlight model itself for the "flashlight object"; you can use other object if you want to (but why would you want to do that?).
The energy decreases if the "F" key is pressed; if we release "F" the lightrange is set to zero -> the flashlight is extinguished.
The action assigned to the batteries is simple:
action battery_pickup
{
my.passable = on;
while (player == null) {wait (1);}
while (vec_dist (player.x, my.x) > 100) {wait (1);}
energy += battery;
ent_remove (me);
}
When the player comes close, the energy is increased and the battery object is removed.