Stratego: RTS and TBS template
First of all, RTS stands for Real Time Strategy and TBS means Turn Based Strategy, but I guess you knew that already. I have created a game demo that will get you started if you plan to create a strategy game. The demo allows you to:
- move the camera;
- create two types of buildings; one produces soldiers, the other one produces nothing (can be used for technology upgrades?)
- move the units using a primitive path finding system.
I have set the screen resolution to 800x600 pixels and I have set mouse_range to 3000 just to make sure that I can touch and click anything on screen (default = 1000). I'm also using
var walk_speed = 2; // soldier speed
var animation_speed = 6; // soldier's animation speed.
My main function is simple (as always):
function main()
{
D3D_PANELS = ON;
LOAD_LEVEL (<strat1.wmb>);
move_camera(); // new stuff here
}
Let's take a look at move_camera:
function move_camera()
{
level_marginx = 200; // scroll the camera from -200 to 200
level_marginy = 200; // on X and Y
CAMERA.ARC = 70;
CAMERA.X = 0; // build your levels with the starting point in the origin
CAMERA.Y = 0; // because at game start the camera will point to the origin
CAMERA.Z = camera_height; // change camera_height to get closer or farther to the ground
CAMERA.PAN = 90; // set the camera to look down.
CAMERA.TILT = -90;
CAMERA.ROLL = 0;
MOUSE_MAP = cursor_map; // choose the cursor and make it appear in the center of the screen
MOUSE_POS.X = SCREEN_SIZE.X / 2;
MOUSE_POS.Y = SCREEN_SIZE.Y / 2;
MOUSE_MODE = 2;
WHILE (1)
{
MOUSE_POS.X = POINTER.X; // mouse movement;
MOUSE_POS.Y = POINTER.Y;
IF (MOUSE_POS.X < 1 && CAMERA.X > level_marginx * (-1)) {CAMERA.X -= 10 * TIME;}
IF (MOUSE_POS.X > SCREEN_SIZE.X - 2 && CAMERA.X < level_marginx) {CAMERA.X += 10 * TIME;}
IF (MOUSE_POS.Y > SCREEN_SIZE.Y - 2 && CAMERA.Y > level_marginy * (-1)) {CAMERA.Y -= 10 * TIME;}
IF (MOUSE_POS.Y < 1 && CAMERA.Y < level_marginy) {CAMERA.Y += 10 * TIME;}
WAIT (1);
}
}
The camera movement code works this way:
IF (MOUSE_POS.X < 1 && CAMERA.X > level_marginx * (-1))
{
CAMERA.X -= 10 * TIME;
}
If the mouse moves to the left and reaches the left edge (MOUSE_POS.X < 1) and we can move the camera (CAMERA.X > -200) then we move the camera to the left (scroll left). The other 3 IF statements look and work in the same way; we're using SCREEN_SIZE.X and SCREEN_SIZE.Y to get the size of the screen in pixels for the right and bottom edge. We could have used numbers because we already know that we're running in 800x600 pixels, but this way our game is prepared for serious strategy games; the code can read the resolutions and adapt the camera movement automatically. Don't forget that the Y axis is reverted, so if we want to scroll upwards we have to reduce CAMERA.Y to make it work.
We are adding a panel that creates buildings if it is clicked and plays a nice sound when we're over the buttons using the mouse_over function:
PANEL main800_pan
{
BMAP main800_map;
LAYER 20;
POS_X 0;
POS_Y 0;
BUTTON 4, 4, building1_map, building1_map, building11_map, create_building1, NULL, mouse_over;
BUTTON 4, 65, building2_map, building2_map, building22_map, create_building2, NULL, mouse_over;
FLAGS OVERLAY, REFRESH, TRANSPARENT, VISIBLE;
}
If we click the building1 button, it will trigger the create_building1 function:
function create_building1()
{
WHILE (MOUSE_LEFT == 1 || MOUSE_RIGHT == 1) {WAIT (1);} // wait for mb release
WHILE (1)
{
IF (MOUSE_LEFT == 1)
{
build1_pos.X = MOUSE_POS.X;
build1_pos.Y = MOUSE_POS.Y;
build1_pos.Z = camera_height; // place buildings at ground position
vec_for_screen (build1_pos,CAMERA);
CREATE (<build1.wmb>, build1_pos, build1_action);
END;
}
IF (MOUSE_RIGHT == 1) {END;} // abort if right mouse button is pressed
WAIT (1);
}
}
If you click the building1 button, you could trigger several events, so this line
WHILE (MOUSE_LEFT == 1 || MOUSE_RIGHT == 1) {WAIT (1);}
waits for the left mouse button release, then all the stuff goes on. If the lmb is clicked again, we're getting the mouse pointer coordinates in build_pos, converting them to world coordinates with vec_for_screen. We create the building1 (build1.wmb) at pointer position and make it run the build1_action:
function build1_action()
{
MY.PUSH = 20; // units (soldiers) have PUSH = 10, building have PUSH = 20
WHILE (MOUSE_LEFT == 1) {WAIT (2);} // don't create units by mistake
MY.ENABLE_SCAN = ON; // SCAN - sensitive
MY.ENABLE_CLICK = ON;
MY.EVENT = build_stuff1; // create units when clicked
scan_area.PAN = 360;
scan_area.TILT = 60;
scan_area.Z = 900;
vec_set (MY_POS, build1_pos);
SCAN MY_POS, MY_ANGLE, scan_area;
IF (RESULT > 0 && RESULT < 200) // buildings must be separated by 200 quants or more
{
PLAY_SOUND cantplacehere_snd, 100;
REMOVE ME;
}
ELSE
{
PLAY_SOUND buildingplaced_snd, 100;
}
}
Building1 is sensitive to SCAN and CLICK. When it is placed on the ground, it will start scanning around it. If another building was found nearby (RESULT > 0 means that SCAN has found another building) and it is closer than 200 quants, the newly created building is instantly removed. If there isn't any buiding in the area, the building succedes and a buildingplaced_snd sound is played.
What happens if any existing building is clicked? It's build_stuff1 event is triggered:
function build_stuff1()
{
IF (EVENT_TYPE == EVENT_CLICK) // make sure it's a click
{
IF (MY.SKILL10 > 2)
{
END; // 8 positions filled, so stop creating units
}
IF (MY.SKILL9 == 1 && MY.SKILL10 == 1) // exclude center of the building
{
MY.SKILL9 += 1;
}
temp.X = unitstartxpositions[MY.SKILL9] + MY.X;
temp.Y = unitstartxpositions[MY.SKILL10] + MY.Y;
temp.Z = MY.Z;
CREATE (<guard.mdl>, temp, unit1_action);
PLAY_SOUND unitcreated_snd, 50;
MY.SKILL9 += 1;
IF (MY.SKILL9 > 2)
{
MY.SKILL9 = 0; // next row
MY.SKILL10 += 1;
}
}
}
Every building can create up to 8 units (soldiers). We have a few arrays to help us do that:
var unitstartxpositions[3] = -65, 0, 65; // stores unit offsets related to the wmb center
var unitstartypositions[3] = -65, 0, 65; // we aren't using 0,0 (building center)
The idea is to place the building1 wmb on the ground; these arrays will help us place the units - look at this picture
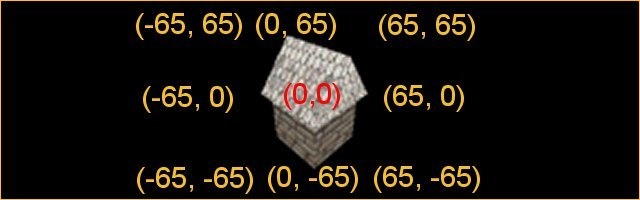
We can place 8 units around the building (3 rows and 3 columns, but we're excluding the center). The figures in the picture are the offsets of the units related to the building. I'm using SKILL9 and 10 for these offsets (the first 8 skills can be accessed in Wed and I thought I should keep them free for your use). When the building is clicked for the first time, SKILL9 and SKILL10 are 0, so the first soldier will have an offset given by unitstartxpositions[0] = -65 and unitstartypositions[0] = -65. The building has the SKILL9 increased by 1 at the second click (second soldier), so the unit will have the offset (0, -65). These things go on and on (excluding (0,0)) until all the units (8 soldiers) have been created. Finally, the most complex function - move_unit - is going to be exposed:
function move_unit ()
{
MY.PUSH = 10; // lower push for units
IF (EVENT_TYPE == EVENT_ENTITY) // collision with buildings or other units
{
// caveman's path finding code
EXCLUSIVE_ENTITY;
MY.PAN = RANDOM (360);
WAITT (10); // wait before setting the target again
temp.X = MY.SKILL12; // stored mouse pointer coordinates
temp.Y = MY.SKILL13;
temp.Z = 0;
vec_sub (temp, MY.X);
vec_to_angle (MY.PAN, temp); // rotate unit towards the target again
// remove the lines above if you want to add your path finding code
}
IF (EVENT_TYPE == EVENT_CLICK)
{
MY.SKILL11 = 0;
WHILE (MOUSE_LEFT == 1) {WAIT (2);} // wait for lmb release
WHILE (MY.SKILL11 == 0) // wait for the target to be set (lmb click)
{
IF (MOUSE_LEFT == 1)
{
EXCLUSIVE_ENTITY; // stop parallel running actions for this unit
MY.SKILL11 = 1; // target has been set
temp.X = MOUSE_POS.X;
temp.Y = MOUSE_POS.Y;
temp.Z = camera_height;
vec_for_screen (temp, CAMERA); // temp holds pointer's coords now
MY.SKILL12 = temp.X; // store pointer's coords before they get lost
MY.SKILL13 = temp.Y;
vec_sub (temp, MY.X);
vec_to_angle (MY.PAN, temp); // rotate unit towards mouse
MY.SKILL15 = 500; // maximum path length = fuel :)
WHILE (abs(MY.X - MY.SKILL12) + abs(MY.Y - MY.SKILL13) > 3 && MY.SKILL15 > 0) // stops near the mouse pointer
{
move_mode = ignore_you + ignore_passable;
ent_move (walk_speed, nullvector);
ent_cycle("walk", MY.SKILL14);
MY.SKILL14 += animation_speed * TIME;
IF (MY.SKILL14 > 100) {MY.SKILL14 = 0;}
MY.SKILL15 -= TIME; // burn fuel
WAIT (1);
}
ent_cycle("stand", 0); // set the idle frame
}
WAIT (1);
}
}
}
We'll ignore IF (EVENT_TYPE == EVENT_ENTITY) for now; this happens only if the soldier collides with one of the buildings or other soldiers. To move the soldiers, we click on them (producing an EVENT_CLICK), then we want to click somewhere on the map and we expect to unit to move there. I'm using soldier's SKILL11...SKILL15 in this function; I could have used SKILL9 and 10 because they aren't connected with SKILL9 and 10 used in the building functions, but I wanted to make the things as clear as possible.
When we click the unit, its SKILL11 is set to zero and it will stay this way until we click on the map to set the target. If we have set the target, temp is used to get the mouse pointer coordinates; we're converting them to world positions with vec_for_screen and we're safely storing them in SKILL12 and 13 because temp can suddenly change its value; we already know unit's Z coordinate, so we don't need to store it.
The unit must rotate towards the mouse then it will start moving, trying to reach its target. My path finding code is really simple, so the unit can "think" too much before finding the right path; this is why I have added "fuel". If a unit can't find its correct path, it will move towards the target until it burns all its fuel
WHILE (abs(MY.X - MY.SKILL12) + abs(MY.Y - MY.SKILL13) > 3 && MY.SKILL15 > 0)
will make the unit stop when it reaches the target or when SKILL15 = 0 (it ran out of fuel). I'm using a simple method to check if the unit has reached the target; please remember that SKILL12 and SKILL13 are holding target's coordinates.
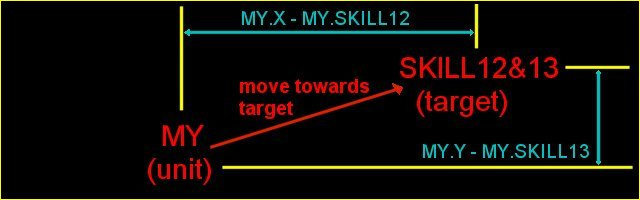
The unit moves towards the target and the "blue" differences become smaller and smaller. When their sum is smaller then 3, the unit stops.
I have used the new guard.mdl file; it walks with walk_speed set at the beginning and is animated using these lines:
ent_cycle("walk", MY.SKILL14);
set the animation frames to the first walk frame (MY.SKILL14 = 0 for now, so the guard is set at the first walking frame)
MY.SKILL14 += animation_speed * TIME;
go through all the walk animation frames; SKILL14 contains the current walk frame
IF (MY.SKILL14 > 100) {MY.SKILL14 = 0;}
loop the animation
If the unit has stopped (reached the target or ran out of fuel), it switches to stand mode
ent_cycle("stand", 0); // set the idle frame = first stand frame
Did I say this was the latest function? We've got the path finding code to discuss, but it is really simple:
IF (EVENT_TYPE == EVENT_ENTITY) // collision with buildings or other units
{
// caveman's path finding code
EXCLUSIVE_ENTITY;
MY.PAN = RANDOM (360);
WAITT (10); // wait before setting the target again
temp.X = MY.SKILL12; // stored mouse pointer coordinates
temp.Y = MY.SKILL13;
temp.Z = 0;
vec_sub (temp, MY.X);
vec_to_angle (MY.PAN, temp); // rotate unit towards the target again
// remove the lines above if you want to add your path finding code
}
.................................................................................
If the unit collides with something, it picks a random direction and moves for a little more than 1/2 second, then it "reads" the right direction from SKILL12 and 13 and tries to reach the target again.
There are many things that you should add to this code to make it perfect ;)
- Better path finding code;
- The buildings can't be placed one over the other, but you can place buidings on top of isolated units and that's wrong. I wouldn't use SCAN for every unit because it would slow down the game in theory (I did that with the buildings, but there aren't too many of them in a level). I would store all the unit positions in an array and I would compare building's coordinates with all the unit coordinates stored in the array. The array could be used to improve the path finding algorithm, too.
- Etc.
Please note that I have used a regular model with 644 polygons for the soldier. I wouldn't do that if I were you - with 100 models visible on screen at the same time, you'll slow down the engine and you don't want that.
SCRAP - SCReen cAPture code
First of all, I'd like to say that I heard somebody at the forum speaking about this and it inspired me (I can't find the post anymore, maybe it got deleted by mistake). The idea was to use SCREENSHOT every time the player was moving and save the shots on the hard drive, then assemble a movie using the screenshots. Scrap works in a different way, but uses the same idea.
You'll have to INCLUDE scrap.wdl in your game file; don't forget to insert scrap_movie(); in main to call the scrap function,
var Count = 11000; // just a number bigger than 10000
var Count1 = 0;
var Count2 = 0;
var Count3 = 0;
var Count4 = 0;
var Count5 = 0;
var Count6 = 0;
var Count7 = 0;
var Count8 = 0;
var Count9 = 0;
function scrap_movie ()
{
WHILE (1)
{
IF (Count == 11000 && KEY_M == 1) {WAIT (2); Count = 0;}
WHILE (KEY_M == 1) {WAIT (1);}
WHILE (count < 10000)
{
Count1 = Count - 1000;
Count2 = Count - 2000;
Count3 = Count - 3000;
Count4 = Count - 4000;
Count5 = Count - 5000;
Count6 = Count - 6000;
Count7 = Count - 7000;
Count8 = Count - 8000;
Count9 = Count - 9000;
IF (Count < 10) {screenshot "Mv000",Count;}
IF (Count >= 10 && Count < 100) {screenshot "Mv00",Count;}
IF (Count >= 100 && Count < 1000) {screenshot "Mv0", Count;}
IF (Count >= 1000 && Count < 1010) {screenshot "Mv100", Count1;}
IF (Count >= 1010 && Count < 1100) {screenshot "Mv10", Count1;}
IF (Count >= 1100 && Count < 2000) {screenshot "Mv1", Count1;}
IF (Count >= 2000 && Count < 2010) {screenshot "Mv200", Count2;}
IF (Count >= 2010 && Count < 2100) {screenshot "Mv20", Count2;}
IF (Count >= 2100 && Count < 3000) {screenshot "Mv2", Count2;}
..........................................................................
// repeats for Count = 3000...8000
IF (Count >= 9000 && Count < 9010) {screenshot "Mv900", Count9;}
IF (Count >= 9010 && Count < 9100) {screenshot "Mv90", Count9;}
IF (Count >= 9100 && Count < 10000) {screenshot "Mv9", Count9;}
Count += 1;
IF (KEY_M == 1) {WAIT (2); Count = 11000;}
WHILE (KEY_M == 1) {WAIT (1);}
WAIT (1);
}
WAIT (1);
}
}
We're using Count to start or stop the movie when the "M" key is pressed; if Count is smaller than 10000, the shots are saved on your hard drive; to stop this process, we're setting Count to 11000 (any number greater than 10000 is a valid Count number).
SCREENSHOT can save up to 999 shots so if your movie is going to have 25 fps, you're limited to 999 / 25 = 40 seconds. I have added a few variables (Count1...Count9) that are used to expand the screenshots to 9999 shots = 7 minutes with 25 fps.
When you press M, you'll notice a slowdown - that's normal because the shots are saved on your hard drive. When you want to finish the capture, press M again. Exit the game and move to the shots folder - you can create one like this:
SAVEDIR "C:\\SHOTS";
If you don't use a line like this in your main file, the shots will be saved in your working folder, mixing with the rest of your files.
Please take a look at the shots; their names start with mv0000.pcx and can continue to mv3201.pcx for example. Use any program that can convert pcx files to movies (Animation Shop that comes with Paint Shop Pro is a good example), then save the movie as avi, mpg, etc.
Use small resolutions for your movies; they'll look great anyway because they're ran in small windows, not in full screen. I use 320x200 all the time and this is the way I've created the METAL movie, too. Just change the screen resolution to 320x200 in your game, then press M to start the capture. If you've seen some game preview movies, you've noticed they all come in small sized windows.
I ran a test on two of my computers: Athlon 900 MHz, 60 GB Quantum Fireball Plus AS 7200 rpm and Athlon 750 MHz, 13 GB Quantum Fireball 4400 rpm. Scrap saves around 25 fps on the system with the fast hard drive and 15 fps for the second PC. If you get more than 8 fps, you can create movies - the movies on my site have 15 fps and a decent size.
If you have a good processor with a fast hard drive, you can create 400x300 pixels movies, but their size is too big unless you make a 2 second movie. Intel PIII 1000 MHz with 60GB QFB Plus AS 7200 rpm will deliver 15 fps in 400x300.