Morrowing
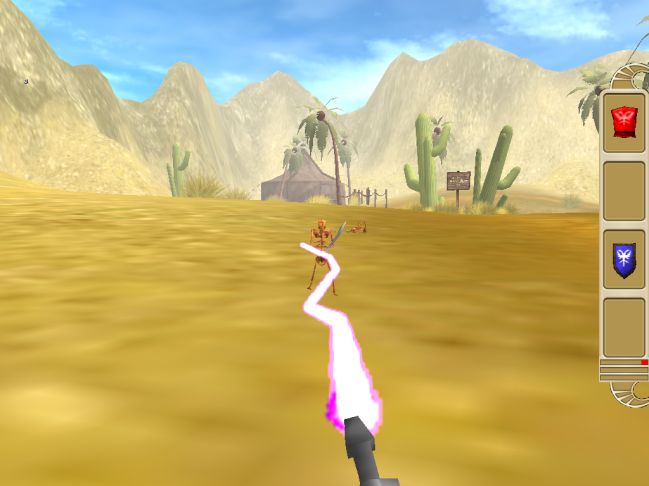
Another month, another Morrowing chunk for you. This time I have added an inventory and a lightning weapon, to name only the most important features. I had to use some of the models and the graphics from my Aum18 inventory but the menu code is completely different and has many more features.
panel main_up_pan // the upper part of the main panel
{
bmap = main_up_tga;
pos_x = 945;
pos_y = 100;
layer = 10;
flags = overlay, refresh, visible;
}
panel main_slot1_pan // the first inventory slot
{
bmap = main_slot1_tga;
pos_x = 945;
pos_y = 140;
layer = 10;
on_click = place_item1;
flags = overlay, refresh, visible;
}
panel main_slot2_pan // the second inventory slot
{
bmap = main_slot2_tga;
pos_x = 945;
pos_y = 248;
layer = 10;
on_click = place_item2;
flags = overlay, refresh, visible;
}
panel main_slot3_pan // the third inventory slot
{
bmap = main_slot3_tga;
pos_x = 945;
pos_y = 357;
layer = 10;
on_click = place_item3;
flags = overlay, refresh, visible;
}
panel main_slot4_pan // the fourth inventory slot
{
bmap = main_slot4_tga;
pos_x = 945;
pos_y = 464;
layer = 10;
on_click = place_item4;
flags = overlay, refresh, visible;
}
panel main_down_pan // the lower part of the main panel
{
bmap = main_down_tga;
pos_x = 945;
pos_y = 567;
layer = 10;
window = 3, 2, 74, 7, red_pcx, player.strength, 0; // can range from 0 to 74 (the cutout window bitmap has 74x7 pixels)
window = 3, 14, 74, 7, green_pcx, player.experience, 0; // can range from 0 to 74
window = 3, 26, 74, 7, blue_pcx, player.mana, 0; // can range from 0 to 74
flags = overlay, refresh, visible;
}
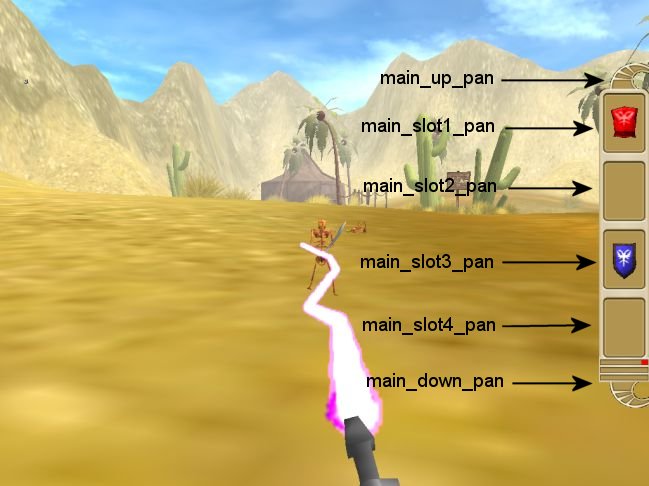
The inventory panel is composed of 6 small panels that blend together nicely. I chose to do that because each slot is a separate panel that can be clicked and I needed separated "on_click" functions for each slot.
panel shield_pan // displays the shield on the panel
{
bmap = shield_pcx;
layer = 11;
flags = overlay, refresh;
on_click = use_shield;
}
panel mace_pan // displays the mace on the panel
{
bmap = mace_pcx;
layer = 11;
flags = overlay, refresh;
on_click = use_mace;
}
panel armor_pan // displays the armor on the panel
{
bmap = armor_pcx;
layer = 11;
flags = overlay, refresh;
on_click = use_armor;
}
panel flare_pan // displays the flare on the panel
{
bmap = flare_pcx;
layer = 11;
flags = overlay, refresh;
on_click = use_flare;
}
These definitions are used for the pictures of the items (look at the armor and the shield in the picture above to see an example).
starter init_player()
{
while (player == null) {wait (1);}
player.strength = 10;
player.experience = 0;
player.mana = 0;
while (1)
{
player.mana += 0.1 * time; // increase the mana slowly
player.mana = min(74, player.mana); // limit player.mana to 74
wait (1);
}
}
This starter function initializes the player, setting its strength, its experience (increases when the player kills skeletons) and its mana. The player needs at least 70 mana points to use its lightning attack; you can see that the mana increases slowly and is limited to 74 (the width of the cutout bitmap on the hud).
function place_item1()
{
// don't do anything if the player hasn't picked up an item yet or if this slot is already full
if ((mouse_map == pointer_pcx) || (item1_placed == 1)) {return;}
if (mouse_map == shield_pcx) // picked up the shield
{
item_ptr = shield_pan;
}
if (mouse_map == mace_pcx) // picked up the shield
{
item_ptr = mace_pan;
}
if (mouse_map == armor_pcx) // picked up the armor
{
item_ptr = armor_pan;
}
if (mouse_map == flare_pcx) // picked up the flare
{
item_ptr = flare_pan;
}
item_ptr.pos_x = 960; // set the proper position for the item
item_ptr.pos_y = 165; // on the x and y axis
item_ptr.visible = on; // and make it visible
item1_placed = 1; // slot1 is occupied
mouse_map = pointer_pcx; // restore the initial bitmap (the arrow)
show_pointer = 0; // hide the mouse pointer
}
This function runs when the player clicks the first panel slot; it checks if the player has picked an object or not (mouse_map = pointer_pcx) and if the slot is occupied or not (item1_placed = 1). If mouse_map is shield_pcx, the player has picked up the shield, so we display the shield_pan panel on the inventory panel. The things repeat for the rest of the items, which are always placed at x = 960, y = 165 for the first slot. We make the correct panel visible (I'm using a panel pointer named item_ptr for that), we occupy the slot and then we restore the initial bitmap that was used for the mouse pointer (arrow_pcx). Finally, we hide the mouse pointer because we aren't interested in seeing it for now. I'm using similar functions for the rest of the slots so I won't discuss them.
action shield_init
{
my.enable_click = on;
my.event = pick_shield;
while (player == null) {wait (1);}
while (player.shield == 0) // wait until the player has got the shield
{
ent_cycle("idle", my.skill20); // play the "idle" animation
my.skill20 += 3 * time; // "idle" animation speed
my.skill20 %= 100;
wait (1);
}
ent_remove(my);
}
function pick_shield()
{
if (mouse_map != pointer_pcx) {return;} // don't pick the item if the mouse pointer isn't the cursor
if (vec_dist (player.x, my.x) > 100) {return;} // if the player is far away ignore it
player.shield = 1; // the player has got the shield
show_pointer = 1; // show the mouse pointer
mouse_map = shield_pcx;
}
The shield is sensitive to clicking, its event function being named "pick_shield". We wait until the player is created in the level, and then we animate the shield using its "idle" animation until the player picks it up. As soon as that happens we remove the shield model. The event function doesn't do anything if the mouse pointer that has clicked the shield isn't the standard "pointer_pcx" arrow; this way, we can't click more than an item without placing it on the inventory panel first.
The shield can't be picked up if the player isn't close than 100 quants to it. If the player has got the shield, we set player.shield (just another name for player.skill1) to 1, we show the mouse pointer and then we replace the arrow pointer with a picture of the shield. Our place_item1()... place_item4() functions will do the rest of the job.
function use_shield()
{
if (mouse_map != pointer_pcx) {return;} // use the shield only if the pointer is normal (not an item)
player.shield = 0; // remove the shield from the panel
if (shield_pan.pos_y == 165) // the shield was placed in the 1st slot?
{
item1_placed = 0; // allow the use of the first slot for other items from now on
}
if (shield_pan.pos_y == 270) // the shield was placed in the 2nd slot?
{
item2_placed = 0; // allow the use of the first slot for other items from now on
}
if (shield_pan.pos_y == 380) // the shield was placed in the 3rd slot?
{
item3_placed = 0; // allow the use of the first slot for other items from now on
}
if (shield_pan.pos_y == 485) // the shield was placed in the 4th slot?
{
item4_placed = 0; // allow the use of the first slot for other items from now on
}
shield_pan.visible = off;
ent_create(shield_mdl, player.x, attach_shield);
shield_on = 1;
}
The function above will run when the player clicks the inventory panel with a pointer_pcx mouse pointer. We remove the shield from the panel, and then we set the corresponding item_placed variable to zero; this frees the slot, allowing the player to place another item there (when it finds a new item). The shield must be created and attached to the player, and that's exactly what the following function does:
function attach_shield()
{
proc_late();
my.passable = on;
my.metal = on;
my.albedo = 0;
while(player != null)
{
vec_set(my.x, player.x);
vec_set(my.pan, player.pan);
my.frame = player.frame;
my.next_frame = player.next_frame;
wait(1);
}
}
The shield model is passable and exists for as long as the player exists in the level. The shield uses the same position, angle and animation frames with the player. The functions for the rest of the items are similar; the only significant difference appears in the function below:
function attach_flare()
{
proc_late();
my.passable = on;
my.scale_x = 0.45; // decrease the size of the sprite
my.scale_y = my.scale_x;
my.albedo = 0;
my.ambient = 100;
while(mace != null) // show the flare for as long as the mace exists
{
vec_for_vertex(mace_tip, mace, 41); // get the coordinates for the mace's tip
my.x = mace_tip.x;
my.y = mace_tip.y;
my.z = mace_tip.z;
my.roll += 3 * time;
wait(1);
}
ent_remove(my);
}
This function attaches a flare sprite to the top of the mace, telling the player that it can use the lightning attack (if it has got enough mana points). We use a loop to get the coordinates for the tip of the mace (vertex 41) every frame, and then we set the proper position for the flare.
Some of the older Morrowing scripts went through some changes; let's examine the major additions to the player.wdl file:
if ((mace_on == 1) && (mouse_mode == 0) && (mouse_left == 1))
{
my.skill48 = 0;
vec_set(trace_coords.x, vector(100, 0, 0));
vec_rotate(trace_coords.x, player.pan);
vec_add(trace_coords.x, player.x);
trace_mode = ignore_me + ignore_passable + use_box;
if ((trace(player.x, trace_coords.x) > 0) && (you != null))
{
snd_play(fire_wav, 50, 0);
you.health -= 35;
}
while (my.skill48 < 100)
{
ent_cycle("attack", my.skill48);
my.skill48 += 5 * time;
wait (1);
}
}
This piece of code was added inside player's while loop. If we have got and have used the mace, and the mouse pointer is hidden and we press the left mouse button, we trace 100 quants in front of the player, ignoring its mace and shield (which are passable models) and if we have hit an entity (not a wall) we play a fire_wav sound and we decrease its health by 35 points. Finally, we play the"attack" animation.
// got the mace and the pointer is hidden and the RMB is pressed and the flare is used and the player has enough mana?
if ((mace_on == 1) && (mouse_mode == 0) && (mouse_right == 1) && (flare_on == 1) && (player.mana > 70))
{
my.skill48 = 0;
player.mana = 0;
snd_play(flare_wav, 50, 0); // play the lightning sound
while (my.skill48 < 100)
{
vec_set(trace_coords.x, vector(500, 0, 0)); // trace 500 quants in front of the player (any skeleton will be alerted at 600 quants)
vec_rotate(trace_coords.x, player.pan); // rotate "trace_coords" in the direction (angles) given by the player
vec_add(trace_coords.x, player.x); // add the resulting vector to player's position
trace_mode = ignore_me + ignore_passable + use_box; // ignore the mace and the shield
vec_set (line_start.x, mace_tip.x);
vec_set (line_end.x, trace_coords.x);
lightning_effect();
if ((trace(player.x, trace_coords.x) > 0) && (you != null)) // hit something?
{
you.health -= 100; // kill the enemy
}
ent_cycle("attack", 100); // play the last "attack" animation frame
my.skill48 += 5 * time;
wait (1);
}
}
If the player has got the mace and has used it (mace_on = 1) and the right mouse button was pressed and the flare (lightning) was picked up and used and the player has enough mana, we set player.mana to zero, we play a flare_wav sound, and then we trace 500 quants in front of the player. We generate the lightning effect using the tip of the mace as the starting point and the point that was computed 500 quants in front of the player as the destination point. If we hit something, we decrease 100 health points from its health, and this kills any skeleton. We set the last "attack" frame for the player and we make sure that the lightning / tracing lasts for 1-2 seconds, until skill48 grows above 100.
The lightning effect can be found inside the particles.wdl file; it's an improved version of the old particle_line function. The code creates several lightning segments of 100 quants each, placing a particle every 5 quants. The particles live for a single frame; feel free to play with the numbers until you get an even better looking effect.
Have fun!