Planet Survivors - part 4
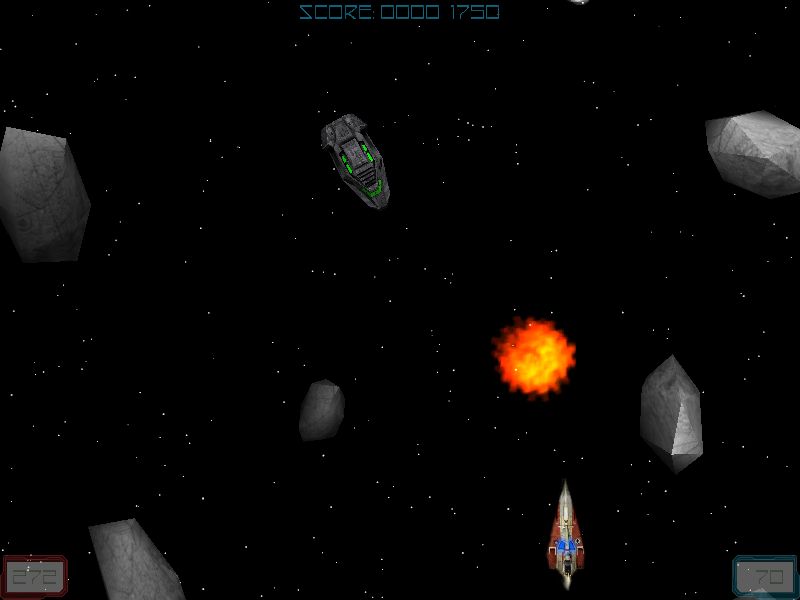
This month we will meet the first enemies: two spaceships and (can't get rid of these) quite a few asteroids. Before I begin, be warned that this project will be a cocktail of games.
I care for you, so I have decided to make a standalone script; this way you won't have to play the previous P.S. levels to get here. You'll find the code for the standalone script at the beginning of the level2.wdl file; be sure to run this file if you want to play the level.
Let's discuss the code that creates the nice starfield effect first:
starter particle_generator
{
var particle_start[3];
wait (3); // wait until the level is loaded
camera.pan = 0; // now set the new camera position and angles
camera.tilt = -90;
camera.roll = 0;
camera.x = 330;
camera.y = 0;
camera.z = 1000;
while(1)
{
particle_start.x = 1000;
particle_start.y = 1000 - random(2000);
particle_start.z = -500 + random(200);
effect (particle_init, 1, particle_start, normal);
wait (1);
}
}
We are defining a variable named particle start; this will be the origin for our particles. You can see that the camera is using a fixed position, looking down at player's ship (tilt = -90); we will give the player the illusion that the ship is moving using the starfield. By the way, the stars are generated using the particle_init function:
function particle_init()
{
temp.x = -(2 + random (15)) * starfield_speed;
temp.y = 0;
temp.z = 0;
vec_add (my.vel_x, temp);
my.bmap = star_tga;
my.alpha = 40 + random(60); // play with this value
my.size = 5 + random(5);
my.bright = on;
my.move = on;
my.lifespan = 500;
my.function = size_particles;
}
function size_particles()
{
my.size += 0.01 * time;
}
The particles have a random, negative speed on the x axis; play with starfield_speed if you want to change the global speed. I'm using the star_tga bitmap for the stars and I have set a random transparency factor and a random size for it. Its associate function size_particles() simply increases the size of the particles during their lives.
Time to take a look at the action attached to the player:
action player_level2
{
player = my;
my.ambient = -100;
my.enable_impact = on;
my.enable_entity = on;
my.event = damage_player;
var speed_factor_x;
var speed_factor_y;
The player is sensitive to impact with other entities; its "damage_player" function is triggered as soon as that happens. Finally, we are defining two local variables that will store player's movement speed on the x and y axis.
while (players_shield > 0)
{
if (key_cul == on)
{
if (speed_factor_y < 10) {speed_factor_y += 5 * time;}
}
else
{
if (speed_factor_y > 0) {speed_factor_y -= 2 * time;}
}
if (key_cur == on)
{
if (speed_factor_y > -10) {speed_factor_y -= 5 * time;}
}
else
{
if (speed_factor_y < 0) {speed_factor_y += 2 * time;}
}
if (abs(speed_factor_y) > 1)
{
if (((speed_factor_y > 0) && (my.y < 500)) || ((speed_factor_y < 0) && (my.y > -500)))
{
my.y += speed_factor_y;
}
}
As long as the player is alive (players_shield > 0) the player can increase speed_factor_y slowly by pressing and holding the left arrow key; speed_factor_y is decreased slowly if the player releases the key. The same thing happens when we press the right arrow key. Why are we using the speed_factor_x and speed_factor_y variables? Mainly because the ship moves much smoother this way, by increasing and decreasing its speed smoothly. If speed_factor_y is bigger than 1 or smaller than -1, we move the ship sideways using the values stored at that moment in speed_factor_y. Please note that the ship can move from -500 to 500 quants on the y axis.
if (key_cuu == on)
{
if (speed_factor_x < 10) {speed_factor_x += 5 * time;}
}
else
{
if (speed_factor_x > 0) {speed_factor_x -= 2 * time;}
}
if (key_cud == on)
{
if (speed_factor_x > -10) {speed_factor_x -= 5 * time;}
}
else
{
if (speed_factor_x < 0) {speed_factor_x += 2 * time;}
}
if (abs(speed_factor_x) > 1)
{
if (((speed_factor_x > 0) && (my.x < 650)) || ((speed_factor_x < 0) && (my.x > 0)))
{
my.x += speed_factor_x;
}
}
The same thing happens on the x axis; the player increases or decreases speed_factor_x when it presses the up or down arrow keys. If the player has its x greater than 0 and below 650 quants, it can be moved with the speed stored in speed_factor_x.
if ((key_space == on) || (mouse_left == on))
{
player_fires();
}
wait (1);
}
}
If the player presses the space key or the left mouse button, function player_fires() is called:
function player_fires()
{
proc_kill(4);
while ((key_space == on) || (mouse_left == on)) {wait (1);} // wait until the player releases the keys
snd_play (fire2_wav, 40, 0);
vec_set (temp.x, my.x);
temp.x += 70; // the laser is generated in front of the ship
ent_create (laser2_mdl, temp, move_bullet1);
players_ammo -= 1;
}
The first line makes sure that only a copy of this function will run. We wait until the player releases the space key or the left mouse button, we play a fire2_wav sound, we compute a position 70 quants in front of the player and then we create a laser2_mdl entity, assigning it the function named move_bullet1(). The last line of code decreases players_ammo because the player has fired a bullet.
function damage_player()
{
wait (1);
snd_play (playerhit_wav, 70, 0);
players_shield -= 10;
if (players_shield < 0)
{
players_shield = 0;
my.invisible = on;
my.passable = on;
effect(particles_explo2, 30, my.x,nullvector);
my.event = null;
}
}
The function above is the event associated to the player. When the player is hit by a bullet, by one of the enemy ships or by an asteroid, we play a playerhit_wav sound, we decrease players_shield, and then, if players_shield is smaller than zero, we set it to zero, we make the ship invisible and passable, we set player's event to null and we create an explosion effect using particles:
function particles_explo2()
{
my.bmap = explo2_tga;
my.bright = on;
my.transparent = on;
my.alpha = 100;
my.move = on;
temp.x = 1 - random(2);
temp.y = 1 - random(2);
temp.z = 0;
vec_normalize (temp.x, (1 + random(1)));
vec_add (my.vel_x, temp.x);
my.size = 2;
my.lifespan = 50;
my.function = explode_2;
}
function explode_2()
{
my.alpha -= 4 * time;
my.size += 3 * time;
if (my.alpha <= 0)
{
my.lifespan = 0;
}
}
The bitmap used for the explosion is explo2_tga; it's a bright, transparent bitmap with its alpha set to 100. The bitmap will move in a random direction on the x and y axis; its associated function (explode_2) decreases the alpha and increases the size of the bitmap, removing the particle if its alpha goes below zero.
Let's examine that action that is used by the enemy ships:
// uses follow_player
action shuttle
{
my.ambient = -100;
while (player == null) {wait (1);}
my.z = player.z; // set the same height for the enemy ships and the player
var shuttle_speed;
my.skill10 = 1;
my.skill40 = 1; // I'm a ship
my.enable_impact = on;
my.event = destroy_them;
shuttle_speed.x = -2 * time;
shuttle_speed.y = 0;
shuttle_speed.z = 0;
my.skill1 = 1 + int(random(70));
The ship will wait until the player is created, and then it will set its z to player's z value. We set skill10 to 1 (this value will be used in the event function), we set skill40 to 1 (this skill stores the id of the entity), we make the ship sensitive to impact and then we associate it the destroy_them() event function. The ships move only on the x axis; here's a picture of Wed's top view that gives more information:
I couldn't show you all the level here; feel free to make it as big as possible by increasing its size on the x axis, placing more ships, asteroids, and so on. Let's get back to our code:
while ((my.x > -300) && (my.skill10 == 1))
{
if (my.follow_player == on)
{
vec_set(temp, player.x);
vec_sub(temp, my.x);
vec_to_angle(my.pan, temp);
}
move_mode = ignore_you + ignore_passable;
ent_move (nullvector, shuttle_speed);
if ((vec_dist (my.x, player.x) < 800) && (total_frames % 90 == my.skill1)) // random firing intervals
{
if (my.x > player.x) // still got the chance to hit the player?
{
snd_play (fire1_wav, 40, 0);
ent_create (laser_mdl, my.x, move_bullet1);
}
}
wait (1);
}
ent_remove (my);
}
As long as the ships haven't moved behind the player and they haven't been destroyed (their skill10 = 1), if we have the follow_player flag set on, the ships will rotate towards player's ship. This is what makes the two types of enemy ships different: one of them fires along the x axis, hitting the player only if it is placed behind it, while the other one rotates towards the player, trying to hit it harder :). The ships move ignoring passable objects and start firing if they are closer than 800 quants to the player and if total_frames % 90 is equal to a random value that was stored in skill1. In plain English, the ship will fire every 1.5 seconds (we have limited the frame rate to 60 fps) but the initial firing moment will be different for every ship. If the x coordinate for the ship is bigger than player's x, we play a fire1_wav sound, and then we create a laser_mdl entity, associating it the move_bullet1() function:
function move_bullet1()
{
var bullet_speed;
my.passable = on;
my.enable_impact = on;
my.enable_entity = on;
my.event = destroy_bullet;
my.pan = you.pan;
bullet_speed.x = 50 * time;
bullet_speed.y = 0;
bullet_speed.z = 0;
my.ambient = 100;
my.bright = on;
my.light = on;
my.red = 50;
my.green = 255;
my.blue = 50;
This function is used by player's bullet and by the enemy ships. The bullet is passable at first and it is made sensitive to impact with other entities, its event function being destroy_bullet. The bullet gets the same pan angle with its creator (the player or the enemy ships) and a speed of 50 * time. We add some colored light to the model entity that will be used for the bullet.
while (my != null) // as long as the bullet exists
{
if (you != null)
{
if(vec_dist (my.x, you.x) > 50)
{
my.passable = off;
}
}
move_mode = ignore_you + ignore_passable;
ent_move (bullet_speed, nullvector);
wait (1);
}
}
As long as the bullet exists, if its creator continues to exist and the distance between the bullet and its creator is greater than 50 quants, the bullet becomes impassable. The bullet will move ignoring its creator and all the other passable entities. The event function associated to the bullet will play a sound and then it will remove the bullet:
function destroy_bullet()
{
wait (1);
snd_play (explo1_wav, 30, 0);
ent_remove (my);
}
Let's see the code for the asteroids now:
action asteroid
{
var asteroid_speed;
my.metal = on;
my.ambient = -random(100);
my.scale_x = 2 + random(5);
my.scale_y = 2 + random(5);
my.scale_z = 2 + random(5);
my.skill40 = 2; // I'm an asteroid
while (player == null) {wait (1);}
my.z = player.z; // set the same height for the enemy ships and the player
my.enable_impact = on;
my.event = destroy_them;
asteroid_speed.x = -2 * time;
asteroid_speed.y = 0;
asteroid_speed.z = 0;
my.skill10 = 1;
my.skill1 = 4 - random(8);
my.skill2 = 4 - random(8);
my.skill3 = 4 - random(8);
while ((my.x > -300) && (my.skill10 == 1))
{
move_mode = ignore_you + ignore_passable;
ent_move (nullvector, asteroid_speed);
my.pan += my.skill1 * time;
my.tilt += my.skill2 * time;
my.roll += my.skill3 * time;
wait (1);
}
ent_remove (my);
}
These asteroids have a random ambient and scale; their skill40 is set to 2, allowing us to see if a certain entity is an asteroid or not. The asteroids wait until the player is created, and then they set their height to player's height, making sure that they will collide with the player if they get the change :). The asteroids use the same misterious destroy_them event function, and move towards the player with the speed given by -2 * time. We generate 3 random rotation speeds for pan, tilt and roll and we store them in skill1... skill3. The asteroids will move and rotate inside a while loop that continues to run if their x is greater than -300 quants and if their skill10 continues to be set to 1 (the asteroids haven't been destroyed).
Ok, let's examine the function that can destroy player's ship, the enemy ships and the asteroids:
function destroy_them()
{
my.skill10 = 0;
snd_play (explo1_wav, 50, 0);
if (my.skill40 == 1) // a ship was hit?
{
score_value += 100; // get 100 points for a ship
effect(particles_explo2, 30, my.x,nullvector);
}
if (my.skill40 == 2) // hit one of the asteriods?
{
score_value += 50; // get 50 points for an asteroid
effect(particles_explo1, 20, my.x, nullvector);
}
If the player, or an enemy ship, or an asteroid is hit, it sets its skill10 to 0 (this means that it is destroyed). We play the explo1_wav sound and then we test the id (skill40) of the entity: if skill40 = 1, we have hit an enemy ship, so we increase score_value by 100 and we generate some particles using the previously discussed particles_explo2 function. If skill40 = 2, we have hit an asteroid, so we increase score_value by 50 and we generate particles using the particles_explo1() function. I'm not going to discuss the code for this particle function because it's identical with function particles_explo2(), using a different bitmap and another set of numerical values. Here are the 2 particle effects in action:
I'll see you all next month!
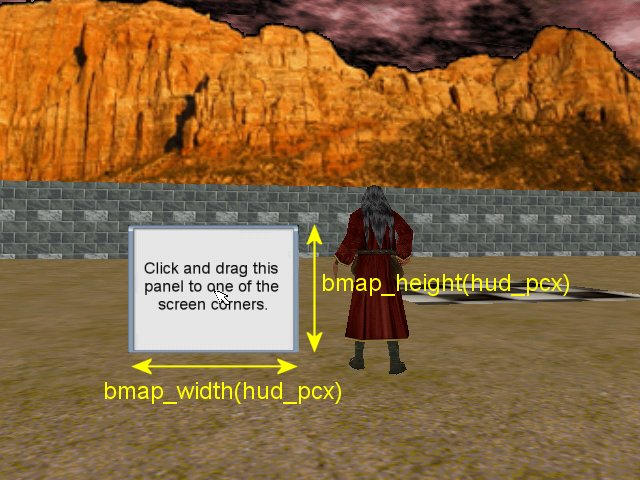
Customizable user interface
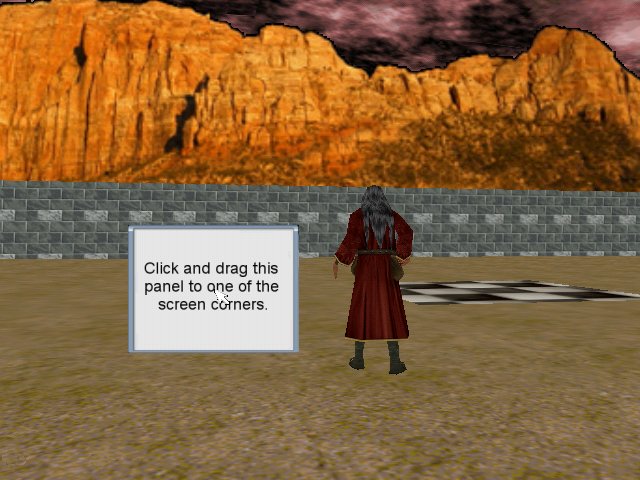
I have to admit that I'm a conservative person. The movement keys need to be configured in a certain way, the hud has to have a certain size and position on the screen, and so on. This article will teach you to create a panel that can be dragged to one of the four corners of the screen, snapping to the correct position automatically.
panel hud_pan
{
bmap = hud_pcx;
layer = 20;
pos_x = 0;
pos_y = 0;
on_click = drag_panel;
flags = overlay, refresh, visible;
}
That's your regular panel definition; the only thing that needs our attention is the function that is run every time we click the panel:
function drag_panel()
{
while (mouse_left == on)
{
hud_pan.pos_x = pointer.x - bmap_width(hud_pcx) / 2;
hud_pan.pos_y = pointer.y - bmap_height(hud_pcx) / 2;
wait (1);
}
The "while" loop above will run for as long as the player keeps the left mouse button pressed; it keeps the center of the panel to the coordinates set by pointer.x and pointer.y
if ((hud_pan.pos_x + bmap_width(hud_pcx) / 2) > (screen_size.x / 2)) // using the right side of the screen
{
if ((hud_pan.pos_y + bmap_height(hud_pcx) / 2) > (screen_size.y / 2)) // lower right corner?
{
hud_pan.pos_x = screen_size.x - bmap_width(hud_pcx);
hud_pan.pos_y = screen_size.y - bmap_height(hud_pcx);
}
else // upper right corner
{
hud_pan.pos_x = screen_size.x - bmap_width(hud_pcx);
hud_pan.pos_y = 0;
}
}
If the center of the panel has a pos_x that is greater than half of the screen resolution on the x axis, we do the same test on the y axis and we place hud_pan accordingly in the lower right or the upper right corner.
else // using the left side of the screen
{
if ((hud_pan.pos_y + bmap_height(hud_pcx) / 2) > (screen_size.y / 2)) // lower left corner?
{
hud_pan.pos_x = 0;
hud_pan.pos_y = screen_size.y - bmap_height(hud_pcx);
}
else // upper left corner
{
hud_pan.pos_x = 0;
hud_pan.pos_y = 0;
}
}
}
If the panel has a small pos_x value, it will be placed on the left side of the screen. We test its pos_y and we place it in the lower left or the upper left corner. We've got another small function to talk about:
starter init_mouse()
{
mouse_map = pointer_pcx;
while (1)
{
if (key_space == on)
{
mouse_mode = 2;
}
else
{
mouse_mode = 0;
}
mouse_pos.x = pointer.x;
mouse_pos.y = pointer.y;
wait (1);
}
}
This starter shows the mouse pointer if we press and hold the "Space" key, allowing us to move the hud panel where we want it. You can see that the code is pretty flexible; you only need to define the panel and the code will do the rest of the job for you.