Planet Survivors - part 3
This month we will see the second level of the game; the ship lands on a platform and we get to play a board game, gaining more ammo and shield.
I had to make a few changes to action player_level1 but don't worry, we will discuss them all. The main addition is a variable named landing, which controls the... landing of the ship, what else? When this var is zero, the ship flies as discussed in the previous P.S. article, but when landing = 1 the ship prepares for landing.
while (players_shield > 0)
{
if (landing == 0)
{
// old stuff from Aum37 here
}
else // landing = 1
{
player.passable = on;
player.transparent = off;
camera.x = 500;
camera.y = -200;
camera.z = -2000;
lbase.visible = on;
crosshair_pan.visible = off;
my.pan = 0;
my.tilt = 0;
my.roll = 0;
my.y = 0;
The "else" branch runs when landing = 1 and does the following things: makes the player passable, in order to prevent the ship from colliding with the asteroids, and sets the "transparent" flag off. We choose a certain (experimental) position for the camera, and then we make the landing base (lbase) visible. Finally, we hide the crosshair and we reset the angles and the y of the ship, because the player might have had a funny position or angles before landing.
while (player.x < 0)
{
if (player.z > -2270) {player.z -= 14 * time;}
player.x += (vec_dist(player.x, lbase.x) / 60 + 2) * time;
vec_set(temp, player.x);
vec_sub(temp, camera.x);
vec_to_angle(camera.pan, temp);
engine_handle = ent_playsound (my, engine1_wav, 400);
my.skill15 = vec_dist(player.x, lbase.x);
if (my.skill15 < 1000)
{
snd_tune(engine_handle, 0, (my.skill15 / 10), 0);
}
wait (1);
}
The ship must land at about x = 0, y = 0, z = -2270. We use a while loop to increase its x and decrease its z. The speed on the x axis depends on the distance between the player and the landing base (lbase); it will decrease slowly as the player approaches the landing area, with 2 * time being the minimum speed. The camera will rotate towards the ship all the time, and the engine sound will be played and tuned, depending on the distance between the player and the base. This means that the engine sound will decrease its frequency as the ship approaches the base.
sleep (2);
my.engine = off;
temp.x = -35;
temp.y = 0;
temp.z = -2285;
ent_create (human_mdl, temp, move_human);
return;
}
wait (1);
}
The ship has landed now. We wait for 2 more seconds, and then we stop the particle generators (the engines). We set x = -35, y = 0, z = -2285 (experimental value) and we create a human_mdl entity at this position, attaching it the move_human function. Let's not forget that all these things were running inside a while loop, so we have to get out of the function using a return.
These were the major changes to the code from Aum37. Let's take a look at the new stuff:
function compute_time()
{
sleep (130);
landing = 1;
}
This tiny function is called by player_level1; it waits until the soundtrack comes close to its end and then it sets landing to 1. I didn't include track1.wav in this month's archive because I know that some of you use 56Kb modems; don't forget to overwrite the track1.wav file with the one from Aum37.
action landing_base
{
lbase = my;
my.invisible = on;
my.passable = on;
while (landing == 0) {wait (1);}
my.invisible = off;
}
The action above is attached to the landing base; it makes it invisible and passable (we don't want any nasty collision detection problems) and then it waits until landing is set to 1, which makes the base visible. I had to hide the base for a while because our level is pretty small, although it appears to be infinite for the innocent player.
Let's discuss the function that drives the little human:
function move_human()
{
my.passable = on;
human = my;
my.pan = 270;
my.enable_touch = on;
my.event = logical_help;
while (my.y > -170)
{
my.y -= 1.4 * time;
ent_cycle("walk", my.skill1);
my.skill1 += 5 * time;
my.skill1 %= 100;
wait (1);
}
ent_cycle ("walk", 25);
The human is passable and gets an initial pan angle of 270 degrees; it is sensitive to touching and runs the logical_help function when you place the mouse pointer above it. This little guy appears below the ship and moves with the speed given by 1.4 * time until its y is smaller than -170 quants; the speed of its walking animation is given by 5 * time. The last line chooses a convenient standing position (25 is an experimental value).
camera.x = -40;
camera.y = -140;
camera.z = -2100;
camera.pan = 270;
camera.tilt = -65;
camera.roll = 0;
mouse_map = logical_pcx;
mouse_mode = 2;
mouse_spot.x = 0;
mouse_spot.y = 0;
temp_bonus = 100;
sound_vol = 20;
while (logical_ended == 0)
{
temp_bonus -= 0.1 * time;
if (temp_bonus < 0) {temp_bonus = 0;}
mouse_pos.x = pointer.x;
mouse_pos.y = pointer.y;
wait (1);
}
The human has approached the logical board; we choose a new set of camera coordinates and angles, we set a new mouse pointer, we restore the default mouse_spot values (they were changed for the main menu) and then we set temp_bonus to 100, which is the maximum bonus that can be gained if the player solves the logical level quickly. I didn't stop the asteroids, so they're still colliding and producing noise in the background; this can upset the player a bit, so we reduce the volume for all the wave sounds to 20%. Finally, we decrease temp_bonus in a loop and we allow the player to move the mouse until it solves the logical level (until logical_ended = 1).
sleep (1);
sound_vol = 100;
while (my.pan > 90)
{
my.pan -= 25 * time;
wait (1);
}
while (my.y < -100)
{
my.y += 1.4 * time;
ent_cycle("walk", my.skill1);
my.skill1 += 5 * time;
my.skill1 %= 100;
wait (1);
}
ent_remove(my);
The logical level is solved here; we wait for a second, we restore the volume for the exploding asteroids, and then we rotate the human towards the ship with the speed given by 25 * time. We move the human inside a while loop, playing its walking animation. The human is removed before reaching its target (the ship) but the player can't see this.
camera.x = 500;
camera.y = -200;
camera.z = -2000;
vec_set(temp, player.x);
vec_sub(temp, camera.x);
vec_to_angle(camera.pan, temp);
while (minimum_bonus > 0) {wait (1);}
sleep (1);
fade_factor = 1000;
player.engine = on;
my = player;
plasma_jet(65, 63);
The ship prepares for the take-off: we restore the former camera position and we rotate the camera towards the ship. We wait until the player gets the entire bonus (ammo and shield), we stop for another second, and then we set a particle fade_factor of 1000. This means that the engine particles will have a short life; we need to do this because the speed of the ship will be really big.
We set the "engine" flag, we tell the engine particle function that "my", the entity that needs the particles, is the player itself. The last line starts the plasma jets.
while (vec_dist(camera.x, player.x) < 10000)
{
player.skill15 = min(100, vec_dist(player.x, lbase.x) / 10);
player.x += (player.skill15 + 1) * time;
player.z += 5 * time;
engine_handle = ent_playsound (player, engine1_wav, 1000);
if (player.skill15 < 10000)
{
snd_tune(engine_handle, 0, (player.skill15), 0);
}
vec_set(temp, player.x);
vec_sub(temp, camera.x);
vec_to_angle(camera.pan, temp);
wait (1);
}
beep;
exit;
}
The last part of the function increases the x coordinate of the ship from 1 * time to 101 * time, depending on the distance between the player and the base. We increase the z too, because the ship is taking off, and we play the engine sound, tuning its frequency according to the speed on x. The camera follows the ship until it is 10,000 quants away; when this happens, we play a beep and then we shut down the engine; that's where we will put a level_load instruction next month.
Let's see the actions and functions that are used for our board game:
starter init_logical()
{
mouse_range = 5000;
while ((tile1 == null) || (tile2 == null) || (tile3 == null) || (tile4 == null) || (tile5 == null) || (tile6 == null) || (tile7 == null) || (tile8 == null) || (tile9 == null)) {wait (1);}
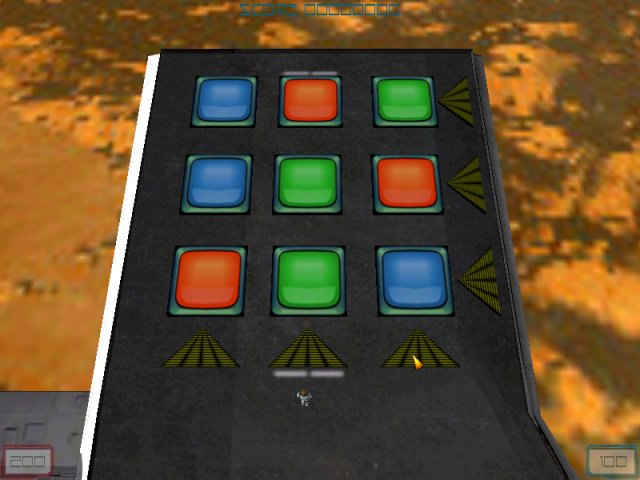
This is a starter function that makes the entities sensitive to mouse clicks even if they are 5000 quants away from the camera. We wait until all the colored tiles are created and then we compute the values for the variables named status1... status9. Here's a typical board setup:
I have created 3 different wmb entities (red, green and blue) and I have placed them as shown in the picture above. Each tile has a simple action that looks like this attached to it:
action tile_1
{
tile1 = my;
}
Each red tile has its flag1 set, each green tile has its flag2 set and each blue tile has its flag3 set. The good news is that this setup allows you to place the tiles in any order, as long as you use 3 tiles from each color. I chose an initial setup that can be solved with only a few moves - this is the first logical level, after all!
Let's get back to our logical function:
while (1)
{
status1 = 1 * (tile1.flag1 == on) + 2 * (tile1.flag2 == on) + 3 * (tile1.flag3 == on);
status2 = 1 * (tile2.flag1 == on) + 2 * (tile2.flag2 == on) + 3 * (tile2.flag3 == on);
status3 = 1 * (tile3.flag1 == on) + 2 * (tile3.flag2 == on) + 3 * (tile3.flag3 == on);
status4 = 1 * (tile4.flag1 == on) + 2 * (tile4.flag2 == on) + 3 * (tile4.flag3 == on);
status5 = 1 * (tile5.flag1 == on) + 2 * (tile5.flag2 == on) + 3 * (tile5.flag3 == on);
status6 = 1 * (tile6.flag1 == on) + 2 * (tile6.flag2 == on) + 3 * (tile6.flag3 == on);
status7 = 1 * (tile7.flag1 == on) + 2 * (tile7.flag2 == on) + 3 * (tile7.flag3 == on);
status8 = 1 * (tile8.flag1 == on) + 2 * (tile8.flag2 == on) + 3 * (tile8.flag3 == on);
status9 = 1 * (tile9.flag1 == on) + 2 * (tile9.flag2 == on) + 3 * (tile9.flag3 == on);
if ((status1 == status2) && (status2 == status3))
{
if ((status4 == status5) && (status5 == status6))
{
give_bonus();
return;
}
}
if ((status1 == status4) && (status4 == status7))
{
if ((status2 == status5) && (status5 == status8))
{
give_bonus();
return;
}
}
wait (1);
}
}
Those 9 vars can have a value of 1 (red tiles, flag1 = on), or 2 (green tiles, flag2 = on), or 3 (blue tiles, flag3 = on). If the variable that checks tile1, the variable that checks tile2, and the variable that checks tile3 have the same value, the first row (1-2-3) contains identical colors. The inner if branch tests if the second row contains identical colors (4-5-6). If this is also true, the player has solved the level, because the third row (7-8-9) can only contain identical colors. We call function give_bonus() and then we get out of the function.
If the variable that checks tile1, the variable that checks tile4, and the variable that checks tile7 have the same value, the first column (1-4-7) contains identical colors. The inner if branch tests if the second column (2-5-8) contains identical colors. If this is also true, the player has solved the level (3-6-9 contains identical colors for sure).
But how do we change the colors? We can use up to 6 buttons (entities): v1... v3 and h1... h3.
I have clicked the v3 entity in the example above; the tiles are pushed one step higher; the one at the top goes down to the bottom. The same thing happens with the h1... h3 buttons, but the tiles are pushed in a horizontal direction. We have 6 buttons (entities) that move the tiles, but the code for them is almost identical, so we'll discuss a single button.
action h1
{
my.ambient = -100;
my.enable_click = on;
my.event = h1_clicked;
}
This bright button is sensitive to mouse clicks and runs its h1_clicked event function when it is clicked.
function h1_clicked()
{
my.ambient = 100;
sleep (0.2);
my.ambient = -100;
if (status2 == 1) // tile2 is a red tile?
{
ent_morph(tile1, tilered_wmb); // then change into a red tile
tile1.flag1 = off; // reset all the flags
tile1.flag2 = off;
tile1.flag3 = off;
tile1.flag1 = on; // tile1 will be a red tile from now on
}
if (status2 == 2) // tile2 is a green tile?
{
ent_morph(tile1, tilegreen_wmb); // then change into a green tile
tile1.flag1 = off; // // reset all the flags
tile1.flag2 = off;
tile1.flag3 = off;
tile1.flag2 = on; // tile1 will be a green tile from now on
}
if (status2 == 3) // tile2 is a blue tile?
{
ent_morph(tile1, tileblue_wmb); // then change into a blue tile
tile1.flag1 = off; // // reset all the flags
tile1.flag2 = off;
tile1.flag3 = off;
tile1.flag3 = on; // tile1 will be a blue tile from now on
}
The yellow buttons will increase their ambient for 0.2 seconds if they are clicked. If status2 (which, in case you don't remember, is the variable that checks the flags for the second tile) is 1, tile2 is a red tile. This means that we have to morph the first tile into a red tile (1 <-- 2 <-- 3). We reset all the flags, and then we set the correct flag for a red tile, which is flag1. If status2 is 2, tile2 is a green tile, so we morph the first tile into a green tile (once again, 1 <-- 2 <-- 3). We reset all the flags, setting flag2 to on. Finally, status2 = 3 means that tile2 is a blue tile. The function morphs the original tile (tile1) into a blue tile.
if (status3 == 1) // tile3 is a red tile?
{
ent_morph(tile2, tilered_wmb); // then change into a red tile
tile2.flag1 = off; // reset all the flags
tile2.flag2 = off;
tile2.flag3 = off;
tile2.flag1 = on; // tile2 will be a red tile from now on
}
if (status3 == 2) // tile3 is a green tile?
{
ent_morph(tile2, tilegreen_wmb); // then change into a green tile
tile2.flag1 = off; // // reset all the flags
tile2.flag2 = off;
tile2.flag3 = off;
tile2.flag2 = on; // tile2 will be a green tile from now on
}
if (status3 == 3) // tile3 is a blue tile?
{
ent_morph(tile2, tileblue_wmb); // then change into a blue tile
tile2.flag1 = off; // // reset all the flags
tile2.flag2 = off;
tile2.flag3 = off;
tile2.flag3 = on; // tile2 will be a blue tile from now on
}
The things look pretty much the same here, with the third tile (status3) being checked. If status3 = 1, tile3 is a red tile, if status3 = 2, tile3 is a green tile, and if status 3 = 3, tile3 is a blue tile. The code morphs the old tiles into the new ones, resets the flags and sets the proper ones for each tile, depending on its color.
if (status1 == 1) // tile1 is a red tile?
{
ent_morph(tile3, tilered_wmb); // then change into a red tile
tile3.flag1 = off; // reset all the flags
tile3.flag2 = off;
tile3.flag3 = off;
tile3.flag1 = on; // tile3 will be a red tile from now on
}
if (status1 == 2) // tile1 is a green tile?
{
ent_morph(tile3, tilegreen_wmb); // then change into a green tile
tile3.flag1 = off; // // reset all the flags
tile3.flag2 = off;
tile3.flag3 = off;
tile3.flag2 = on; // tile3 will be a green tile from now on
}
if (status1 == 3) // tile1 is a blue tile?
{
ent_morph(tile3, tileblue_wmb); // then change into a blue tile
tile3.flag1 = off; // // reset all the flags
tile3.flag2 = off;
tile3.flag3 = off;
tile3.flag3 = on; // tile3 will be a blue tile from now on
}
}
The last part of the function checks the color of the first tile (status1) and changes it depending on the color of its neighbor (tile3, because tile3 does the jump from the right side of the screen to the left). Let's examine two more tiny functions and we are done!
function give_bonus()
{
logical_ended = 1; // the logical level has ended
mouse_mode = 0; // // so hide the mouse
snd_play (victory_wav, 50, 0);
sleep (2);
minimum_bonus += temp_bonus; // add what's left of temp_bonus to minimum_bonus
while (minimum_bonus > 0)
{
snd_play (bonus_wav, 100, 0);
players_shield += 2;
players_ammo += 2;
minimum_bonus -= 2;
sleep (0.1);
}
sleep (1);
}
The function above is called as soon as you solve the logical level. It hides the mouse, plays a victory sound, waits for 2 seconds, and then it adds to the minimum_bonus variable (10) what's left from temp_bonus, which is set to 100 before starting the logical level, but decreases inside the while loop as the time passes by. We play a tiny sound and we increase player's shield and ammo with a value that can range from 10 to 110.
function logical_help()
{
logical_txt.visible = on;
sleep (5);
logical_txt.visible = off;
}
This last function runs when you move the mouse pointer over the human, and displays a helpful text for 5 seconds. I have used a fixed width font for this text, which made it look pretty ugly, but readable by the A5 engine.
Editable text
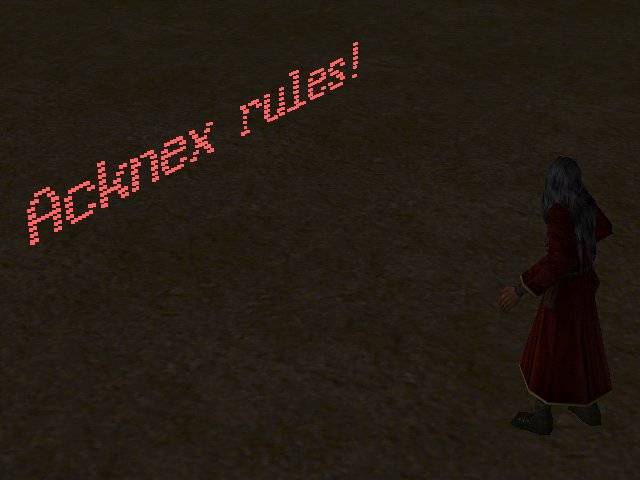
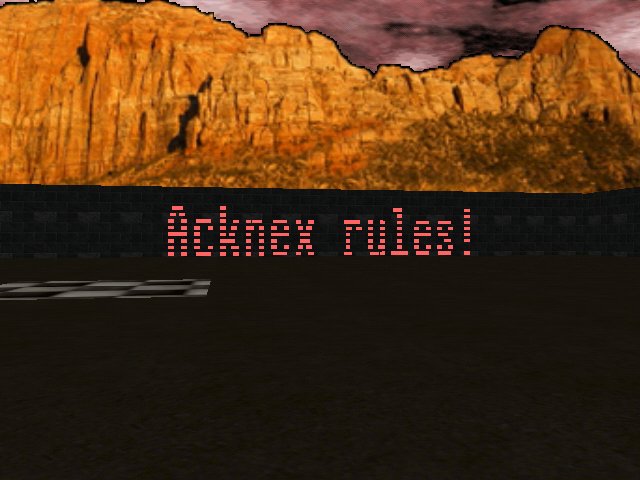
Ok, I know that the title doesn't say too many things, but I'm pretty excited when I think about this article. Wouldn't you like to be able to place a text inside your 3D world, maybe to display some of those banners for your sport game, or the name of the winner in a racing game, or an access code that changes from time to time? We know how to use regular texts that appear on the screen, but wouldn't it be nice if we could display them as objects inside our 3D worlds? Well, that's exactly what I'm going to show you today. There is some bad news: this code can't run with A5.
The idea behind this code is pretty simple: we define a font bitmap as a regular bitmap (not as a font!) and we read all its pixels. Whenever we encounter a pixel that hasn't got its RGB = 000 we draw a particle in the level. Let's start examining the code, shall we?
bmap system_font = <system.pcx>;
string temp_str; // just a temporary string that holds your text
You can see that system_font was defined using a regular bmap definition; temp_str is the string that will store our text ("Acknex rules!" in my demo).
function create_text(my_string)
{
var number_of_chars;
var format;
var char_minx;
var char_miny;
var char_maxx;
var char_maxy;
var pixel_value;
var char_width;
var char_height;
var particle_width = 1.3;
var particle_height = 1.5;
var particle_space = 12;
Let's discuss each and every var definition:
- number_of_chars stores the number of characters in our string (13 in my demo);
- format is returned by a bmap_lock instruction and gives the type of the texture;
- char_minx is the minimum x (in pixels) for the current character on the font bitmap;
- char_miny is the minimum y (in pixels) for the current character on the font bitmap;
- char_maxx is the maximum x (in pixels) for the current character on the font bitmap;
- char_maxy is the maximum y (in pixels) for the current character on the font bitmap;
- pixel_value stores the RGB value of the current pixel that is read from the bitmap;
- char_width and char_height give the width and height of any character in our font bitmap;
- particle_width sets the width of the letters (the distance between 2 particles on the x axis);
- particle_height sets the height of the letters (the distance between 2 particles on the y axis);
- particle_space sets the space between the letters.
Play with the last three variables and you will obtain thinner or thicker texts using the same bitmap for the font.
char_width = bmap_width(system_font) / 32;
char_height = bmap_height(system_font) / 4;
number_of_chars = str_len(my_string);
format = bmap_lock(system_font, 0);
The lines above compute char_width (each system_font row has 32 chars) and char_height (system_font has 4 rows of chars). We get the number of characters stored in our string (Acknex rules!) and then we lock the font bitmap because we will need to work it quite a bit :)
while (number_of_chars > 0) // create the particles char by char
{
temp = str_to_asc(my_string);
str_clip (my_string, 1);
char_minx = (temp % 32) * char_width;
char_miny = int(temp / 32) * char_height;
char_maxx = char_minx + char_width;
char_maxy = char_miny + char_height;
Our particle-based characters are created one by one, so we use a loop that does just that. We convert the first character from our text into its ASCII equivalent, and then we remove the first character from the string because next time we will want to read the 2nd char, then the 3rd, and so on. We get char_minx and char_miny, the minimum x and y of the current char on the font bitmap, and then we compute char_maxx and char_maxy.
The picture above shows these values for the "C" character from our font bitmap as an example.
while(char_minx < char_maxx)
{
char_miny = char_maxy - char_height;
while(char_miny < char_maxy)
{
pixel_to_vec(pixel_value, temp, format, (pixel_for_bmap(system_font, char_minx, char_miny)));
if (pixel_value > 0)
{
vec_set (temp, vector (100, 80, -5));
temp.y += (char_maxx - char_minx) * particle_width + number_of_chars * particle_space;
temp.z += (char_maxy - char_miny) * particle_height;
effect(particle_text, 1, temp, nullvector);
}
char_miny += 1;
}
char_minx += 1;
}
number_of_chars -= 1;
}
bmap_unlock(system_font);
}
We are using 2 while loops to draw the particle "pixels" for our character; the inner loop draws the columns and the other loop increases the x coordinates. We use pixel_to_vec to read the RGB value of the pixel (pixel_value) and if it isn't completely black (RGB > 0) we create a particle. We set the approximate position of our text in the 3D world using a simple vec_set instruction; please be aware that the size of the text depends on particle_width, particle_height and particle_space, so you'll have to play with (x = 100, y = 80, z = -5) from my demo until they match your level. If you want to change the orientation of the text along the x axis, simply replace "temp.y = ...;" with "temp.x = ...;". The "effect" line creates the particles; you can ent_create small sprites here if you hate particles, but you'll lose the ability to change their color, or fade them, or whatever you can do with particles. Number_of_chars is decreased outside the two loops, in order to move on to the next character from our text. Finally, we unlock the bitmap because it must be tired by now...
That was the hard part. Let's examine the functions drive the particles:
function particle_text()
{
my.size = 1;
my.red = 255;
my.green = 100;
my.blue = 100;
my.function = keep_particles;
}
function keep_particles()
{
my.lifespan = 100;
}
If you want to create a big text, change particle_width, particle_height and particle_space, but don't forget to choose a convenient size for the particles (1 in my demo). The following lines set the RGB combination of colors for the particles, and the last line of code inside function particle_text sets function keep_particles() as a particle nanny. All this function does is to set a lifespan of 100 for each particle, which means that the particles will live forever. You should decrease the lifespan if you plan to use different texts in the same spot.
Let's see the function that tests our beautiful script:
function test_particles()
{
str_cpy (temp_str, "Acknex rules!");
create_text(temp_str);
}
on_t = test_particles;
Ok, so we have to press "T" to see our text. The function associated to the "T" key copies our desired text to temp_str and then calls the ugly function we've talked about, using our string as a parameter.