"Buy now!"
Your game is finished and you've uploaded a great demo on your website. But haven't you forgotten something? Yes, you need to add that "Buy my game" button to your demo.
This is one of those rare situations when you will want to use the sdk; don't worry, I have included the dll, so you won't have to write a single line of code if you don't want to. If you are wondering how to use the sdk check Aum31 and you will learn how to create a dll from scratch.
Let's take a look at the cpp file:
// buynow.cpp : Defines the entry point for the DLL application.
//
#include "stdafx.h"
#include "a5dll.h"
#include "a5funcs.h"
int nSuccess;
BOOL APIENTRY DllMain( HANDLE hModule, DWORD ul_reason_for_call, LPVOID lpReserved)
{
return TRUE;
}
DLLFUNC fixed Exequte(long command)
{
fixed *temp = (fixed *)a5dll_getwdlobj("temp");
A4_STRING *my_command = (A4_STRING *)command;
nSuccess = WinExec (my_command -> chars, SW_MAXIMIZE);
return INT2FIX(nSuccess);
}
The red lines were added by me, the rest of the code being added by the MS VC++ 6.0 wizard. My "Exequte" function grabs the predefined "temp" variable (read Aum31 to see why we need to do that) and then gets a pointer named my_command to the string that is passed to the function. Finally, we use WinExec to run the string (program + arguments) that is passed to Exequte, returning the result of the operation. The variable named nSuccess will return a value that is greater than 31 only if WinExec succeeds.
Some of the advanced programmers will want to use CreateProcess because WinExec is obsolete, but it does its job great here and (that's a secret they don't want you to know) WinExec actually calls CreateProcess. Let's examine the content of the script file now:
var success = 0;
var_nsave dll_handle;
text error_txt
{
pos_x = 200;
pos_y = 200;
layer = 30;
font = std_font;
string = "Error while trying to run the command!";
}
panel outro_pan // exit panel
{
bmap = outro_tga;
layer = 20;
pos_x = 120;
pos_y = 100;
button = 133, 100, buyme2_tga, buyme1_tga, buyme2_tga, buy_now, null, null;
button = 133, 180, nothanks2_tga, nothanks1_tga, nothanks2_tga, shut_down, null, null;
flags = overlay, refresh, visible;
}
I have defined a simple text that displays an error message if WinExec fails. "Buy now!" should be a regular button on a panel, and it must run function buy_now when it is clicked:
function buy_now()
{
dll_handle = dll_open ("buynow.dll");
success = Exequte("C:\\Program Files\\Internet Explorer\\iexplore.exe www.randombyte.com");
if (success <= 31) // WinExec failed?
{
error_txt.visible = on; // show an error message
}
dll_close (dll_handle);
}
function shut_down()
{
exit;
}
The function above opens the dll, and runs Internet Explorer with my site given as parameter. Please note the C-Style notation "\\" for the paths. If WinExec fails (success <= 31) we display the error message. If the player presses the "No thanks!" button, function shut_down will shut down the engine.
That's all! You should make outro_pan visible only when the potential customer tries to shut down the game. One more thing: you can use this dll to run any application you can think of; let me try something...
success = Exequte("C:\\Program Files\\Microsoft Office\\Office10\\winword.exe office.wdl");
It works! This line starts Microsoft Word and opens the existing office.wdl file for editing.
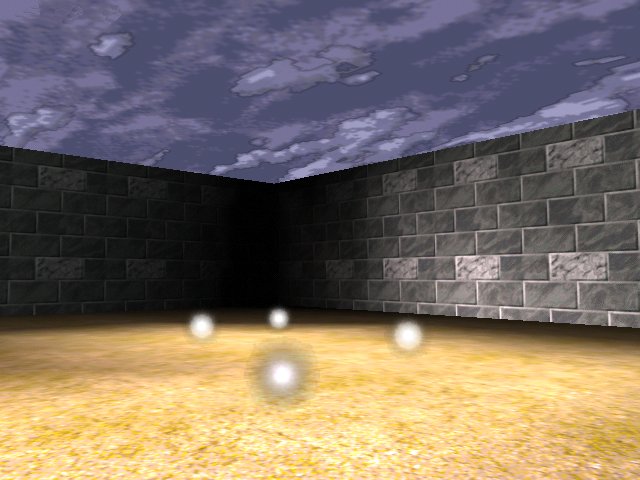
Flares
I have to admit that a darker level looks better than a well lit level most of the time. You can add even more drama by making a small area of the level completely black, and maybe give the player a few flares that will generate light for a limited number of seconds, and this is exactly what we're going to create in this article.
starter init_flares()
{
while (player == null) {wait (1);}
while (1)
{
if (key_f == 1)
{
while (key_f == 1) {wait (1);}
ent_create (flare_pcx, player.x, create_flare);
}
sleep (0.1);
}
}
The function above will run by itself at game start; it waits until the player is created, and then creates a flare every time we press the "F" key. The last line of code instructs the while loop to stop for 100ms, so we can't create more than 10 flares a second, which is a good thing according to your keyboard :).
function create_flare()
{
my.burn_time = 10; // this flare lasts for 10 seconds
my.passable = on;
my.flare = on;
my.ambient = 100;
my.pan = camera.pan;
my.tilt = camera.tilt;
my.enable_entity = on;
my.enable_impact = on;
my.enable_block = on;
my.event = show_flare;
Every flare will burn for 10 seconds; burn_time is just another name for skill20. The sprite used for the flare is passable at the moment of creation, has its flare flag set and its ambient is 100. The flare will inherit the pan and tilt angles used by the camera, and it will be sensitive to impact with other entities and level blocks. The event function associated to the flare is function show_flare.
while (my.skill10 == 0)
{
if (vec_dist (my.x, player.x) > 50) {my.passable = off;}
my.skill1 = 50 * time;
my.skill2 = 0;
if (my.skill40 < 100)
{
my.skill3 = 0;
}
else
{
my.skill3 = - 5 * (my.skill40 / 100) * time;
}
move_mode = ignore_you + ignore_passable;
my.skill30 = ent_move (my.skill1, nullvector); // get the distance that was covered this frame in skill30
my.skill40 += my.skill30; // store the distance covered so far in skill40
wait (1);
}
}
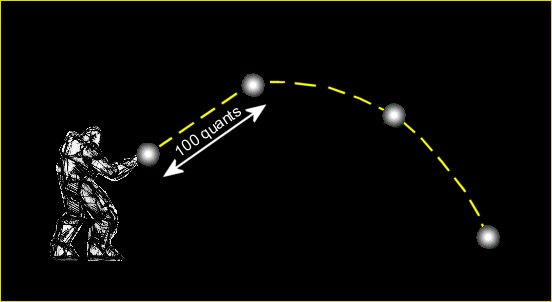
The flare will move until its skill10 is set to a non-zero value, and it will become impassable as soon as the distance to its creator (the player) is bigger than 50 quants. The sprite moves with a speed given by 50 * time; its movement will start to include gravity (negative speed on z, set by skill3) if the flare has covered at least 100 quants. Take a look at the picture below to see what I mean.
The flare ignores any passable entity that might come in its way (water, etc). The distance that is covered by the flare in a single frame is stored in skill30, and the total distance covered by the flare is stored in skill40. If this value is bigger than 100 quants, we start decreasing the height of the flare sprite. What happens when the flare hits something? Its show_flare event function will run:
function show_flare()
{
my.skill10 = 1; // stop moving
my.passable = on; // become passable
while (my.burn_time > 0)
{
my.lightred = 255;
my.lightgreen = 200 + random(55);
my.lightblue = 230;
my.lightrange = 200 + random(50);
my.scale_x = 0.9 + random(1) / 10; // scale = 0.9 to 1
my.scale_y = my.scale_x;
my.scale_z = my.scale_x;
my.burn_time -= time / 16;
wait (1);
}
As soon as the flare hits a level block or another entity, it sets its skill10 to 1; this way, the while loop in the previous function is terminated, so the flare stops moving. We make the flare passable because we don't want it to stand in player's way, and then we let it generate a dynamic white light with slight variations of range and color. The scale of the flare sprite changes from 0.9 to 1, and we subtract "1" from burn_time every second. Please note that I am changing scale_z too, so you can use a 3D model for the flare as well.
while (my.scale_x > 0.1)
{
my.scale_x -= 0.1 * time;
my.scale_y = my.scale_x;
my.scale_z = my.scale_x;
my.lightrange -= 3 * time;
wait (1);
}
ent_remove (me);
}
This new loop will start to run when burn_time goes below zero. The scale of the sprite and its lightrange are decreased continuously until scale_x goes below 0.1, and then the flare sprite is removed. Don't forget to experiment with different sprites, colors and light ranges for your flares.