Light gate
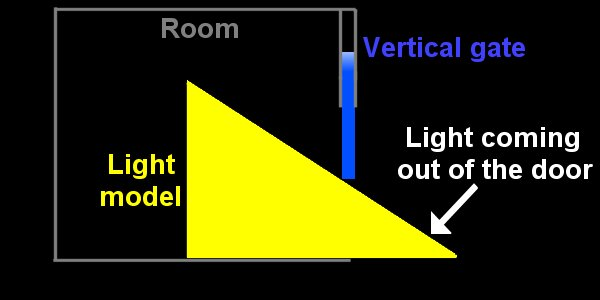
Whenever you start a new Half-Life (HL from now on) game, you can't skip the intro. At a certain moment there's a gate on the left; as this vertical door opens, you see the "light" coming out of the door - and this is what I'm going to do here.
I think that this effect should be used for cut scenes or for places that can't be reached by the player. I can hear you asking "Why?". Well... because everything has to be faked the way they did it in HL.
HL uses a sprite for the light; we will use a model because it is a 3d object and it will look much better if you use a good texture for its skin. I have used a flat white texture but I'm not a modeler; in fact, I could easily teach you how "not to" model.
The idea is simple: when the gate moves upwards, we move the light model to the right; when the gate is lowered, we move the light model to the left. Let's take a look at the action attached to the light model first:
entity* light_ptr;
action light_model
{
light_ptr = me;
my.skill1 = my.y;
my.transparent = on;
my.passable = on;
my.alpha = 30;
}
I have created a pointer to the light model; this way I can use the light model in any other action or function. The model moves on the y axis in my example level; we can't be sure that by moving back and forth several times the model will return to its starting position, so we store it in skill1. The model is transparent, passable (the other entities should pass through the light, right?). The transparency factor is set to 30.
The door does the rest of the job - let's see its code:
action hl_gate
{
my.skill1 = my.z;
while (light_ptr == null) {wait (1);}
while (player == null) {wait (1);}
while (1)
{
while (vec_dist (player.x, my.x) > 600) {wait (1);}
while (my.z < my.skill1 + 200)
{
my.z += 3 * time;
light_ptr.y -= 4 * time;
wait (1);
}
while (vec_dist (player.x, my.x) < 700) {wait (1);}
while (my.z > my.skill1)
{
my.z -= 5 * time;
light_ptr.y += 7.5 * time;
wait (1);
}
my.z = my.skill1; // correct the displacement
light_ptr.y = light_ptr.skill1;
wait (1);
}
}
We store the z coordinate for the gate in skill1 because we must place it at the correct position every time. We wait for the light model and for the player model to be loaded and then we enter a while (1) loop - a loop that runs forever.
As long as the distance between the player and the gate is bigger than 600 quants, the gate does nothing. When the player has come closer, the gate will move upwards until its height is 200 quants bigger than its original height. At the same time, the light it moved towards the player with a speed given by 4 * time; play with 4 until you get the best results. The gate has opened, the light model has appeared, now what? As long as he player is closer than 700 quants to the gate, nothing happens. When the player moves away from the gate, the gate is lowered until its height is close to the starting position. At the same time, the light is moved away from the player (to the left in the picture above) with a speed given by 7.5 * time.
The last lines correct the displacement for the gate and for the light model. If the gate has moved from (just an example) 200 to 400 quants several times, it could go down to 199.2 instead of 200 quants. These lines set the gate and the light model at their starting positions.
This effect looks great at night! Why can't I use this effect for all the doors in my level? What if the player passes through the doors?
It wouldn't look that great if the player passes through the light model. All the triangles that compose the light model must be 100% visible to be rendered. My model consists of only a few triangles but if you really want to use this effect here are some <tested> ideas:
- split the light model in as many faces as possible: open Med, choose triangle mode, select a face - press "subdivide". This way you will get much smaller triangles but don't forget to keep an eye on the poly count;
- make the light model more transparent when you approach it;
- use white fog for the walls inside the room and increase camera.fog depending on the distance between the player and the light model.
Pianissimo
Pianissimo is a small stereo piano that can be played using the mouse; it uses real sound samples taken from my Yamaha synthesizer. Use it to tune your musical instruments (guitars, etc) or to impress your neighbors.
This project is standalone - let's see its main function:
function main()
{
level_load (dummy_wmb);
wait (2);
mouse_map = mouse_pcx;
mouse_mode = 2;
while (1)
{
mouse_pos.x = pointer.x;
mouse_pos.y = pointer.y;
wait (1);
}
}
We are loading a dummy level, we set the mouse pointer bitmap, we make the cursor visible and we allow the mouse movement in a while loop.
The piano is in fact a panel with several buttons:
panel main_pan // main panel
{
bmap = main_pcx;
pos_x = 190; // close to the center of the screen
pos_y = 120; // on x and y
layer = 10;
button = 24, 54, keypressed_pcx, key_pcx, key_pcx, key_pressed, null, null;
button = 45, 54, keypressed_pcx, key_pcx, key_pcx, key_pressed, null, null;
button = 67, 54, keypressed_pcx, key_pcx, key_pcx, key_pressed, null, null;
button = 89, 54, keypressed_pcx, key_pcx, key_pcx, key_pressed, null, null;
button = 110, 54, keypressed_pcx, key_pcx, key_pcx, key_pressed, null, null;
button = 132, 54, keypressed_pcx, key_pcx, key_pcx, key_pressed, null, null;
button = 154, 54, keypressed_pcx, key_pcx, key_pcx, key_pressed, null, null;
button = 175, 54, keypressed_pcx, key_pcx, key_pcx, key_pressed, null, null;
button = 197, 54, keypressed_pcx, key_pcx, key_pcx, key_pressed, null, null;
button = 219, 54, keypressed_pcx, key_pcx, key_pcx, key_pressed, null, null;
flags = refresh, d3d, visible;
}
The panel is placed close to the center of the screen and has 10 buttons - the 10 keys on the keyboard. When you click one of the keys with the mouse, function key_pressed will run:
function key_pressed(key_number)
{
if (key_number == 1)
{
snd_play(do_wav, 70, -100);
}
if (key_number == 2)
{
snd_play(re_wav, 70, -70);
}
...........................................
if (key_number == 10)
{
snd_play(mi2_wav, 70, 100);
}
}
When we press one of the buttons on the panel, key_number is set to a certain value: 1 for the first button, 2 for the second button and so on. This way we can use a single function for all the buttons (all the keys on the keyboard). If we press one of the buttons a note is played using a simple snd_play instruction. The stereo effect is obtained by setting different balance values for the keys, starting with -100 for the first key and going up to 100 for the last key.