Level changing code
Acknex uses a simple level loading system; a single line of code allows you to move from one level to another. If you have tried to do that you have noticed that the new level "erases" the weapons, items, etc so you need to create them again somehow. There are only two golden rules so you'd better learn them right now:
1) Global variables aren't erased;
2) A function will continue to run after you load a new level only if you add this line of code to it:
me = null;
What are global variables? They are nothing more than your normal variables defined at the beginning of your C-Script files, OUTSIDE any function definition:
var number_of_mice;
These vars keep their values even after a level_load instruction so you can use them to store the number of bullets, the number of lives, etc - they will survive the level loading.
What is it with those functions? When you load a new level, all the entities in the old level are removed (sounds fair to me). This means that the actions or functions attached to any entity would give some error messages because their parent entity has disappeared. My = null will make the function say to the engine: "Hey, I'm on my own here! I don't have any entity attached to my tail so don't shut me down!"
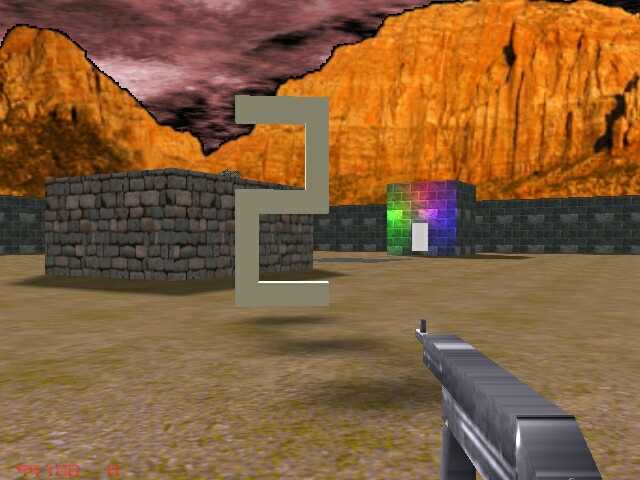
I have used the standard office.wmp as the first level and a slightly modified version of it (including a huge "2" figure) for the second level. The first level (office.wmp) includes 2 weapons and an entity that will trigger the level change; let's take a look at the code for the weapons first:
action pistol
{
my.__rotate = on; // rotates before being picked up
my.__repeat = off; // disable auto fire
my.__silent = on; // don't show any pickup message
my._offs_x = 30; // position of the pistol
my._offs_y = -10; // on x, y, z
my._offs_z = 15;
my._ammotype = 1.20; // uses ammo type 1, comes with 20 bullets
my._weaponnumber = 1; // press "1" to select this weapon
my._bulletspeed = 1000.01; // speed.recoil
my._firetime = 8; // time to reload
my._firemode = damage_shoot + hit_hole + gunfx_brass + gunfx_animate + 0.10; // hit holes on the walls, damage = 10 points / shot
gun(); // call the real gun action
}
action machine_gun
{
my.__rotate = on; // rotates before being picked up
my.__repeat = on; // auto fire
my.__silent = on; // don't show any pickup message
my._offs_x = 35; // position of the gun
my._offs_y = 10; // on x, y, z
my._offs_z = 15;
my._ammotype = 2.99; // uses ammo type 2, comes with 99 bullets
my._weaponnumber = 2; // press "2" to select this weapon
my._bulletspeed = 5000.01; // speed.recoil
my._firetime = 2; // time to reload
my._firemode = damage_shoot + hit_hole + gunfx_brass + gunfx_animate + 0.20; // hit holes on the walls, damage = 20 points / shot
gun(); // call the real gun action
}
I have created a pistol that comes with 20 bullets and a machine gun that comes with 99 bullets. Press "1" and "2" to select the weapons after you have picked them up. The entity that triggers the level change has this piece of code attached to it:
action level_12
{
my.enable_impact = on;
my.event = change_levels_12;
}
function change_levels_12
{
wait (1);
if (you != player) {return;}
me = null;
level_load (level2_wmb);
sleep (1);
restore_12();
}
The entity is sensitive to impact; when any other entity collides with it, its change_levels_12 event function will run. If the entity that has collided with the trigger (you) isn't the player, we won't change the level; otherwise we set me = null to make sure that this function will survive the level_load instruction, we wait for a second and then we call function restore_12() which is supposed to restore the items taken from level 1 to level 2.
function restore_12()
{
while (player == null) {wait (1);}
if (weapon_1 == 1) // if the player has picked up weapon1
{
ent_create (weapon1_mdl, nullvector, pistol); // create the pistol again
}
if (weapon_2 == 1) // if the player has picked up weapon1
{
ent_create (weapon2_mdl, nullvector, machine_gun); // create the gun again
}
gun_loaded = 1; // make sure that it is loaded
gun_select(); // and select it
}
This function waits for the player to be created; if the player has picked up weapon1 in level1, the weapon is created again and runs the same action (pistol); if the player has got weapon2 in level1, that weapon will be created too. We make sure that the gun is loaded and then we select the last weapon that was used in the first level.
I have used a few variables that are defined inside weapons.wdl to keep the things simple. If you plan to write your weapon / inventory / etc code from scratch here's what you need to do to make sure that you can carry all the items in all the levels:
1) Set a certain variable to 1 when you have picked up a certain object (weapon_1 = 1 or key_blue = 1, etc);
2) Add me = null to the body of the function that does the level changing BEFORE the new level_load instruction;
3) Wait a little (sleep (1) in my example but you could wait (2) etc);
4) Call the function that restores the items;
5) The function that restores the items will check which items were picked up in the previous level (key_blue = 1 or 0?) and will create them again (using ent_create) if their associated vars were set to 1.
6) Repeat the same process for all your levels (restore_23, restore_34, etc).
Sight range
Have you ever played Commandos? They have implemented a neat effect: you can see the sight range for the enemies, in other words you can see if a certain enemy can see you or not. I am an older engine user but even I am impressed to see how easy it is to implement such a great effect using Acknex and C-Script.
I will use the templates so I will have to define a new view because I don't want to edit too much template code:
view bird_view
{
layer = 15;
pos_x = 0;
pos_y = 0;
size_x = 640;
size_y = 480;
arc = 80;
flags = visible;
}
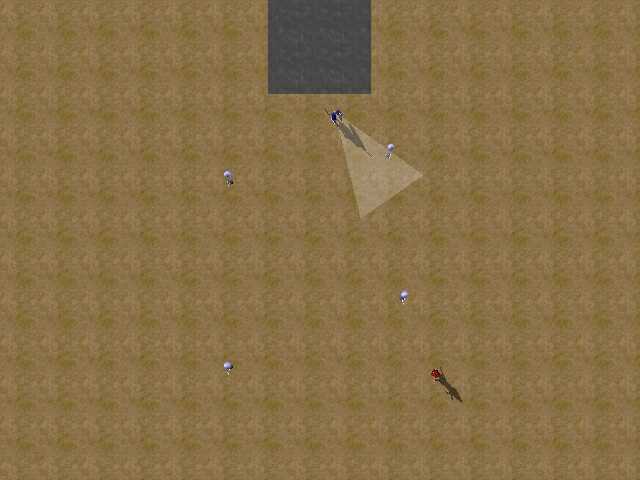
I have created a top view that has 640x480 pixels; if your game uses a different resolution change these values. I chose a convenient zoom factor (80) but if you aren't happy with it feel free to choose any other value for it.
I have used the standard guard that patrols on its path as the "enemy"; this entity will detect the player and the four... lamps used as player's team mates. The only change that needs to be done to your enemy models is to put a line of code as the first line in the action that is attached to the enemy:
action patrol_prog
{
init_sight();
guard = me;
// watched = me;
..................
}
You can see how I have added the line to patrol_prog; I have included the modified office.wdl file to the downloadable archive. Let's see what this init_sight function does:
function init_sight()
{
LensFlare_Stop(); // diasble the lens flares if they are present
camera.visible = off;
clip_size = 0;
my._health = 100; // if needed
ent_create (cone_mdl, my.pos, move_cone);
bird_view.x = 0;
bird_view.y = 0;
bird_view.z = 1200;
bird_view.tilt = -90;
We stop the lens flare effect because we don't want that in a top view; if you get errors then you aren't using it at all so remove the first line in init_sight(). We hide the default view (camera), we show all the triangles for all the models inside the level. We set health to 100 for the patrolling guard (we will need that later) and then we create the vision cone model and we assign it the move_cone function.
Finally, our bird view is placed in the origin, 1200 quants above the ground and looks down because of its tilt angle value.
while (my._health > 0)
{
my.skill40 = 40; // pan
my.skill41 = 180; // tilt
my.skill42 = 300; // range
scan_entity (my.x, my.skill40);
if ((result > 0) && (!snd_playing (alert_handle)))
{
alert_handle = snd_play (alert_wav, 50, 0);
}
wait (1);
}
}
As long as the guard is alive (it can't die but your enemies should be able to do that), we set a scanning sector of 40 degrees horizontally and 180 degrees vertically and a scanning range of 300 quants.
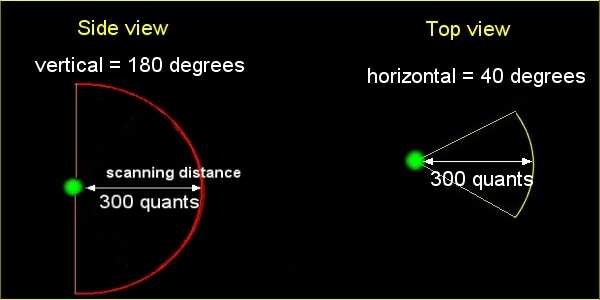
The guard is ready to start scanning now; if it detects something in range it will play an alarm sound in a loop.
Ok, so at this point we've got an enemy that can scan for other entities and if it detects them it plays a sound. Let's see how the actual vision cone works:
function move_cone()
{
proc_late();
my.passable = on;
my.albedo = 0;
my.transparent = on;
my.alpha = 20;
my.z += 25;
The first line of code makes sure that the guard and its cone move smoothly together. The cone will be passable and transparent; its z will be placed 25 quants above guard's z (that's the needed value for the eye level if you use the guard model).
while (you._health > 0) // as long as the creator (the enemy) is alive
{
my.x = you.x;
my.y = you.y;
my.pan = you.pan;
my.tilt = you.tilt;
my.scale_x = you.skill42 / 10;
my.scale_y = 2 * you.skill42 * tan(you.skill40 / 2) / 10;
wait (1);
}
// the enemy is dead here -> destroy the cone
ent_remove (me);
}
As long as the enemy is alive, the cone sticks to the player and inherits its tilt angle too. The scale of the cone on x (the range) is given by you.skill42 / 10. Now why is that?
Start Med and open cone.mdl:
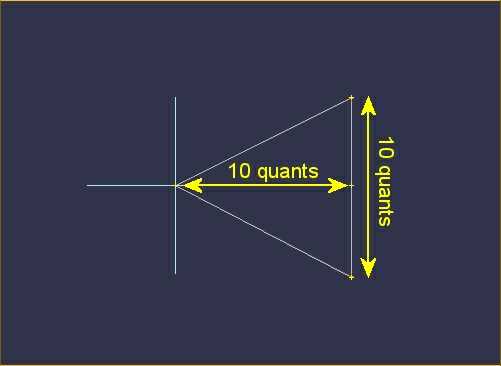
You can see that the cone vision model is in fact a triangle that has a size of 10 quants. If we set a scanning range of 300 we must set scale_x for this model to 30 because that would give us 30 * 10 quants = 300 quants, get it? I could have used a triangle with a size of 1 quant but we can't use values over 100 for scale_x... scale_z and this would have limited our scanning range to 100 quants! That's why we divide skill42 by 10. The next line of code looks even more frightening:
my.scale_y = 2 * you.skill42 * tan(you.skill40 / 2) / 10;
Here's some advice for the younger users: learn to love math! I hated it while I was in high school and at the university but if you plan to earn your existence as a programmer you need to know a lot of math!
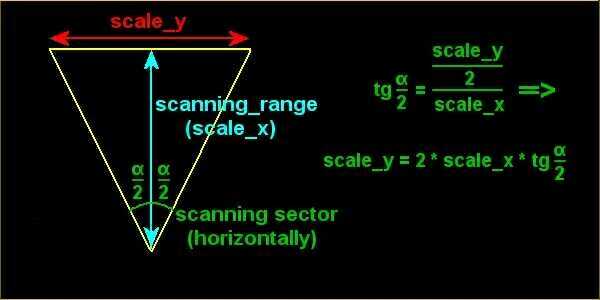
You can see how I have come up with that formula by looking at the picture above; scale_y depends on scale_x (you.skill42) and the horizontal scanning angle (you.skill40).
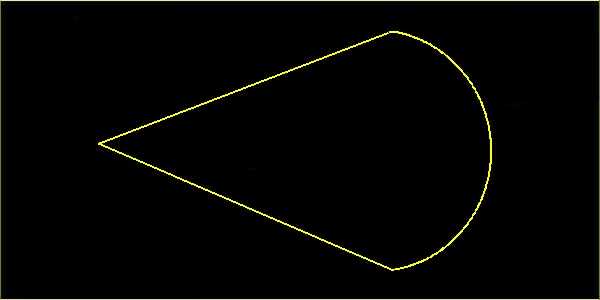
When the enemy looses its health the cone will disappear. If you test the demo carefully you will notice that my triangle works ok but if you want to have more precision you should use a model that looks like a vertical section through a cone, not a simple triangle. Take a look at the picture below to see how you should design your cone model.
I forgot to tell you something important: the entities that can / should be scanned must have their enable_scan flag set. The player has it set but take a look at the action attached to the four lamps:
action scan_me
{
my.enable_scan = on;
// add your code below
}
That's all! Of course that you can (and should) add extra code for your allies but don't forget to set their enable_scan flag on, otherwise they will not be detected.